Announcement

Collapse
No announcement yet.

pizza oven build

Collapse
X
 
  • Filter
  • Time
  • Show
Clear All
new posts

    pizza oven build

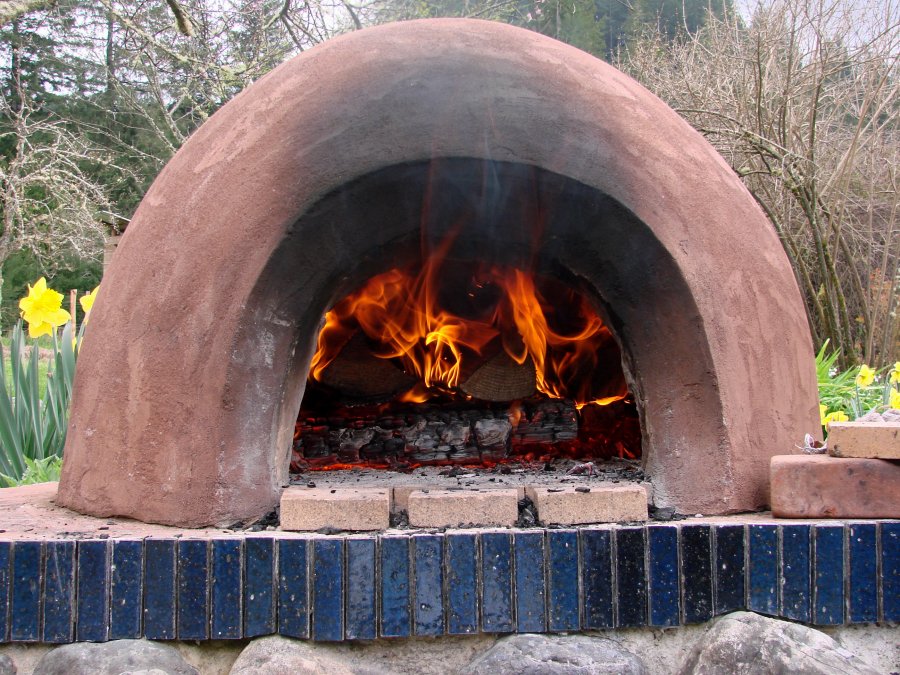
    this was a project very near and dear to my heart (stomach?), and it's nearing its completion after 9 months of on-and-off work.

    a bit of backstory; we (pizza partner Shayna and I) got 3 credits for this.. call it an exploratory lab, or call it what it is.. playing around outside with bricks. bricks? hundreds of thousands of bricks. bricks that used to be the Penn State architecture building, now laying in a field far off campus. It's an architecture professor's pet project.


    without further adieu, the pizza oven.. via iphone photos (apologies!)


    step 1: dig out foundation, lay sand, build formwork


    (brickpile in background)


    step 2: mix up some concrete and pour (shovel, really)


    step 3: let cure, remove formwork, and stack bricks! the base is double wythe brick (unmortared) with a core of recovered mortar, tamped to hell and back.


    fun with counterbalances


    almost there! also, note assorted architecture projects


    step 4: the slab on which to build the dome.. build formwork, lay rebar, mix concrete, and pour..


    of course we hammered and vibrated the formwork to settle the concrete


    step 4.5: wow, i really wished i had documented this one. using a system of levers and wedges (and 4 unsuspecting underclassmen), we flipped over, then hoisted the slab up on top of the base.. all 1100 lbs of it (over 13 80# bags of quickrete + rebar). twas a feat of roman proportions.


    what's that on top? well, a brewski, and our mockup of the dome.. in cake of course! it's all about the foods.


    after this point, the project sat over winter.. in the meantime I graduated, Shayna took other classes, and we returned just a few weeks ago to get cookin on the remainder of the project.


    more to follow tomorrow.. i am le tired.

    #2
    Originally posted by evandael View Post


    she fine

    must post pics of pizza when completed.
    sigpic

    Comment


      #3
      Very cool! My friend and I built one of these a while back at his parents ranch.
      Excuse the small pictures. Cell phone camera tech was not what it is now when I took these.


      Concrete, cinder block, brick, refractory brick, and refractory mortar along with some stucco. The opening at the base is for fire wood. We never finished it :(
      It works great though. Will melt your arm hair off if you hold your arm up at the opening.
      sigpic
      "The bitterness of poor quality remains long after the sweetness of low price is forgotten."

      Comment


        #4
        Very cool.

        I once had to take out a backyard BBQ that was about the same size. I think I went through 3 sledge hammers.
        Originally posted by Matt-B
        hey does anyone know anyone who gets upset and makes electronics?

        Comment


          #5
          No Cob oven? Should have been.


          "The Camry is an appliance, not a car. It attracts folks who have the same regard for driving that they have for washing dishes,
          i.e. it's a necessary but somewhat unpleasant chore and they want something to make the task a little easier and insulate them from the process."
           - my friend, Número Veintiséis

          Comment


            #6
            ^
            Thats some hippy shit hehehe
            sigpic
            "The bitterness of poor quality remains long after the sweetness of low price is forgotten."

            Comment


              #7
              Hi res of Shayna please
              sigpic

              Comment


                #8
                Originally posted by deutschman View Post
                Very cool! My friend and I built one of these a while back at his parents ranch...

                .. Concrete, cinder block, brick, refractory brick, and refractory mortar along with some stucco. The opening at the base is for fire wood. We never finished it :(
                It works great though. Will melt your arm hair off if you hold your arm up at the opening.
                excellent! that looks great. we used similar materials.. fire brick w/ a vermiculite/concrete insulation layer, refractory brick (they are so dense), and high-heat mortar. your firewood storage is very smart.. i kinda wish we had done that, perhaps with a drainage culvert providing the space/support in the base. why'd it never get finished?


                Originally posted by george graves View Post
                Very cool.

                I once had to take out a backyard BBQ that was about the same size. I think I went through 3 sledge hammers.
                thanks. but why did it need to be destroyed! =[


                Originally posted by JBird View Post
                No Cob oven? Should have been.
                those are cool, looks totally shire-esque. i'll have to investigate those. also..

                Originally posted by deutschman View Post
                ^
                Thats some hippy shit hehehe
                haha the url's for those pics are great. 'eco-hobby.ru'.. 'mudflowercreations.com'.. total hippy shit!


                Originally posted by bimmer2288 View Post
                Hi res of Shayna please
                looool, wouldn't be r3v without this.

                Comment


                  #9


                  yoooooooooooooooooooooooooooooooooooooooooooooooo
                  Originally posted by TSI
                  ♫ Rust flecks are falling on my head...♫
                  OEM+

                  Comment


                    #10
                    ^ lol

                    alright, so the first post was Fall. now this is Spring.


                    as I mentioned in re: to deutschman, our bill of materials for the dome included..

                    - vermiculite/concrete insulating layer (vermiculite, like from the garden section of Lowes.. the final mix is very airy and air = great insulator)
                    - refractory-grade fire bricks (purchased from PSU's ceramics department)
                    - high-temp mortar (1:1:1:5 lime, portland cement, fire clay, and sand)
                    - bricks formerly known as the Architecture department. they are old, and as a result, denser and a much friendlier shape in the hand than new cored veneer bricks.


                    we had access to a brick saw (praise FSM) and had access to a generator and a grinder with masonry grinding/cutting discs. still, i occasionally made use of the ol' hammer and chisel and felt like a real modern day M. Buonarroti..


                    step 5: build template (Shayna did this, I was being lazy) and pour insulating layer, and lay out the floor/circumferential spring-line. the ID of the dome is 35" (allows enough room for the fire and two medium-sized pizzas/any number of loaves of bread/naan/pretzels/etc to cook)


                    the bricks in herringbone (that look like salami in section) are the fire-bricks, all others are the salvaged bricks cut in half.


                    step 6: using a plywood template, begin dome construction (!) bricks are cut in half. the dome rises to a max height of approx. 20"


                    checking for square w/ random piece of slate..


                    this was about 4 hours of work.. master masons we are not!


                    step 7: the intersecting vault.. again, a plywood template. i did this one mostly myself (sorry Shayna!) and felt pretty proud of it =]


                    Shay for scale


                    the vent for smoke


                    step 8: the difficult intersection/rest of the dome.. please excuse the ovalized course!


                    from the inside..


                    it then started to rain, but that wasn't stopping us


                    i guess at this point i'll take a little sojourn for a life story. shayna and i dated for a long time, and so this was a definite issue of pride and satisfaction that we finish it and not let it stand monument to a failed relationship. also, pressure was on because I just got a job at ECS Tuning (starting in a little over a week!), and she is currently in San Diego preparing as a crew member on the Wounded Warriors RAAM team before she leaves to teach English in S. Korea. so we had to get this done, no matter what the weather! anyway.. you just want pictures, so i'll continue.


                    clusterfuÇk of brick scaffolding/support (the courses were nearing vertical at this point!)


                    cutting bricks (diamond tipped cutoff wheel ftw) for the last courses


                    step 9: setting the keystone(s) and slathering outer shell of mortar


                    views from inside (i'm going back next week to clean it out.. when i was cramming mortar around the keystone on my back it was hard to see what the hell was going on!)


                    our prof, James. he's a great guy.. eclectic, you could (should) say


                    and.. well, there she sits. when i head back next week, i'm going to clean off extraneous mortar and start the curing process (a week-long series of progressively hotter fires). the outside could use a 2+" shell of the same vermiculite insulation as what lies under the floor, and i may take care of that. we also need to cut/weld together a double-walled steel door to trap heat inside the cooking zone.. but time is pressing.

                    i hope before i move/Shayna leaves the country that we'll get to cook a pizza in it.. but barring unforeseen tragedy (all those trees make me nervous), it ought to be there for a long while. i'll keep up to date here.. maybe with some pizza recipes haha :up: and..

                    Originally posted by z6ne View Post
                    must post pics of pizza when completed.
                    you know it!


                    commence comments/critiques/queries/your own builds please!
                    Last edited by evandael; 06-13-2013, 08:11 AM.

                    Comment


                      #11
                      +5 for Shay.

                      I've been wanting to make one of these for some time, but won't happen until I have some land of my own. Really cool to see this happen though and get some ideas/inspiration. Thanks for sharing man.

                      In for pics of Shay stuffing a whole slice in her mouth.
                      Different strokes for different folks.

                      Comment


                        #12
                        Damn that's really cool. Looks good man, my grandfather & I made a brick BBQ pit when i was in like 6th grade. That slab is thick. I was gonna say wife her but looks like it'll have to wait. Hopefully you get a pizza in there.

                        Comment


                          #13
                          Originally posted by deutschman View Post
                          ^
                          Thats some hippy shit hehehe
                          haha, I agree. waffleswaffleswaffleswafflesin hippies
                          "I wanna see da boat movie"
                          "I got a tree on my house"

                          Comment


                            #14
                            great craftsmanship for the both of you. this makes me want to build my own oven.
                            NRG Quick Release/MOMO Hubs|NRG Limited Edition Deep Dish Wheels|NRG Wood Wheels|Nardi|
                            9five Eyewear|Day of the Dead Tees|
                            WORK Wheels|Lug Nuts|
                            STĂ„TUS|
                            Got Juice?|

                            Comment


                              #15
                              thanks, all. it was at times frustrating, time consuming, and painful (mortar has quite the appetite for the skin on fingertips).. but in all it was great fun, and will continue to be. i am never more satisfied than the feeling after building something lasting and encourage everyone to do it to. it's just sweat equity really!


                              there's lots of stuff we would change, but hey, like building a car (or anything really), ya learn new tricks along the way. i can say this.. every home i move into from here on out will have a pizza oven in the yard!


                              http://www.fornobravo.com/ is a great site from where we gathered most of our researching/drew inspiration. theres a forum for everything!


                              also pacman, thanks for the 'craftsmanship' kudos.. when we were both in architecture studio, the 'C' word was the bane of our existence.. damn those chintzy little models.. so it's nice to hear that from someone completely objectively.

                              Comment

                              Working...
                              X