Announcement

Collapse
No announcement yet.

88' 327i -> s52 build

Collapse
X
 
  • Filter
  • Time
  • Show
Clear All
new posts

    88' 327i -> s52 build

    Hi All,

    This project has been a long time coming. I started it about three years ago and have been slowly accumulating parts over the last years in my spare time on a grad student budget (i.e. not very quickly). I just finished up with school a few weeks ago and thought whats better than celebrating by finishing this beast up.

    The Car.


    '88 Zinno 325 coupe that I've had since high school. Not the prettiest, but shes mine. Over the years I have done the following:
    - 327i conversion
    - IE Stg 3 + bilstein sport
    - IE urethane trailing arm and subframe poly bushings
    - m3 CABs
    - 4.10 lsd
    - z3 shifter
    -akg poly trans and motor mounts

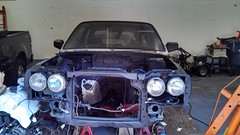
    I have been mostly working on the engine (90k s52 out of an automatic) over the last few years. Had the head recently rebuilt by VAC to their STG 1 spec. just did a cleanup of the bottom end since everything looked tidy. Built harness for OBD II operation myself to put some of my EE skills to work. Sorry for the crappy cell pics. Will take a better camera tomorrow. I am using an ECU flashed by Dave @ MMW. I have the whole week to work on this thing so hopefully we can get it to crank by Friday...

    s52 from the wrecker


    head before recondition... not too bad.


    off to VAC. needed to build a crate


    after some time...it was peak racing season and they were busy...


    so shiny.


    and clean


    built the frankenharness. just decided to make a direct OBDII->c101 harness to minimize extra cables.


    also installed some new seals for the VANOS and a new WP, Tstat, chain tensioners. Ready to go in:


    Todays work consisted of pulling the m20. I tried my best to not snip anything so it took some time but was worth it since now I have a known good M1.3 m20b25 wiring harness for a future project. Ill let the pictures do the talking.

    almost won...


    win!


    Plan for tomorrow:
    -clean 26 years of road grime off of engine bay
    -put a new clutch and pp on the s52. bolt up the zf320 and mount her up in the bay.

    #2
    Cool! Sounds like going OBD2 with a flashed ECU is an easier way to go. That's what the shop is doing with my car. I wanted to tackle the swap myself but live in a shitty location right now with no garage. Subscribed.
    84 325e Burgundrot S52 M Tech 1.

    Your signature picture has been removed since it contained the Photobucket "upgrade your account" image.

    http://www.r3vlimited.com/board/showthread.php?t=250109

    Comment


      #3
      I think each OBD has its easy and difficult parts. I got a reasonably complete set of OBD II sensors with the engine so it made more sense to leave it as is. I also wanted the live data capability for a future configurable gauge pod project.

      Comment


        #4
        9.2.14 update.

        Goals for today were to start checking off the list of to do's before I can mount up the s52 in the engine bay. The following were accomplished:

        - clean 26 years of road grime from engine bay (yuck)
        - install iX booster
        - install rebuilt e36 rack
        - install e34 oil pan

        also, I brought along my real camera today (Nikon D200) so that I can actually have some decent quality pix. I hope you all enjoy.


        This was the situation I was greeted with this morning. I figured if I'm going to install a nice clean s52 I might as well make the engine bay respectable while its easy to do.


        the tools of the trade


        plus elbow grease and time equals


        installed iX booster


        forgot to take a parts bin pic yesterday...now to find the place for all of these...


        installed e36 rack using AKG kit. realized that I needed a removable steering coupler to install (doh, wish AKG had that in the description). So will need to wait for that to come in before I can put in the u-joint assembly, but got the spacer part complete. Had to do a bit of grinding to get things to stop binding. Somehow diddn't manage to take a picture of my hard work.


        After I was done monkeying with that I worked on installing my e34 oil pan. As I previously mentioned, I installed the VAC baffle in it by TIG welding in place. I opted to remove the scraper on the S52 and bend off the pickup mount as described in other threads. I decided to tackle the sprocket nut while I was in there with a safety wire kit.


        That is all for today. Tomorrows goals are

        - install flywheel, clutch and PP to s52, mount up transmission. Hoist into bay and bolt down.

        - if time allows, start installing manifolds and harness.
        Last edited by the.other; 09-02-2014, 08:06 PM.

        Comment


          #5
          9.3.14 update

          didn't make as much progress as I hoped yesterday, but still moved forward. Got the flywheel, new clutch and PP installed and bolted up the zf320.

          engine bay with pic of shiny new steering rack.


          s52 off the stand and on the pallet for work.


          clutch and pressure plate bolted up


          transmission bolted up and engine is ready to go in! damn that was a bitch. Tolerance on the input shaft splines is really tight on the s52. needed to get creative with c-clamps to pull the transmission and block together...


          today I'm going to hoist the motor and trans into the bay and bolt it down, then take a breather for an afternoon.

          Thomas

          Comment


            #6
            9.04.14 update

            Well today actually went according to plan. I bolted the starter to the bell housing. Double checked all the torques and then rigged the motor for hoisting into the bay. Installed Condor swap mounts and then proceeded to hoist. Nothing like dropping a motor in solo. thankfully the HF load leveler made it doable, even though the handle is garbage. Here is the pic progression.

            well. now I'm committed...


            after a whole lot of sweat and grunting. The load leveler and floor jack to lower the chassis is crucial to this step.


            success!!!


            I think the condor guys put the label on upside down. Right now I have the mounts set up such that the top stud (the one going into the motor mount) is centered and the bottom (going into the subframe) is eccentric. Can somebody confirm that this is correct?


            Plan for tomorrow:

            -finish bolting down the motor and trans (I'm reusing my AKG poly mounts)
            -install AKG poly steering coupler to u-joint assy. install assy.
            -begin installing wiring harness, s52 manifolds and ancillaries.

            Thomas

            Comment


              #7
              that is correct, i think mine may have been the same way. If you compare it to a oem mount
              motormount4 by Rdreas, on Flickr I'd say you got it right.

              Comment


                #8
                9.05.14 update

                got the new AKG coupler in the mail yesterday. First action item was to install it and thereby finish the mechanical aspect of the steering rack swap. Needed to drill the holes in the u-joint oversize to fit the M8 bolts but otherwise was a straightforward install. my one complaint is that the M8 bolts cannot be torqued to a proper spec since the poly begins to yield considerably earlier. not sure why AKG decided to use such huge bolts. I threw some loctite on the threads as extra insurance in addition to the nylok nuts.


                the rest of the day didn't result in many pictures since it was underneath the car, but it involved the final torquing of all engine and transmission bolts as well as connection of steering linkage, shift linkage and driveshaft. steering and gearshift control surfaces work great now. I reused my z3 1.9 shifter and e30 linkage. I did notice that the pin on the transmission side is too long, and therefore a spacer should be made.


                starting a new job next week so further progress will have to wait a few days. Right now the shop I am using is a 50 minute drive away from my house, which significantly reduces weeknight progress... Currently working on a better solution.

                Thomas

                Comment


                  #9
                  Sorry haven't been updating this thread... but...

                  IT LIVES!!!!!


                  experiencing this weird intermittent sound on cranking. might be the jankety picknpull starter I'm using. I have a new one I'm going to swap in next weekend.

                  Comment


                    #10
                    Originally posted by the.other View Post
                    9.2.14 update.

                    installed e36 rack using AKG kit. realized that I needed a removable steering coupler to install (doh, wish AKG had that in the description).


                    So will need to wait for that to come in before I can put in the u-joint assembly, but got the spacer part complete. Had to do a bit of grinding to get things to stop binding.
                    And

                    Originally posted by the.other View Post
                    9.05.14 update

                    got the new AKG coupler in the mail yesterday. First action item was to install it and thereby finish the mechanical aspect of the steering rack swap. Needed to drill the holes in the u-joint oversize to fit the M8 bolts but otherwise was a straightforward install. my one complaint is that the M8 bolts cannot be torqued to a proper spec since the poly begins to yield considerably earlier. not sure why AKG decided to use such huge bolts. I threw some loctite on the threads as extra insurance in addition to the nylok nuts.


                    Thomas
                    Interesting...none of the How-To threads that I read mention this.
                    Last edited by phenryiv1; 03-30-2015, 11:22 AM.
                    Patrick Henry

                    1989 325iC build: http://www.r3vlimited.com/board/showthread.php?t=316880


                    Comment

                    Working...
                    X