
I definitely plan to take part in the local get togethers. I saw the pictures from the spring picnic this past year and it looked like a great time.
-
I was originally planning to work on the removable front clip today, but some other parts came in the mail so I shifted gears. What did I get you may ask?
A Class 2 trailer hitch and receiver of course!

As any of you that track your car know, normally you want to take spare tires, tools, jacks etc with you. Adding that to the fact that I want to be able to use the car on trips and vacations, the ability to haul a small trailer makes it much more practical. The Class 2 set up is rated for 3,500 gross trailer weight and 300 lbs tongue weight, which will be plenty for anything I ever need to do.
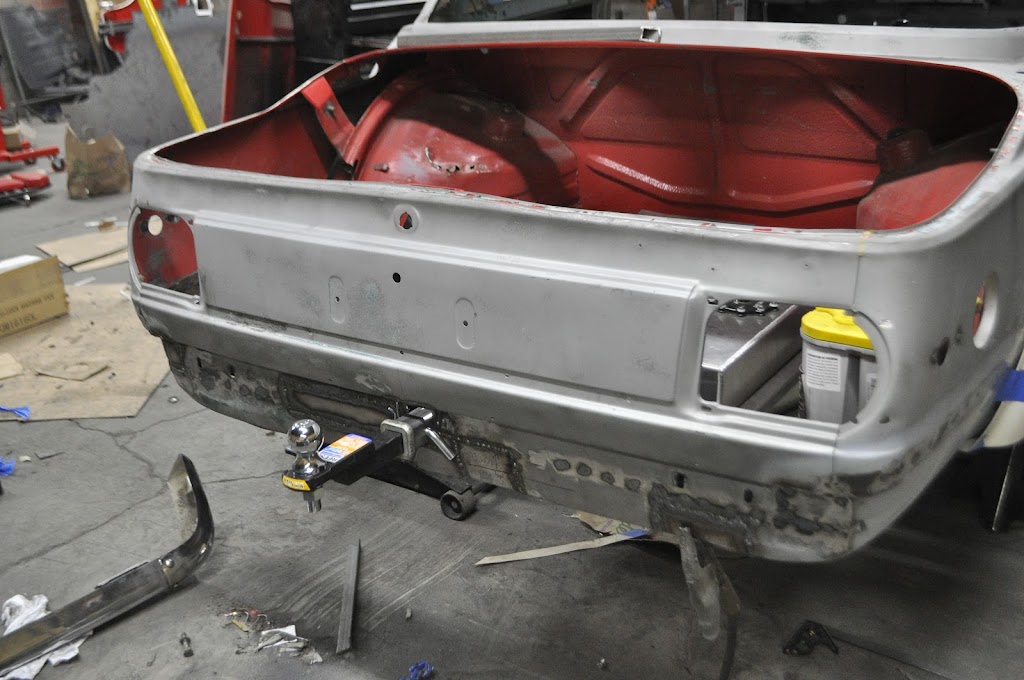
One of the biggest challenges with the hitch was figuring out how to package it with the center exit exhaust in the rear. Originally I was planning to have a fixture for the receiver that would bolt up to the underneath of the trunk frame. While this would have worked, the fixture would have been VERY heavy and a pain to store when not in use. Also the packaging of the exhaust around the fixture would have been difficult, leading to the receiver being very low or very far from the rear edge of the body. Luckily I was already building up a new trunk frame, which gave me a better option.
The first step was to clean up my bumper brackets. This is how the came on the bumper:

Then after a quick trip to the sand blaster:
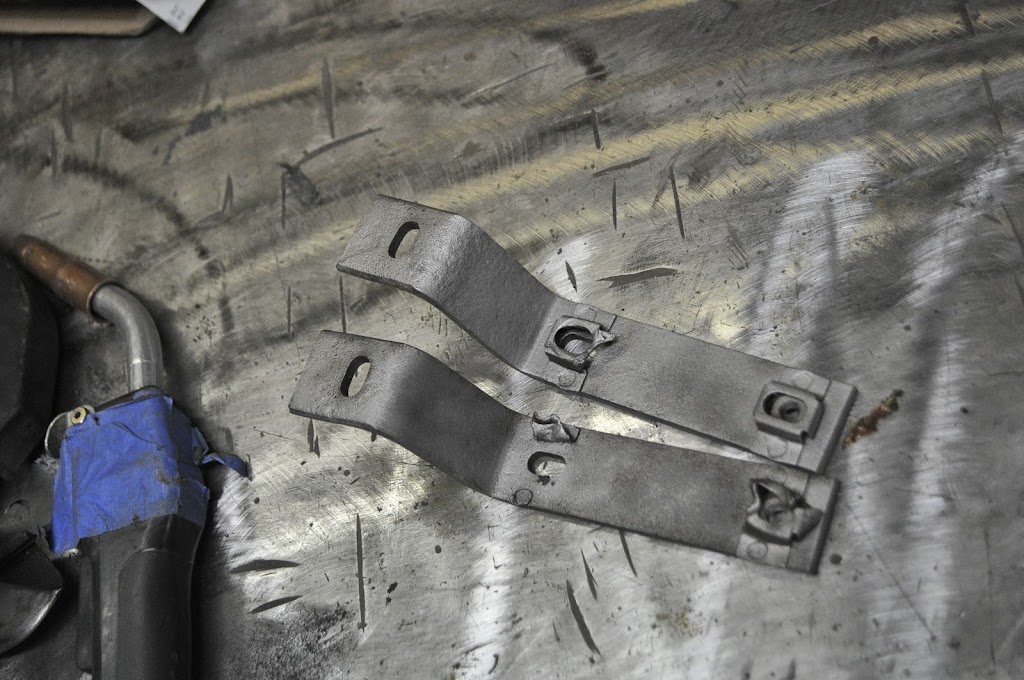
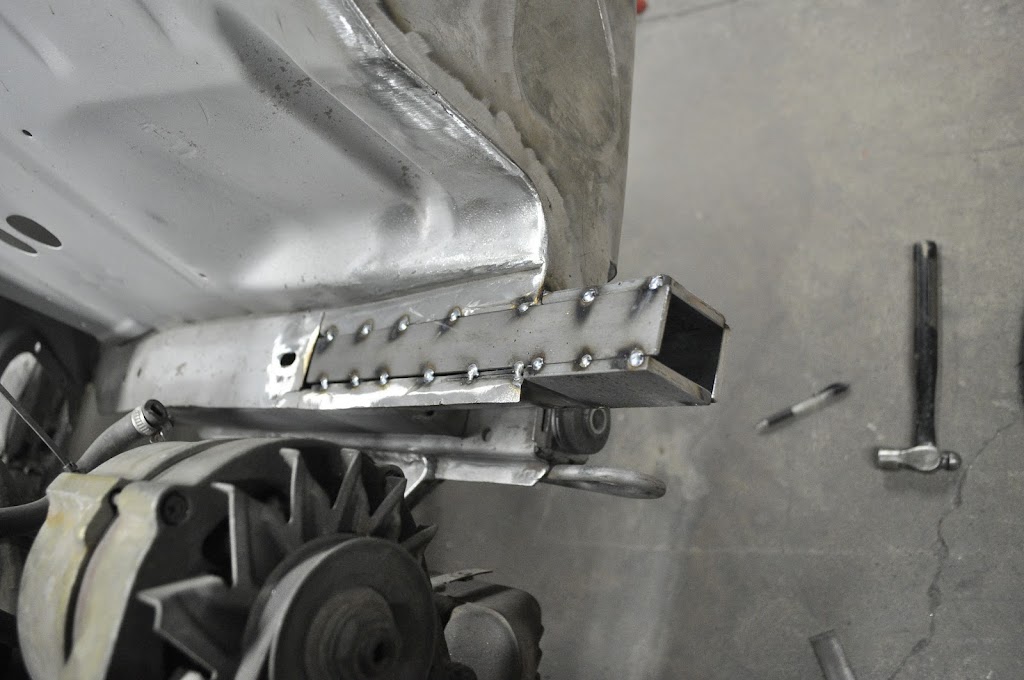
They still aren't that pretty, but for now they are rust free. After cleaning those I moved on to cutting the receiver to length. I forgot to take pictures while fitting it in place, but here it is tacked in place.
Here you can see the clearance between the body and the locking pin. It's tight, but shouldn't rub on the paint when installed.
Next up was to add the safety chain bars. When towing, the safety chains is used as a last resort in case the ball or hitch fail completely. It should keep the trailer from completely detaching until you can pull off to the side of the road.

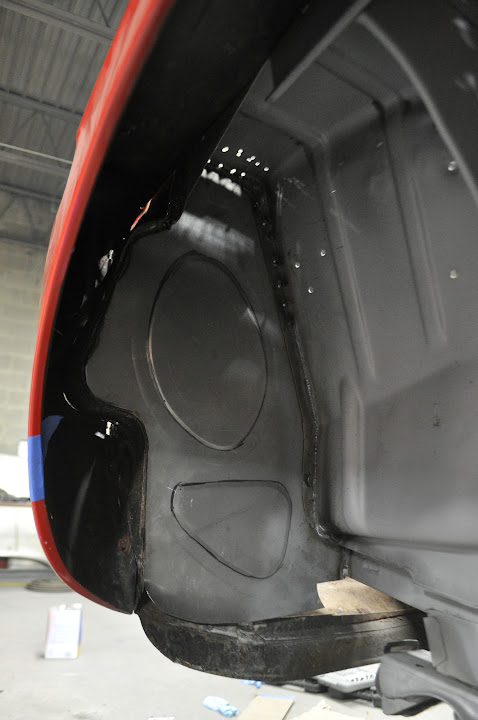
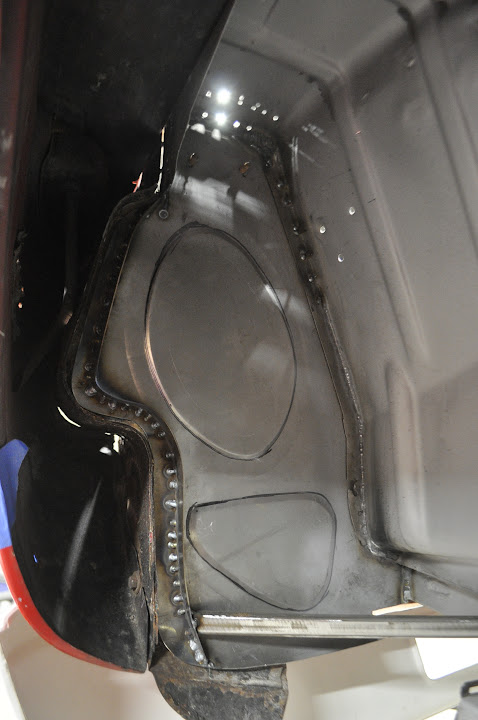
With those in place, it was time to reinforce the connections on the inside of the trunk. The picture below shows the receiver, the inner trunk frame, and a strengthening bar on top of both. The receiver is butted up against the trunk frame (you can't really see it, it's in the shadowed area underneath the top tube). The strengthening bar is to help keep the receiver from bending away from the trunk frame.All of these connections were welded fully around to ensure they won't fail.

Then I added another bar across the entire back of the trunk. This is to help keep the trunk frame tube from twisting in the center due to the moment from the tongue weight. The upper tube was notched to fit around the previously shown top brace. It will be stitch welded on both sides across the back of the trunk. The rear portion of the roll cage will tie into the far ends of this upper tube as well.
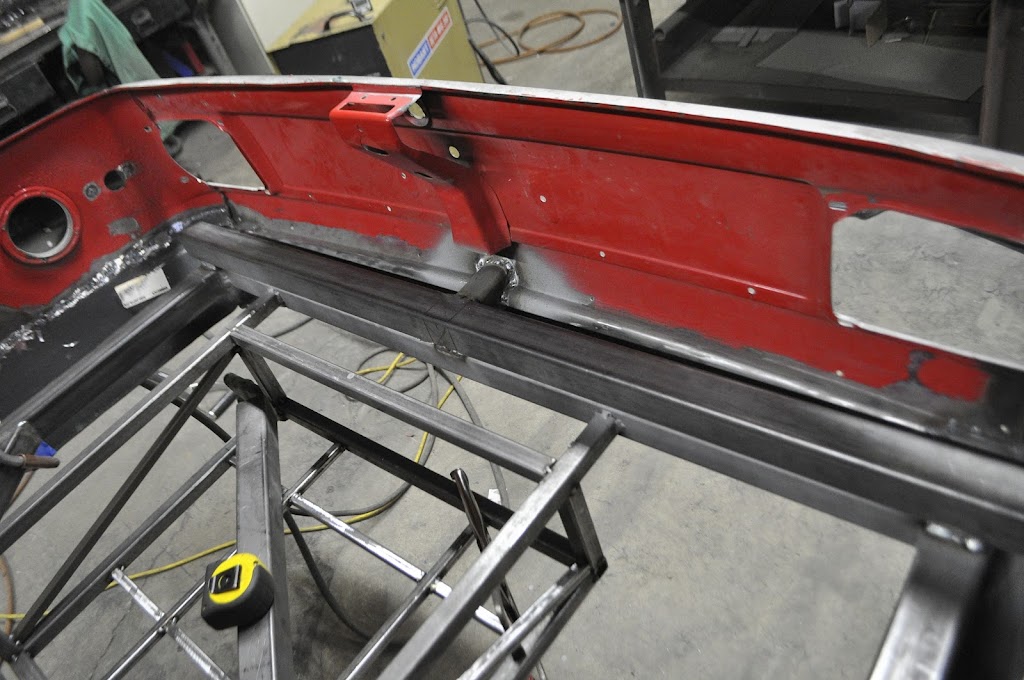
Here's a close up showing the notched area. Again, all edges are/will be fully welded.

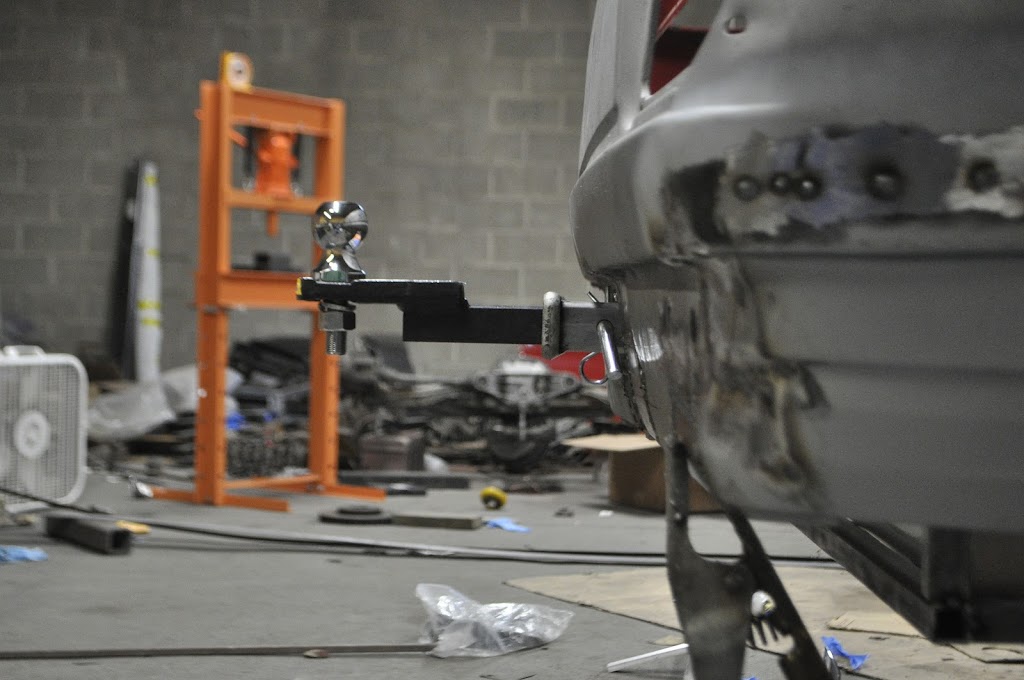
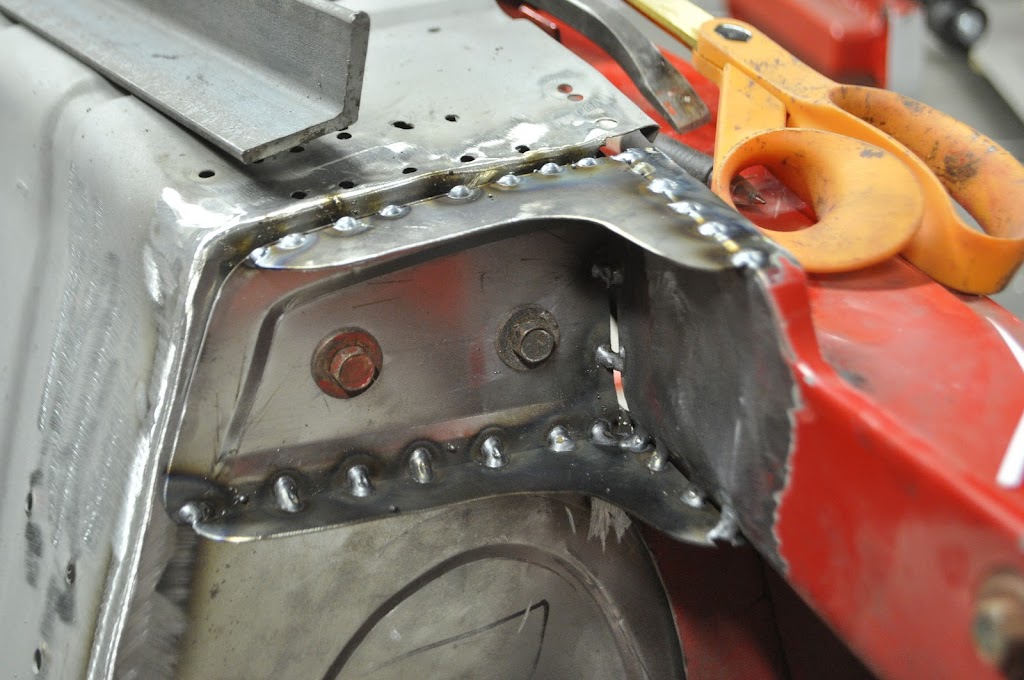
Now why did I need to clean up the bumper brackets for this little project you may wonder? Simple, so that I could ensure the entire hitch assembly would fit behind the stock bumper.
What hitch???
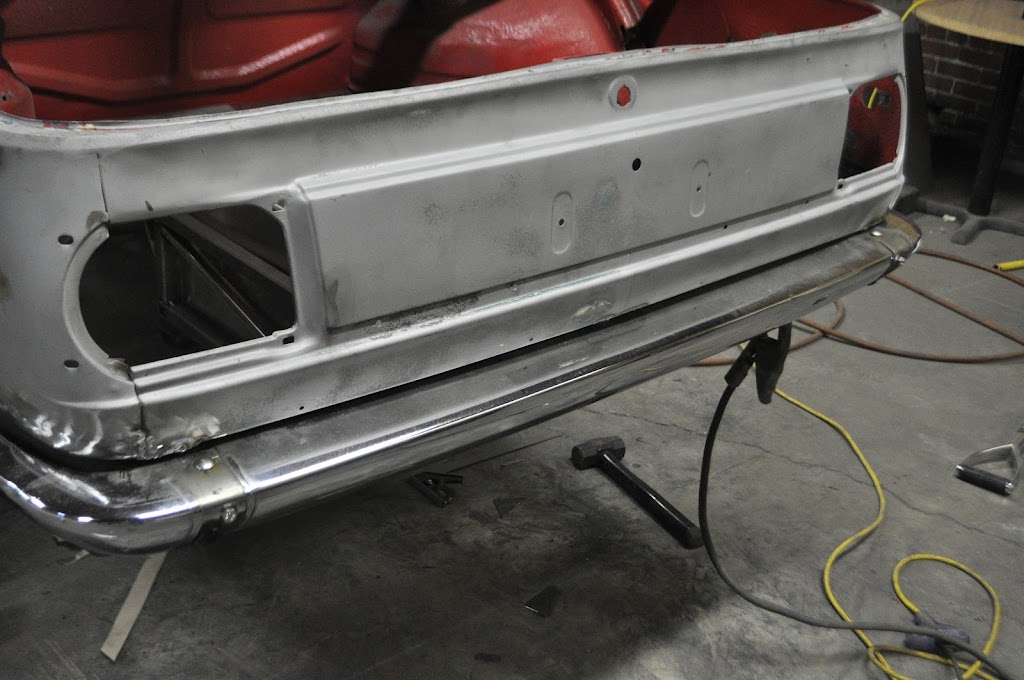
View from the bottom, it was very tight packaging. (For reference, the bottom edge of the bumper is in the top of the picture.)

And this is waiting for me tomorrow:

A partial sheet of 11ga and anew sheet of 18ga sheet metal for the front end work.
:woot:
Thanks for looking!Comment
-
Badass. Do you plan to Upgrade your brakes?Comment
-
wow thats really neat. this thread is getting better and better by the post.:up:
Comment
-
Yup, at first they will probably just be 4 wheel disc with vented rotors up front (stock was non vented disc up front with small drums in the back). Down the road I'll probably pick up an aftermarket BBK or fab my own.Originally posted by A Sucked Orange View Post
Thanks!Originally posted by e30_neverstock View PostComment
-
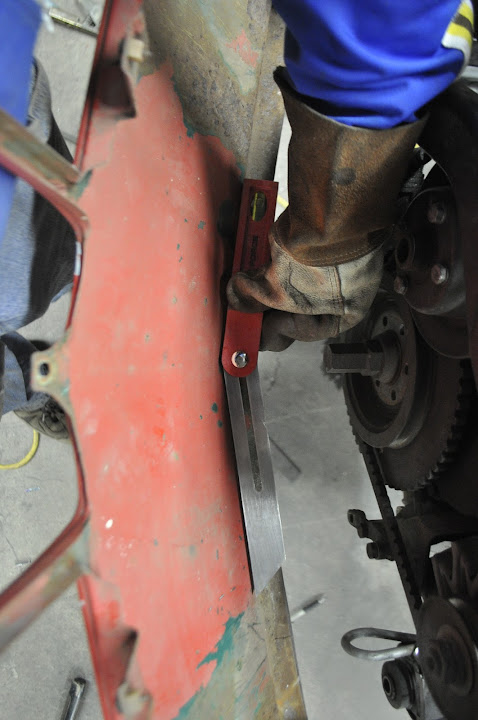
Finally got started on the removable front clip. I've been trying to think about how to do this for a while now. There are probably a bunch of ways to do it, but this is the best way I could come up with and I think it should turn out pretty nicely. The first step was to clean up the edge where the old nose clip was spot welded on. With the edge straight and clean, I applied some weld-thru primer to the areas that would be overlapped with new sheet metal to help prevent future rusting.
This is where the front clip was spot welded in place.
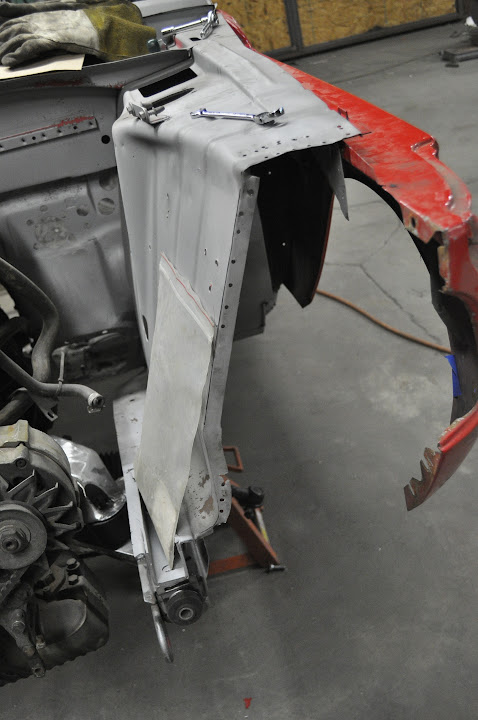
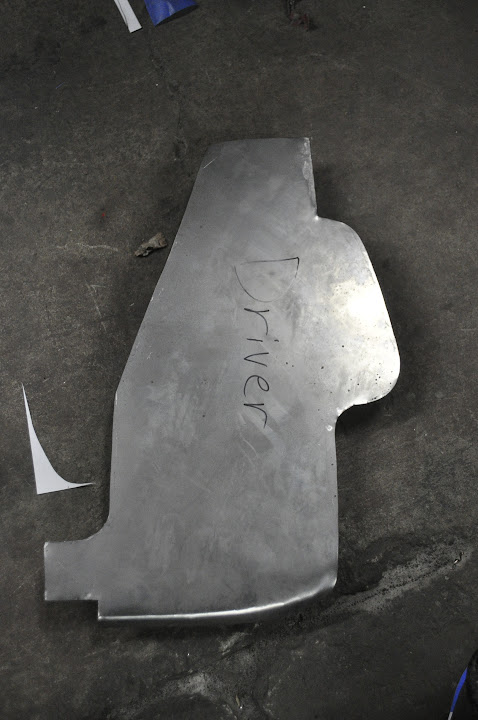
With the edges cleaned up I needed to make a template for the new metal. This section is important because it helps to block off the front wheel well from the headlight area and engine bay.

With the template made, I could transfer it to my 18ga metal and cut out the driver side plate.
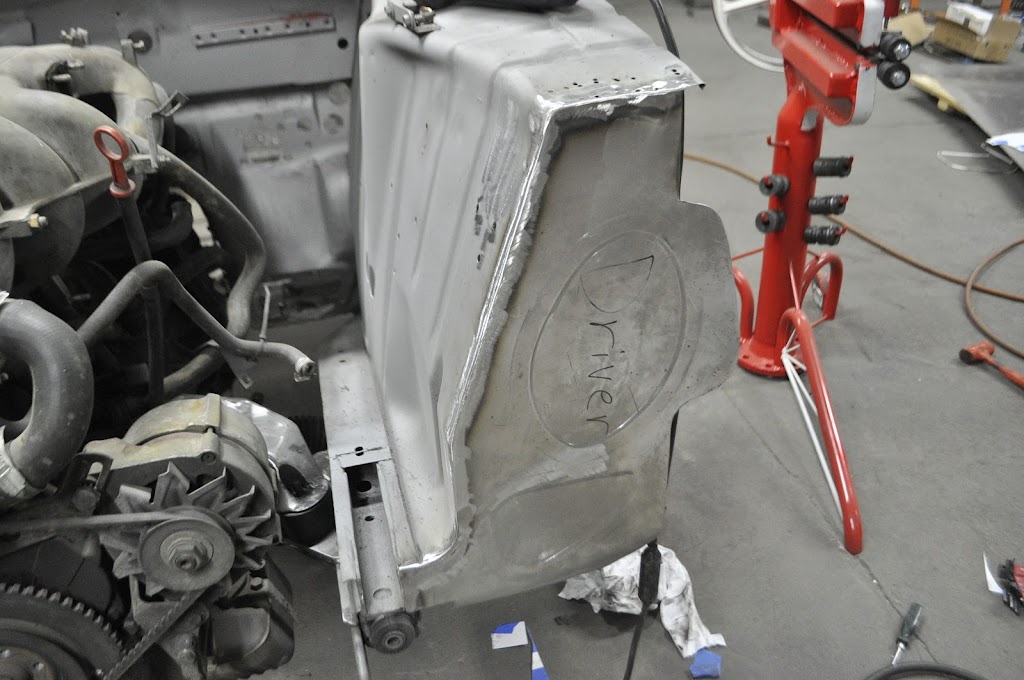
Now just a plain sheet of 18ga isn't very strong. So in order to add some strength I decided to roll a couple 'dimples' into. These also mimic the OEM plate.
Traced the pattern:

Rolled the dimples and the welded in place:

And welds ground smooth.
Now here is a rough example of how the front clip will bolt on. I'm planning to use the same type of fasteners that hold on the fenders, and so I will have a bit of adjustment to help make sure everything lines up. There will be two screws in the tab along the top of the nose panel, as well as a couple of connection down along the bottom edge. Also note that the nose panel will no longer be a structural panel of the car. I will be adding more bracing across the engine bay, welded in place along the bottom edge and then a separate piece that bolts into the top that is incorporated into a strut bar assembly.

And here is a view from the inside of the wheel well. As you can see it still creates a barrier between the wheel area and the engine bay (the light you see coming through is from some rust holes that I still need to patch on the nose panel).
Then it was onto another round of plastic surgery on the nose panel. Not much left on it, but it doesn't need much either. I'll be adding some light bracing in strategic places once it's bolted back up and I know it's true and straight. As far as weight the only thing that it needs to support now is the headlights, grills and part of the front turbo lip.

To finish up the night I knocked out the passenger side panel. I still need to do some trimming along the outer edge so the nose panel can fit up tight to it, but it looks good so far.
Thanks for looking.Comment
-
Finished up the front clip mounting points tonight. Where we left off last time was here, with the new front wheel well panels welded in place:

Then I added some bracing to the rear of the new panels. This ensures that they will have the necessary sturdiness to not move around or deflect as the car drives around. The bracing consists of two parts. First I welded a strip of 18ga x 0.75" metal down the outer edge, then triangulated the lower outside corner to the frame rails with some thin wall square tubing.
Then I remounted the front clip so I could locate the new mounting plates and holes.

Then I made up the new mounting tabs. This will be welded onto the front clip and attach it to front panels of the wheel well.

Test fitting before welding in place:

Drilled the mounting holes in the tabs. Once tacked in place I can transfer the holes to the chassis so I know they will be in line.

Here are the new mounting plates welded in place. As you can see I also made upper and lower braces to help strengthen it. How the passenger side looks:

And the driver's side:
I also got some goodies from the fatherland in this week. A bunch of new fasteners:

And new sheet metal for the rocker panel area. Now that I got these in I can locate the rear fender flares and finish up that area of the car.

Last but not least, a little teaser. I've got some goodies coming in the next week that should really start to pull the car together. No pics yet, but the waiting is half the fun lol.Comment
-
-
Great as always.. the hitch receiver was an unexpected surprise. So you'll pull the rear bumper to tow things? I assume you'll have some place awesome to store the bumper in the trailer while towing or something spectacular like that hehe.
How exactly does one "roll dimples" into the sheet metal? The rest of the metal is still so straight, and doesn't look stretched. If you have a minute, outlining a walkthrough of that would be valuable!
Comment
-
-
Originally posted by everlast View Post
Yeah, I'm planning to make a spot on the trailer to hold the bumper while I'm towing stuff.
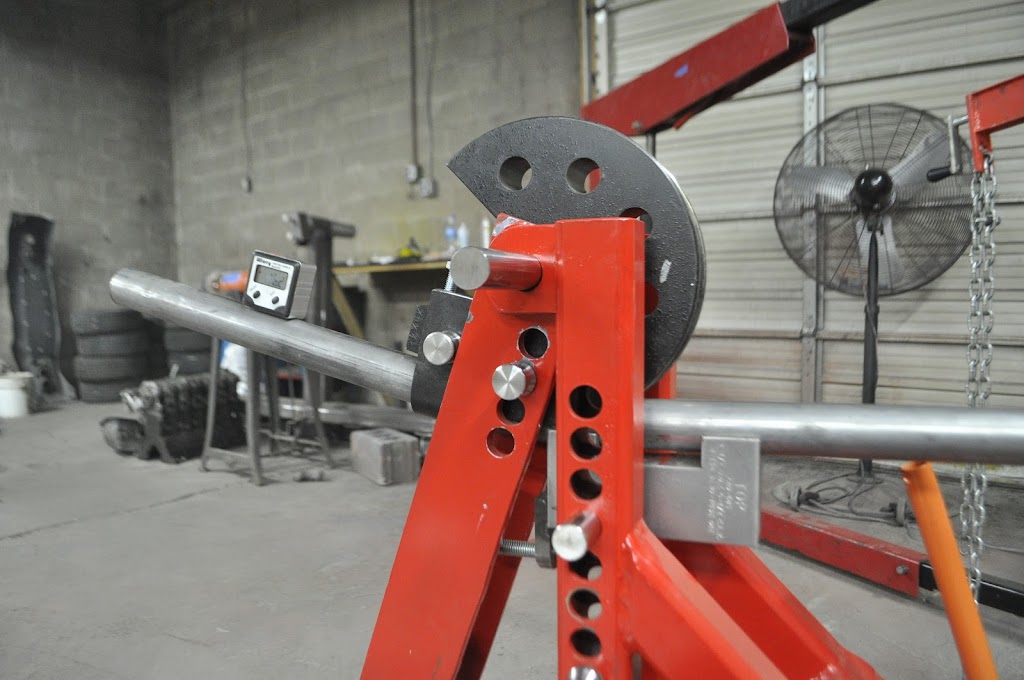
As far as rolling 'dimples' or 'beads' into metal, it's all about having the right tools. In this instance, it's called a Bead Roller (go figure). Mine started as a Harbor Freight unit, that I improved with some tube steel and an old tractor steering wheel.
It started life looking like this:

This is how it looks now:

Depending on the dies you use, you can change between rolling dimples, beads, flanges etc. To roll a bead you simply insert the metal and clamp the rollers together with the small hand wheel in the picture below.

With the metal clamped tight between the rollers, you just turn the large wheel to feed the metal through. Once you finished rolling the sheet can develop a few small bends or kinks, especially a larger piece of thin gauge sheet. However, most of the time these can easily be beaten back flat with body hammers.
Haha, totally forgot about that part. Man I wanna watch that movie again now.Originally posted by TrentW View PostComment
-
This is a great thread! Picking up a 1970 2002 tomorrow awesome Inspiration !!!!The Current Army
-(UnderConstruction) 1991 330iS 24v S52 build thread
-1992 325iC
-1987 E30 Truck
-1991 332iS (BecauseRacecar)
-1988 Dinan M3
-1988 325iX Tribute car
-1989 320i Touring (S52/6spd)Comment
-
Oh so nice!sigpic
"The bitterness of poor quality remains long after the sweetness of low price is forgotten."
Comment
-
Now the the front clip sheet metal won't be in charge of supporting the structure at all, I needed to tie the two front frame rails together again. This is how they looked after removing the brackets for the 'diving board' front bumper:
Passenger side, prepped with weld-through primer and ready to be patched:

Extendsions tacked in place:
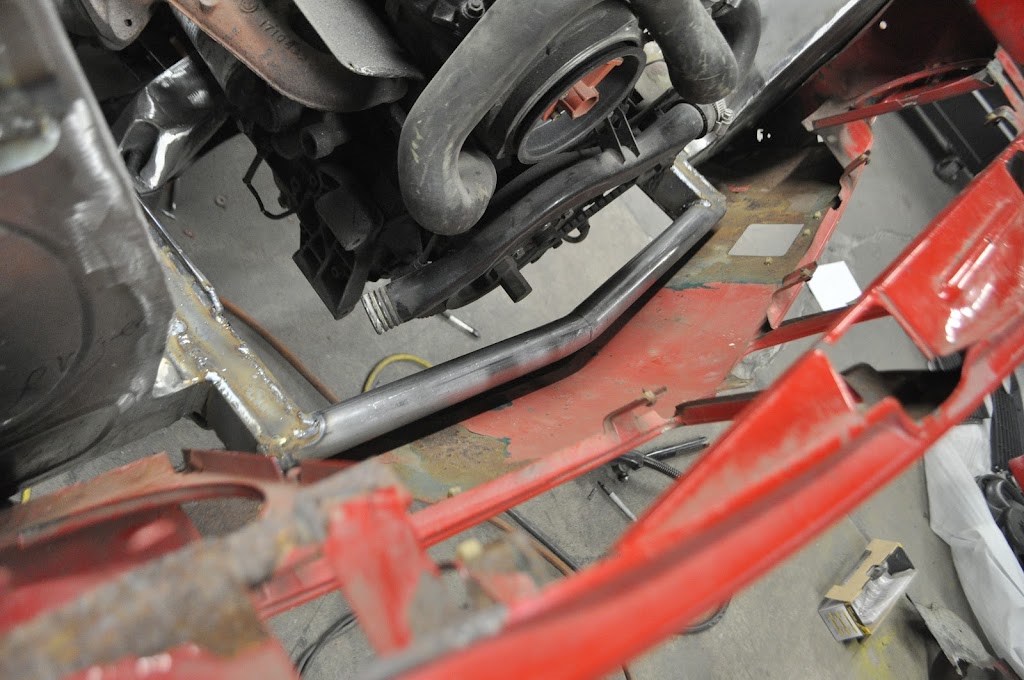
With both sides tacked up, it was time to make up the cross bar. I decided to use the same 1.5" DOM tube that the roll cage will be made from. The first step was to measure the angle needed to fit the nose panel:
Then I used the bender to bend stuff:
Then I cut and notched the tubing to fit onto the front frame rails:

And here's how it fits with the nose panel in place:
With the cross bar in place the next steps will be to mount the radiator and figure out how I'm going to run the coolant lines. I also need to get the last turbo flare ordered so I can mount the front turbo parts and make the necessary body modifications.
Then I decided to take a break from the body/frame work and work on some of the other things that need to happen in the engine bay. Any guesses as to what this guy will be for??? 10 internets to anyone that gets it right.

Last but not least I got a nice surprise in the mail today:

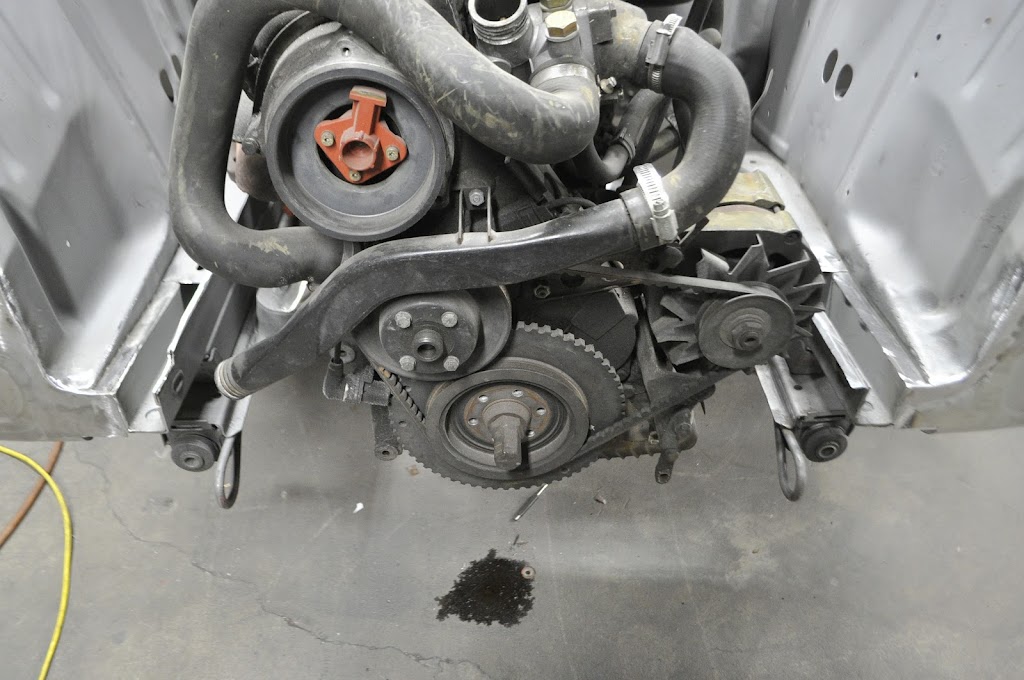
I got a smoking deal on a set of original e30 Racing Dynamics headers. Having only had one set of 'ebay' headers in the past I must say the quality on these is really great. I was very afraid that they wouldn't fit in the '02 engine bay, but turns out they are compact enough that there is plenty of room. I was able to get them for a steal, and I'll probably get them ceramic coated at some point. Some more pics of them:

Here you can see that I had to flip the Oil filter housing 180 degree's in order to get it to fit with the new headers. In the end it works out great because it puts the oil filter in an easier place to get to, I can take it off very easily without getting under the car.

Comment

Comment