Announcement

Collapse
No announcement yet.

butters 318i project, S54door...

Collapse
X
 
  • Filter
  • Time
  • Show
Clear All
new posts

    #16
    Corey introduced me to his black '87 325 eta 2-door automatic, known affectionately as Harold. Love that old M20 starter motor sound.. well, I love all the sounds that motor makes.

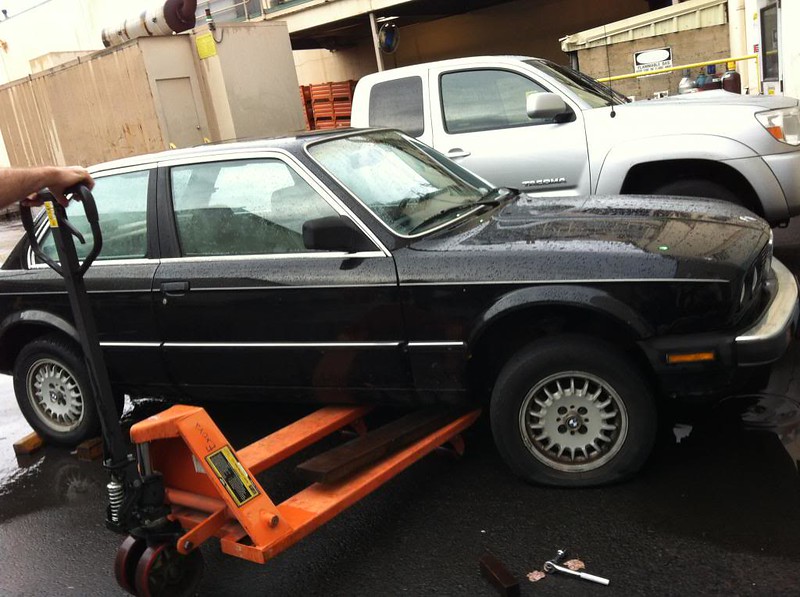
    I have one picture of Harold on hand. A couple weeks into the process I had a flat on my way to work. Luckily it happened literally pulling off the main road into the plant. The car had a flat spare and no jack, but luckily I rolled it into maintenance and found a nozzle, and it held air. I was in an area of the plant with no other cars around, and the owner of the truck was nowhere to be found, so we grabbed a pallet jack and made quick work of it:

    Last edited by butters; 10-21-2017, 04:38 PM.

    Comment


      #17
      I hate you for having roads like this where you live...

      Stage rally/rallycross e30 build/competition journal
      Track/street e21 build
      visit Condor Speed Shop
      visit Motorsport Hardware


      [FONT="Franklin Gothic Medium"] 1985 318i/M50 Rally Car - 1988 Porsche 924S - 2005 Sequoia tow pig - 2018 GTI

      Comment


        #18
        Pictures from the head removal process:


        While my car was down I decided to have Corey take care of some other things. I had noticed a knocking from the right rear entering the parking lot at work, and I was sure it was the subframe bushings. I went with OEM rubber for those as well as the RTA bushings.

        There was also a spot of rust at the driver's side unibody near the subframe bracket, so it was ground away and I ordered some POR-15 to prevent further corrosion. I'm saving body work for later as far as replacing the sheetmetal there. Corey used the extra por to treat as many surfaces on the diff housing, subframe, and trailing arms as possible where surface rust was becoming ugly.


        Here's what was left of that subframe bushing. The other one was also bad.


        Last edited by butters; 10-21-2017, 04:51 PM. Reason: Scumbag photobucket

        Comment


          #19
          Brian at M&B gave me the diagnosis on the head. It was warped so they machined it flat, and I had provided all the top-end seals which they installed after a valve job. He didn't suspect that the lifters were very far gone and recommended that the bottom end be investigated. While I didn't agree with the logic, I couldn't help but imagine how pissed I'd be if I got everything back together and it still had major issues.

          Corey agreed that the best thing to do while we were so far into it was to go ahead and do the full rebuild. I was excited at the very thought of a fully rebuilt S50 and decided it was worth the investment at this point. So the engine came out and went off to Brian. Corey offered to diassemble it to help save some cost vs. M&B doing it. We would leave it to the experts to assemble the top & bottom separately and then Corey would mate the two once the machining was complete.

          I ordered a full bottom end kit from Blunt, new OE rod & main bearings, piston rings, etc.


          Brian called me once they measured everything up. Bad news, but good in that it gave somewhat of a possible explanation as far as a lack of oil pressure causing lifter tick. The thrust journal surface on the crankshaft was "heavily scored" and not worth machining to correct. I would need to source a replacement
          Last edited by butters; 10-21-2017, 06:17 PM. Reason: Scumbag photobucket

          Comment


            #20
            Originally posted by irish44j View Post
            I hate you for having roads like this where you live...
            Not to jump ahead in my story but, sadly, I don't live out there anymore. But yes that road is absolutely amazing. It's normally closed to motor vehicle access (popular with bikes, even street luge etc) but can be rented out for events. Pictures and videos start on this page of the BFc thread from that year's event.

            Comment


              #21
              I was able to quickly find a replacement crank from a reputable recycler. Wasn't cheap of course, but Brian had it within a few days and reported that it was in excellent shape and OE spec bearings could be used.

              A like-new engine deserves fresh filtration and perfect delivery of its fuel. So in went a new fuel filter, and I looked around at injector options. Not wanting to bother with increased flow or otherwise replacing what I had, I learned about rebuilding injectors. In my searching, someone PM'd me on BFc and offered to ultrasonic clean, rebuild, and flow match my injectors at a great price. He even painted the bodies for me and put up a video of the results:

              Enjoy the videos and music you love, upload original content, and share it all with friends, family, and the world on YouTube.


              M&B did a great job with the machine work. Here's the engine halves coming together at Corey's hands:


              The beautiful new crank still in its heat-treated blue hue:


              A fresh OE head gasket and it was getting there:

              Last edited by butters; 10-21-2017, 06:27 PM. Reason: Scumbag photobucket

              Comment


                #22
                how many miles did the s50 have before you swapped it in? just curious
                Your signature picture has been removed since it contained the Photobucket "upgrade your account" image.

                Trust me it stock :yawn:

                Comment


                  #23
                  I figured that this was my chance to do some things under the hood with the engine out. I was tired of manual steering with the slow E30 rack, and sir Henrikson happened to have an E36 rack I could take off his hands. Nibbling the opening at the firewall was tricky but we got it done. I wound up with a steering coupler combination that I haven't seen before - I had to cut the rivet-type fasteners that attach the upper and lower halves of the E30 coupler to the steering guibo, and use that as my joint between the E36 half (rack side) and the E30 half (input side).

                  This photo shows what I'm talking about:


                  I tackled this while Corey worked on the motor, and it was unbelievably frustrating. I'm not sure why my car/rack seemed to be different, but I was cursing the writeups touting the "simplicity" of this upgrade for E30s with airbags.

                  I had my parents send out my P/S pump, lines & reservoir from back home and ordered the necessary new washers and hardware. Bending the lines was a pain but doable. I believe I was able to use the E36 lines. Corey whipped up a basic bracket to sit the reservoir on the frame rail, hidden from view once everything is installed.

                  I pulled out the engine harness and Corey was kind enough to let me attack it with his soldering kit. I shortened as much as I could find, using heat shrink insulation as I went along. I also was able to relocate the diagnostic plug to the drver's side. At the end I zip tied the bundle as tightly as I could and arranged it into the M42 plastics along with the relays.

                  I went after the unused bracketry on the driver's side and pulled out the AC lines and the dryer. Steven even lent a hand making the sparks fly:


                  I called in an order for a couple of aerosol of alpine white 2 to even out the color as best I could. This is not show quality by any means, and I still hope to redo it later on along with a whole-car respray just so it's perfect.

                  Ready for pressure washing:


                  I DIY bondo'd and sanded that bracket scar as best I could, it's ugly but at least not very visible. Masked everything off, I hate overspray. This was a late night in the shop:


                  Painting the next day:


                  That'll do:


                  Harold had some issues around this time, turns out the motor mounts were shot and the M20 was moving forward, cutting into a coolant line. Corey was kind enough to let me borrow his other car, a white '90 325i called Truman. Here he is in my garage with a former E30 owner's diesel Scout and Z4 35is:


                  Shortly thereafter the S50 was back in place. Finally got around to mounting up the SPAL fan with Massive's fan brackets which I won at yet another PNW meet. December 10th 2011:


                  I found a second-hand M-Power coil cover on BFc and it was on the way. I actually ran into problems without, as the E30 hood likes to drip water right in coil #6 when opened while wet and I then had misfires until I dried it out.

                  Upon cranking she fired right up. Relieving to hear much less lifter tick, though maybe still faintly there. Still ran like a beast, and I proceeded to give it a proper hard run-in (motoman technique). Checking the oil often confirmed that I could stop worrying about consumption issues, and of course I never saw smoke again.


                  After visiting home for the holidays, I finally got the coil cover on and installed a new ECT sensor along with a refreshed smoother-operating factory throttle body.


                  Last edited by butters; 10-23-2017, 08:40 AM.

                  Comment


                    #24
                    Originally posted by knuklehead92 View Post
                    how many miles did the s50 have before you swapped it in? just curious
                    According to the M3's carfax, it was wrecked at around 117k miles.

                    Comment


                      #25
                      I finally decided to have Matrix do an oil pressure test because the lifter tick would come back here and there. I really should have done it immediately after the rebuild... live and learn. Matrix told me the idle oil pressure was out of spec and all they could do was recommend that I install a new oil pump. This was quite a ways from Corey's shop, so I chalked it up to having a basically new S50 and bit the bullet, and Matrix gave me a decent rate on the installation.

                      The next milestone at this point was the exhaust, which was really getting to me after 6 months. Corey and I had been discussing how he wanted to get experience building an exhaust - he already had the welding skills it was just a matter of bent tubing, a layout concept, and downtime. I was willing to wait as long as it took, and Truman could be made available, so in February we set about preparing. Steven was kind enough to offer the facilities of vintage european for the project. This of course turned into somewhat of another "while we're in there" period that stretched into the summer.

                      I had brought my detailing supplies along from home, in case I ever had the chance to put them to use (PC 7424XP, menzerna line of polishes, uber pads from detailers domain etc). Steven had me do his vert, giving me the opportunity to show some results. The shine was great, but the color change was dramatic:


                      Just in time for a pseudo-indoor gathering in NE Portland, where Stephen Sayer came for a bit of photography:


                      Last edited by butters; 10-23-2017, 08:45 AM.

                      Comment


                        #26
                        Here's a "before" shot of the front half of the exhaust, really quite cobbled together.


                        I chose to move the rear bank flange back towards the front of the car where it belonged, and flex joints on the engine side of both flanges. From there, the tubes would go out to 2.25" diameter, all mandrel bends, a through-style X for the O2 sensor (where the rear bank could also cross over to the driver's side), dual metallic cats, v-band joints, dual vibrant resonators, out to the existing rear end with new and improved hangers.
                        Last edited by butters; 10-23-2017, 08:46 AM.

                        Comment


                          #27
                          Looking forward at the cats:


                          Looking back at what needs to be coped:

                          Comment


                            #28
                            Corey working with this coping contraption:


                            Last edited by butters; 10-23-2017, 03:17 PM.

                            Comment


                              #29
                              Getting there..


                              Last edited by butters; 10-23-2017, 03:20 PM.

                              Comment


                                #30
                                Looking quite good:


                                Last edited by butters; 10-23-2017, 03:23 PM.

                                Comment

                                Working...
                                X