Announcement

Collapse
No announcement yet.

New(ish) owner, 1988 325ic rehab-storation

Collapse
X
 
  • Filter
  • Time
  • Show
Clear All
new posts

    New(ish) owner, 1988 325ic rehab-storation

    Hi! It's new(ish) because I have actually owned it for a year, but I'm just now starting to fix her up. When I bought the car, I had it inspected by a local European specialty shop here in Santa Barbara (Schneider Autohaus) and I had them drain and fill all the vital fluids. I figured that would keep me from burning up any of the expensive bits (diff, tranny, engine) while I made up my mind as to whether I would keep her or not.

    I wasn't even planning to buy an e30, truth be told. I'm a long-time VW guy, and I was searching for a MkIII Cabby. I have some BMW-owning friends who told me that I should check out some BMW convertibles, so, for fun, I test drove an e36 convertible (328i, five-speed) and, while its condition was really nice, it really didn't do anything for me.

    Still looking for a VW, I saw an ad on Craigslist for an e30 'vert for sale just blocks away from me. Long story short, I fell in love on the test drive. On the switchback roads in the hills, the thing was just a hoot to drive. I had a hard time haggling, actually, because I could barely conceal my stupid grin.

    So for the last year, all I did was put gas in it and drive it. 167k on a broken odometer, no maintenance history to speak of, and the damned thing wouldn't die. The shifter feels like it's connected to the tranny with zip ties, and every piece of rubber in the suspension is beyond worn out, but it's STILL fun to drive.

    So, even though I know it would be cheaper to just buy one that's already done (I have been down the restoration route before) I'm keeping her. I'm addressing all the maintenance issues found in the inspection in a hospital triage fashion, with the most-needed items getting addressed first.

    I wanted to offer a "thank you" to the members of this forum because in my internet research on e30's, your site invariably provided the most useful hits, IMO. So I joined up. I don't feel my plans qualify my car for "project" status, so I'll just list what I do here, if that's kosher.

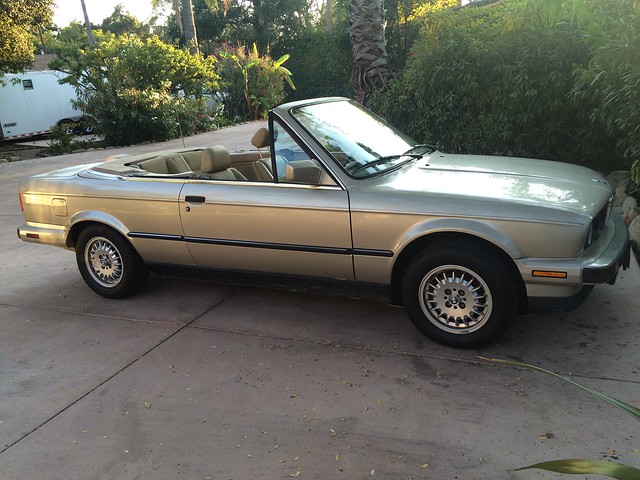
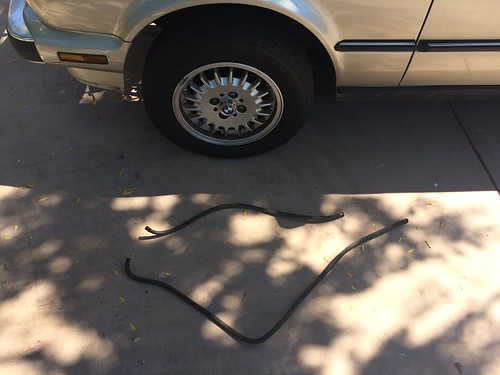
    Here's a pic in all her bronzit glory:

    Last edited by bmwtool; 09-29-2016, 05:15 PM.

    #2
    welcome to the party!

    Comment


      #3
      Thanks for the welcome. :up:

      The first maintenance I did was flushing the old brake fluid. I have no photos of that thrilling procedure, but my next step was getting rid of the aftermarket car alarm. I thought the under-dash wiring looked a little bloated, and this is what I found:


      I followed all the wiring and neatly disconnected it all, the result was this pile:


      5 pounds of useless weight off the nose of the car, I'm sure this will make the handling more balanced.

      Comment


        #4
        Next up was a valve adjustment and new gasket. Only four valves needed adjusting, and the gasket wasn't too bad, but the end plugs were shriveled and hard as a rock. The breather hose was, too, so it got replaced:


        I couldn't resist the temptation to make it a little prettier while I had it apart:


        I wet sanded the raised ribs starting with 400, finishing with 1600, then I polished them before painting with VHT wrinkle finish black. I also replaced the badly worn spark plugs, and installed a new bosch cap and rotor, along with IE plug wires. I had noticed the car missing while climbing hills, and I'm sure the weak ignition system was the culprit. The car definitely runs better now, and it looks slightly less ugly under the hood:

        Comment


          #5
          So I got all the parts to do the timing belt and water pump, including all the coolant hoses, and I decided the best way to tackle this was to pull the intake, too. Much easier access to the throttle body coolant hoses, etc.

          When removing the belts, I discovered a bad bearing in my alternator. Since I had the manifold off, I decided to pull the starter, too, and have them both rebuilt locally. I would hate to button this up, then have the starter die 6 months from now.

          Comment


            #6
            I was only going to replace the cam seal and o-ring, but looking at the crud inside the lower cover, I don't think it all dribbled down the front of the block, so I just couldn't leave it like that.


            After reading all the crank bolt horror stories, I was prepared to do battle, but all I can say is thank God for rust-free west coast cars! Back east, this would probably been a 5-foot breaker bar and torch job, but here, all I did was hit it with some PB Blaster. The next morning, all I did is put the car in 5th gear, and give a big tug with my two footer and it came right out. After a lifetime spent fighting rust, I started giggling. My GF thought I was slightly crazy. :mrgreen:


            For the timing belt crank gear, I figured all I needed was a fairly stout piece of metal bridged across the crank bolt minus its washer. I turned my fan clutch wrench into a multi-use tool by drilling a second hole into it. There was already one hole there, I just enlarged it slightly and drilled a second one using the pulley as a drilling template.


            Two 75mm long 8mm bolts and it came right off.

            Comment


              #7
              Good stuff so far!

              I'll be keeping an eye out.
              My previous build (currently E30-less)
              http://www.r3vlimited.com/board/showthread.php?t=170390

              A 2016 Toyota Tacoma TRD 4x4 Offroad in Inferno is my newest obsession

              Comment


                #8
                Beautiful vert
                Instagram : makeitsnap

                1985 e28 520i

                Comment


                  #9
                  Removing an aftermarket alarm system is one of the most satisfying things to do on any new-to-me car, and always one of the first on the list.

                  I took some pleasure in seeing yours on the ground, so thanks for that!
                  '84 318i - Lapisblau/Schwarz (in cryosleep)
                  '06 330i - Titansilber/Schwarz

                  Comment


                    #10
                    Thanks for the feedback, guys. It really was fun to pull that alarm out, it felt like I was exorcising electrical demons. :D

                    More age-cracked rubber to replace. It wasn't cracked all the way through, but light finger pressure was all it took to break it; I went genuine BMW on this:


                    I'm trying to replace every possible source of leaks. The only one I won't be doing is the fitting on the back of the cylinder head. I didn't see a way to do that one short of pulling the engine. If anyone knows a way to get at it, though, I'd love to hear it! FWIW, this tiny passageway inside the throttle body was the only place I saw any deposits in the cooling system.


                    The hose couplings look rough on the thermostat housing, but that's because I gave it a bath in a muriatic acid solution to remove all traces of corrosion, and it left the aluminum grey. The pitting isn't really very bad at all. Even the bleed screw cleaned up nicely. The temp senders are both new.


                    And lastly, 80" of hard-as-a-rock fuel line. I bought 7 feet of new, and I'll probably do the soft lines under the car, too, while the system is de-pressurized.


                    None of this is very exciting, but I do get a good deal of satisfaction getting all this squared away.
                    Last edited by bmwtool; 10-03-2016, 09:13 PM.

                    Comment


                      #11
                      Great work so far! I want to do the same refresh on my M20.

                      COTM

                      Comment


                        #12
                        I pulled the crank/intermediate seal holder and cleaned up the block and oil pan lip. There was no gasket on the pan, only some silicone goop. I want to stop or slow the leaking pan temporarily until I can drop the pan and do the job right, so I made up a partial cork gasket for this section. But I could NOT get the cover over the shafts and onto the dowels with the gasket material there. I finally gave up and made a temporary gasket out of Permatex #1; I figure it can't be much worse than what was there. I also wet sanded the crank and intermediate snouts to lessen, if not completely remove, the groove from the seals.


                        I hope this doesn't come back to bite me in the ass, but I decided to play with the positioning of the seals a bit so the new seals don't ride directly on the old groove. The most accurate measurement I got was by lubing the seals with ATF, then pulling the cover. I could clearly see where the line left by the ATF was in relation to the groove, and I positioned the seals accordingly. Hope it works.


                        Rebuilt starter back in! It was so easy to do this with the manifold off that I don't regret having it rebuilt as a precautionary measure.


                        Oil return tube back in with new seals. I used mechanics wire to compress the spring instead of zip ties and it worked fine.


                        Got the fuel rail reassembled with rebuilt x415 injectors. The FPR has a Bosch part number, so I'm assuming it's not original. It was working fine before I tore it down and if it acts up, it's easy to access.


                        I'm getting excited to get it all together.

                        Comment


                          #13
                          Damn great work! Doing it right the first time around I see, looks to be in good hands.


                          1992 M tech 2 Convertible - S50 Swap
                          1992 e34 Touring- S50 Swap
                          1992 325i-S50 Swap (SOLD)

                          1995 e36 M3 Mugello Red - S50 (SOLD)
                          1991 325i Convertible Laguna Green (SOLD)
                          1987 325i (SOLD);1992 M tech 2 Convertible (SOLD)
                          1988 325i Convertible Alpine White (SOLD)
                          1991
                          Brilliantrot Convertible 80k Miles (SOLD)
                          1992 325i Convertible Schwarz (SOLD)
                          1992 318i Convertible Project-Finished (SOLD)

                          Comment


                            #14
                            Originally posted by KIRIEIW View Post
                            Damn great work! Doing it right the first time around I see, looks to be in good hands.
                            Thanks! I'm trying to get the drudgery out of the way and move on to the fun stuff!

                            I got my ass kicked a bit trying to reassemble the wiring and hoses under the intake on the driver's side. It was covered in oil when I took it apart, and the pics I took weren't helpful at all. I think I finally have it sussed out, and I took some better pics in case anyone should need them for reference. I'm focused on the metal holder that bolts up to the underside of the intake, three frames, moving left to right:


                            Also: I found these two electrical connectors hiding under the fuse box. The first has two wires inside a six-wire connector that was broken at some point.


                            …and this guy


                            If anybody knows what they're for, I'd love to know. :up:

                            Comment


                              #15
                              Would the oil return tube be hard to do without the intake off?? I'm pretty sure that's where mines leaking the most oil from besides the valve cover.
                              88 d21 draggin pavement
                              89 dirty30 kissin earth

                              Im just here to learn new things and meet new people.

                              Comment

                              Working...
                              X