Announcement

Collapse
No announcement yet.

Project Just the Tip: E30 M30B34/5 VNT Turbo Vert

Collapse
X
 
  • Filter
  • Time
  • Show
Clear All
new posts

    #16
    Suspension Update

    I snapped a couple quick shots of the front and rear subframe today, to show off the stuff I welded on from Garagastic. It is quite nerve wracking to grind out the slots--every tiny slip had me questioning if this car will ever drive straight again!
    Click image for larger version

Name:	IMAG0367[1].jpg
Views:	1
Size:	44.3 KB
ID:	7175787
    In addition to the rear adjusters, I also welded in reinforcements on the engine mounts, front sway bar mount, and the differential mount.
    Click image for larger version

Name:	IMAG0368[1].jpg
Views:	1
Size:	41.3 KB
ID:	7175788
    I honestly would not have thought of doing that if it wasn't for picking up a copy of FrankM E30's excellent guide on the M30 swap. I have no doubt I could have figured all this out (eventually), but that guide really cut down the time to do so!

    Braking Update

    Late last night, after hours of feverish research, I made a ridiculous (at the time) impulse buy:

    This is a set of 1990 300zx (Z32) aluminum calipers. I was looking up DIY brake upgrades, switching back and forth between the Corrado G60/RX7 write up, the Aussie e30 braking thread, and randomly searching 4-piston calipers on eBay...it just kinda happened
    Click image for larger version

Name:	Z32 Calipers.jpg
Views:	1
Size:	94.4 KB
ID:	7175784
    I wish I could say I knew it would work, but I didn't--and I still don't. However, necessity is the mother of invention, and through a bit more research, I may have found a way :)

    After poring through the Brembo catalog, and taking a few of my own measurements, it looks like I've found a few contenders for OEM brake rotors. The Z32 front calipers require a 280mm by 26mm disc, and the rear calipers require a 297mm by 18mm disc.

    Turns out, the 2004 Hyundai Sonata has a 280x26 vented front rotor, and has a height of 34.2mm to the underside of the hat. It's hub bore is a little bigger (69mm to the E30's 66mm) and it's bolt pattern is 4x114.3, but that can be fixed with a spacer ring and a bit of slotting.
    Click image for larger version

Name:	04 Hyundai Sonata Rotor.jpg
Views:	1
Size:	52.1 KB
ID:	7175785
    As for the rear, that was a bit trickier. It's not perfect, but the 85-87 Toyota Cressida vented rear rotor seems to be the best match. It's only 269mm, but it has the 18mm width, and has the ability to handle a pad up to 72mm tall. It's got a height of 55.1mm to the inside of the hat, compared to the E30's 53mm, but I believe a spacer could fix that. The inside diameter is 167mm, which is a little bigger than the E30's 161mm, but I think the parking brake should still work...I guess I'll find out soon enough! Other than that, it's 4x114.3 like the front rotor, but has a hub bore of 60mm, so it'll have to be slotted, and bored out 2mm.
    Click image for larger version

Name:	85to87 Toyota Cressida Rear Rotor.jpg
Views:	1
Size:	101.8 KB
ID:	7175786
    ...It's not road rage--it's simply preemptory defensive driving...:D

    1989 BMW 325i Convertible "Desire" (M30 VNT Turbo Swap in Progress)
    1981 Porsche 924 S2 Turbo "Bast"
    1980 Porsche 924 S1 Turbo (20V Turbo AAN swap on back burner)
    1978 Dodge Tradesman B200 "Sasha"
    1966 Lincoln Continental "Gracie"


    Comment


      #17
      Here's a couple extra shots of the subframes:
      Click image for larger version

Name:	IMAG0366[1].jpg
Views:	1
Size:	57.7 KB
ID:	7175789
      Click image for larger version

Name:	IMAG0369[1].jpg
Views:	1
Size:	36.9 KB
ID:	7175790
      And the diagrams of the E30 front and rear rotors, for reference:
      Click image for larger version

Name:	86to89 BMW 325i Front Rotor.jpg
Views:	1
Size:	87.9 KB
ID:	7175791
      Click image for larger version

Name:	86to89 BMW 325i Rear Rotor.jpg
Views:	1
Size:	87.5 KB
ID:	7175792
      ...It's not road rage--it's simply preemptory defensive driving...:D

      1989 BMW 325i Convertible "Desire" (M30 VNT Turbo Swap in Progress)
      1981 Porsche 924 S2 Turbo "Bast"
      1980 Porsche 924 S1 Turbo (20V Turbo AAN swap on back burner)
      1978 Dodge Tradesman B200 "Sasha"
      1966 Lincoln Continental "Gracie"


      Comment


        #18
        sub'ed!
        Originally posted by Matt-B
        hey does anyone know anyone who gets upset and makes electronics?

        Comment


          #19
          Originally posted by george graves View Post
          sub'ed!
          Thanks! I hope this will prove to be an adventure for all of us--if we're lucky, the kind with a happy ending ;)

          FWIW, I've been editing the first post. It is an active list of all modifications, and I am adding links to the the parts I bought/will buy, and the various forum threads and websites that helped me consider these mods.

          Bodywork Update

          Main repair panel has finished being welded in and ground back down (mostly) flush, along with all the other spots underneath the car. Pictures will be up in the next few days, as I get back in there to do the battery tray and several nail/screw holes (don't ask!)

          Braking Update


          Pull-A-Part had both a '04 Hyundai Sonata, and its sister car, the '04 Kia Optima. I took one rotor from each. Preliminary fitting revealed the need for a ~5mm spacer under the rotor, so we will be machining out a prototype--one that will have the 66mm to 69mm hub bore adapter built in to it :D
          ...It's not road rage--it's simply preemptory defensive driving...:D

          1989 BMW 325i Convertible "Desire" (M30 VNT Turbo Swap in Progress)
          1981 Porsche 924 S2 Turbo "Bast"
          1980 Porsche 924 S1 Turbo (20V Turbo AAN swap on back burner)
          1978 Dodge Tradesman B200 "Sasha"
          1966 Lincoln Continental "Gracie"


          Comment


            #20
            The Citroen C5 Break 2.0L has 283mm x 26mm discs too that might be worth checking out - had height is very close to the e30, and the centre bore is 66mm. You just need to redrill for 4 x 100 (I think Citroens are 4 x 10⁸).
            My e30: OEM+ with M30B35

            Comment


              #21
              Subscribed. Looks like a helluva plan!

              Comment


                #22
                Originally posted by lukeADE335i View Post
                The Citroen C5 Break 2.0L has 283mm x 26mm discs too that might be worth checking out - had height is very close to the e30, and the centre bore is 66mm. You just need to redrill for 4 x 100 (I think Citroens are 4 x 10⁸).
                You make a very good point, but I am not in Europe, so those rotors are not easily available. Believe me, I wish: you should see what rotors they are putting on the top-of-the-line Fiat Abarth Turbo over there!

                My plan is to build this with components that are easily available at most any parts stores in America, so that repairs and replacements can be headache free =)

                Bodywork Update

                The welding and grinding work is finally done, and finished off with coats of etching primer and sealing primer. I decided to use the asphalt sealant (available at Lowes) to seal up all the work on the underside, and a heavy-duty paintable silicone to seal it up topside. Afterwards, the entire underbody was coated with 3M Professional Undercoating.

                Click image for larger version

Name:	IMAG0407.jpg
Views:	1
Size:	74.7 KB
ID:	7176131
                Click image for larger version

Name:	IMAG0408.jpg
Views:	1
Size:	63.9 KB
ID:	7176132
                Click image for larger version

Name:	IMAG0409.jpg
Views:	1
Size:	73.0 KB
ID:	7176134

                On to the rest! I decided to try my luck at bodywork, and chose the driver's rear quarter as my test bed. It suffered the same maladies as the rest of the paint on the car--severe fading and cracks due to sun damage. I ground down and feathered the pits, then tried to sand and fill the cracks with filler primer.

                Click image for larger version

Name:	IMAG0406.jpg
Views:	1
Size:	60.6 KB
ID:	7176133
                Click image for larger version

Name:	IMAG0419.jpg
Views:	1
Size:	70.1 KB
ID:	7176135

                No dice.

                So, after more research, it looks like I'm going to have to strip it back to the E-coat, and start from there :(

                Does anyone know a better way to do that besides a coarse flap disc? I'd like to preserve the E-coat, if at all possible...

                Braking Update

                My brother and I have worked out some preliminary CAD drawings of the hub adapter for the front. It looks like we will be replacing the existing 10mm spacer with this, and the rotor will ride on top of it! It clears the rims, so there that...

                Also, I may have stumbled across a better rotor for the rear, but I need more measurements. Behold the 1988 Isuzu Impulse Rear Rotor!


                It has some very similar dimensions, and even the correct bolt pattern! I still need to figure out the inside diameter, to figure out if the parking brake shoes will work properly, but it looks very promising :)

                Engine Update

                I scored a complete cylinder head and intake manifold from a grungy, but serviceable M30B35 (thanks again, PullAPart!), so my B34 head is now up on eBay, along with the CarTech water-to-air intercooler and RotoMaster T04E. I dropped off the new head at my favorite machine shop today. Turns out their mill can do a 50 RA surfacing job, so I'm all set. I should get it back in a week, cleaned and disassembled so I can do the port work and ceramic coat the exhaust ports, valves, and combustion chambers. I will get pictures up when I can.
                Last edited by HappyPuppy; 04-07-2015, 08:11 PM.
                ...It's not road rage--it's simply preemptory defensive driving...:D

                1989 BMW 325i Convertible "Desire" (M30 VNT Turbo Swap in Progress)
                1981 Porsche 924 S2 Turbo "Bast"
                1980 Porsche 924 S1 Turbo (20V Turbo AAN swap on back burner)
                1978 Dodge Tradesman B200 "Sasha"
                1966 Lincoln Continental "Gracie"


                Comment


                  #23
                  Bodywork Update

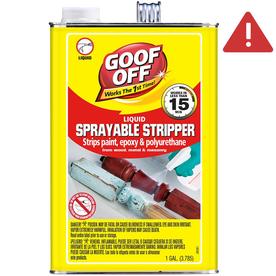
                  After doing some research, I decided to try the chemical route to strip the old weathered paint off the car. I saw OSPHO suggested many times, but since it was expensive and not readily available, I went down to Lowe's and gave this stuff a shot:


                  --FAIR WARNING-- Buy chemical gloves, and wear a long sleeve jacket and face protection. This stuff will burn you if it gets on you!

                  However, the results were pretty amazing. I went through the process of spraying, waiting, then using the putty knife to strip the paint off about three times per section, and that was it :D
                  Click image for larger version

Name:	IMAG0429.jpg
Views:	1
Size:	66.3 KB
ID:	7176258
                  Eventually this is what I was left with:
                  Click image for larger version

Name:	IMAG0427.jpg
Views:	1
Size:	67.1 KB
ID:	7176259
                  Click image for larger version

Name:	IMAG0428.jpg
Views:	1
Size:	56.2 KB
ID:	7176260

                  Engine Update

                  The very crusty B35 cylinder head has returned from the machine shop, disassembled and ready for me to try my hand at ceramic coating :o
                  Click image for larger version

Name:	IMAG0432[1].jpg
Views:	1
Size:	53.9 KB
ID:	7176262
                  It was good to see things moving along with the head, but a recent purchase has overshadowed and outshone everything else--at least for the moment....
                  Click image for larger version

Name:	IMAG0421.jpg
Views:	1
Size:	75.6 KB
ID:	7176261
                  ...It's not road rage--it's simply preemptory defensive driving...:D

                  1989 BMW 325i Convertible "Desire" (M30 VNT Turbo Swap in Progress)
                  1981 Porsche 924 S2 Turbo "Bast"
                  1980 Porsche 924 S1 Turbo (20V Turbo AAN swap on back burner)
                  1978 Dodge Tradesman B200 "Sasha"
                  1966 Lincoln Continental "Gracie"


                  Comment


                    #24
                    AAAAAAAAAWWWWWWW YYYYYEEEEEAAAAAAh indeed…
                    Originally posted by Andy.B
                    Whenever I am about to make a particularly questionable decision regarding a worryingly cheap diy solution, I just ask myself, "What would Ether-D do?"
                    1987 325iS m30b34 Muscle car (Engine electrical phase)
                    ~~~~~~~~~~
                    I was born on 3/25…
                    ~~~~~~~~~~

                    Comment


                      #25
                      This is epic


                      1989 325is l 1984 euro 320i l 1970 2002 Racecar
                      1991 318i 4dr slick top


                      Euro spec 320i/Alpina B6 3.5 project(the never ending saga)
                      Vintage race car revival (2002 content)
                      Mtech 2 turbo restoration
                      Brilliantrot slick top "build"

                      Comment


                        #26
                        Bodywork Update

                        After finishing up the last of the stripping job--which ended up including the windshield frame--I wiped down the whole thing with MEK, then gave it two coats of etching primer. Unfortunately, the rotisserie frame kept me from getting some spots as well as I wanted to, but I will get them later, when the car is back on the ground.

                        NOTE
                        : To anyone using Rustoleum Etching Primer, two words of warning.
                        • Let it sit for a week after you shoot a couple coats. The can may say 2-3 hours, but it's pretty delicate at that point.
                        • Do not use MEK after you put it on, because it will take it right back off! Use Mineral Spirits to clean it between and after coats.

                        Rain kept me from doing terribly much--didn't want to risk getting moisture into the paint :| I managed to get one coat of filler primer on each rear quarter, and that was about it.

                        Instead, I spent time sanding the interior, and getting it ready for paintwork. So many nooks and crannies!
                        Click image for larger version

Name:	IMAG0430.jpg
Views:	1
Size:	71.9 KB
ID:	7176334

                        Braking Update

                        My rear rotors showed up, and they immediately went under the knife. I shaved the hub bore from 57mm to 62mm, gave them a 45-degree back cut, and...
                        Click image for larger version

Name:	IMAG0438.jpg
Views:	1
Size:	69.0 KB
ID:	7176335
                        It fits, and clears the backing plate with no problems! That leaves only one issue: I have to find out if the 160mmx25mm parking brake shoes will stretch enough to accommodate the 170mm inside diameter of the hat, or if I get to search for something that will--which so far has been as appealing as

                        Engine Update

                        I think I'm beginning to lose my already tenuous grip on reality...
                        Click image for larger version

Name:	Wiseco Piston.jpg
Views:	1
Size:	72.0 KB
ID:	7176336
                        If this piston (and its six friends) look a bit strange to you, don't feel bad--they were made for a Mitsubishi 3000GT!

                        "What had happened was" I was at work, very late in the night, researching the pros and cons of forged pistons for my build. I was told earlier in the night from the MaxSil rep that while plenty of people use their pistons in turbo M30s, they do not recommend more than 14psi of boost, and any detonation will screw the pooch. I was pretty disheartened by that: I was already a bit nervous about blowing $500 on pistons anyway, so the $900-$1300 on custom forged pistons was more like:


                        Forget midichlorians or the Q continuum, desperation is quite possibly the most powerful force in the universe. I looked to the internet for answers--and eventually, I came up with two plans :? I decided on either using the H22 Prelude forged rods, and running either the Mitsubishi 3000GT or Ford 4.0 XR6 pistons, or the S38 rods, and using most of a set of Ford 5.0 Coyote V8 pistons. What sealed the deal was THIS
                        Click image for larger version

Name:	Wiseco Piston Info.jpg
Views:	1
Size:	81.9 KB
ID:	7176337
                        At $200, I just couldn't pass it up :D Considering forged H22 rods are about $200 or so as well, I could just about squeak this out for the price of the MaxSil set! I did the calculations over and over again, then ran them by my brother, just to be sure. I've reprinted them below, just for reference:

                        ENGINE DATA

                        Deck Height 217.5mm 8.563"
                        Stroke 86mm
                        Bore 92mm


                        PISTON/ROD RELATIONSHIP

                        M30
                        Total Rod/Piston Length 174.85mm
                        Total Stroke Length 217.85mm

                        CXRacing/3000GT Hybrid
                        Total Rod/Piston Length 174.25mm
                        Total Stroke Length 217.25mm

                        S38/3000GT Hybrid
                        Total Rod/Piston Length 175.75mm
                        Total Stroke Length 218.75mm


                        ROD DATA

                        M30
                        Rod Big End Bore 52mm 2.047"
                        Rod Big End Width 24mm 0.940"
                        Rod Length 135mm 5.315"

                        S38
                        Big End Bore 52mm 2.047"
                        Big End Width 24mm 0.940"
                        Length 144mm 5.670"
                        Small End Bore 22mm 0.866"
                        Small End Width 24mm 0.940"
                        H22
                        Big End Bore 51mm 2.008"
                        Big End Width 23.75mm 0.935"
                        Length 143mm 5.630"
                        Small End Bore 22mm 0.866"
                        Small End Width 23.75mm 0.935" CXRacing "S38"
                        Big End Bore 52mm 2.047"
                        Big End Width 24mm 0.940"
                        Length 142.5mm
                        Small End Bore 22mm 0.866"
                        Small End Width 24mm 0.940"


                        PISTON DATA
                        M30B34

                        Compression (Pin) Height 39.85mm 1.569"
                        Diameter 92.00mm 3.622"
                        Pin Offset 1.016mm 0.040"
                        Pin Diameter 22.0mm 0.866"
                        Total Piston Length 73.85mm 2.907"

                        Wiseco 3000GT (Mistake)

                        Compression (Pin) Height 31.75mm 1.250"
                        Diameter 94.0003mm 3.7008"
                        Pin Offset 1.016mm 0.040"
                        Pin Diameter 22.0mm 0.866"

                        Ford 5.8 Supercharged (Shelby GT500)

                        Compression (Pin) Height 31.04mm 1.222"
                        Diameter 93.4974mm 3.681"
                        Pin Diameter 22.0mm 0.866"

                        Ford 5.0 Coyote V8

                        Compression (Pin) Height 30.99mm 1.22"
                        Diameter 92.1766mm 3.629"
                        Pin Diameter 22.0mm 0.866"

                        Ford 4.0 XR6

                        Compression (Pin) Height 30.89mm 1.21"
                        Diameter 92.286mm 3.633"
                        Pin Diameter 22.0mm 0.866"

                        While the math checked out, the labor did not--I called my machine shop that morning, and asked them about boring out the cylinders to 94mm, and the big end of the connecting rods to 52mm. He quoted me $160 for the cylinders (not bad), though he was perturbed by the amount I wanted taken out of the block. The rods were a different story--I started to zone out after the words "several hundred dollars" was bandied about (probably due to shock). Dismayed, I took the the interwebs again, and found an intriguing solution: the CX Racing "S38" rods. They had the same dimensions as the actual S38 rod, barring one crucial one: the length was 142.5mm--not the 144mm and actual S38 rod is. I had found my answer!
                        Last edited by HappyPuppy; 04-22-2015, 05:47 AM.
                        ...It's not road rage--it's simply preemptory defensive driving...:D

                        1989 BMW 325i Convertible "Desire" (M30 VNT Turbo Swap in Progress)
                        1981 Porsche 924 S2 Turbo "Bast"
                        1980 Porsche 924 S1 Turbo (20V Turbo AAN swap on back burner)
                        1978 Dodge Tradesman B200 "Sasha"
                        1966 Lincoln Continental "Gracie"


                        Comment


                          #27
                          Bodywork Update

                          The filler primer showed up from Summit, and I got to try my hand at using an HVLP gun :???: I have to say, it was not difficult to get it to spray--but to spray correctly, that took some fiddling. The Harbor Freight guns are cheap, but they have a lot of adjustability, and dialing it in is crucial for a good spray pattern.

                          Fortunately for me, I was doing the trunk, interior, and engine compartment, so I could have my learning experiences on more forgiving areas. The result?
                          Click image for larger version

Name:	IMAG0454.jpg
Views:	1
Size:	73.7 KB
ID:	7176537
                          Not too bad, for my first go at it ;)

                          I am waiting for the primer coat to fully dry, then it's time to break out the boat paint!

                          Engine Update

                          I had a bunch of stuff finally show up!
                          Click image for larger version

Name:	IMAG0443.jpg
Views:	1
Size:	74.3 KB
ID:	7176538
                          The rods got here, and went immediately off to the machine shop to be thoroughly inspected. I'll post the results here when they come back, in case anyone else wants to try out CX Racing's rods.

                          Most of the Cerakote stuff showed up, so I finally did a gut check, and got to work prepping the cylinder head :crazy: I taped up everything I didn't want sand blasted, then put it in my blast cabinet.
                          Click image for larger version

Name:	IMAG0442.jpg
Views:	1
Size:	60.2 KB
ID:	7176539
                          The combustion chambers were terrifying enough, but blasting the cam journals was so much more! I really do hope this stuff does what it's supposed to...
                          Click image for larger version

Name:	IMAG0455.jpg
Views:	1
Size:	76.2 KB
ID:	7176540

                          Braking Update

                          I finally inspected the calipers thoroughly: no signs of damage, no torn boots :) Cracked open the Caliper Paint Kit, cleaned the crap out of them, and started brushing on the coats.
                          Click image for larger version

Name:	IMAG0456.jpg
Views:	1
Size:	103.4 KB
ID:	7176541
                          After three coats, they are looking stellar!
                          ...It's not road rage--it's simply preemptory defensive driving...:D

                          1989 BMW 325i Convertible "Desire" (M30 VNT Turbo Swap in Progress)
                          1981 Porsche 924 S2 Turbo "Bast"
                          1980 Porsche 924 S1 Turbo (20V Turbo AAN swap on back burner)
                          1978 Dodge Tradesman B200 "Sasha"
                          1966 Lincoln Continental "Gracie"


                          Comment


                            #28
                            What type(s) of Cerakote are you using, and where?

                            Comment


                              #29
                              Originally posted by CorvallisBMW View Post
                              What type(s) of Cerakote are you using, and where?
                              I'll break it down :)

                              Head

                              Pistons

                              Exhaust Manifold

                              Turbocharger

                              That's what I've figured out so far...though I'm open to any suggestions. Near as i can tell, no one's ever coated the turbine impeller before, but it's a common practice on the impellers of jet aircraft. I figure I'll coat them, then send them off to get rebalanced.


                              Two words of caution though:

                              • The M30 head will not fit in a standard oven--it's about 2 inches too narrow. Either buy/build an oven that fits, or take a jack and push the walls out a bit ;D
                              • Do not buy anything other than the tester sizes! I bought either pints or quarts, and both are ridiculously too much for this project. According to Cerakote, these chemicals only have a shelf life of 1 year

                              Since I bought too much, I'm actually debating on coating all kinds of stuff--block, intake manifold, transmission parts, etc. Also, if any of you guys live near Chattanooga and want to coat some stuff, let's talk!


                              Anyways, on to the updates!


                              Braking Update


                              Finally got a few shots of the finished calipers.
                              Click image for larger version

Name:	IMAG0457.jpg
Views:	1
Size:	70.6 KB
ID:	7176610
                              If you really look close, you can see a few blemishes, but I'm happ with them :)


                              I finally got in some time with the lathe, and got the front hub adapters roughed in. My brother will be finishing them off for me, since he has access to more precise equipment.

                              Click image for larger version

Name:	IMAG0459.jpg
Views:	1
Size:	48.5 KB
ID:	7176611
                              I will be uploading the CAD file once we're finished, in case anyone wants to replicate this.

                              Engine Update


                              The coating has begun! I got the "piston coat" on the head and ports...
                              Click image for larger version

Name:	IMAG0464.jpg
Views:	1
Size:	44.3 KB
ID:	7176612
                              ...cooked it in the oven at 300, then went back and did the the dry film lubricant on the cam journals and spring perches.
                              Click image for larger version

Name:	IMAG0463.jpg
Views:	1
Size:	37.6 KB
ID:	7176613
                              After burnishing them with #0000 steel wool, they feel really smooth--which is a big relief after sandblasting them!


                              Next, I did the same thing to the valves...
                              Click image for larger version

Name:	IMAG0467.jpg
Views:	1
Size:	93.4 KB
ID:	7176614
                              They look really cool...I just hope they work good, too
                              ...It's not road rage--it's simply preemptory defensive driving...:D

                              1989 BMW 325i Convertible "Desire" (M30 VNT Turbo Swap in Progress)
                              1981 Porsche 924 S2 Turbo "Bast"
                              1980 Porsche 924 S1 Turbo (20V Turbo AAN swap on back burner)
                              1978 Dodge Tradesman B200 "Sasha"
                              1966 Lincoln Continental "Gracie"


                              Comment


                                #30
                                Wow, you're coating crazy! :P

                                I'll be interested to see if you can tell any difference with the low-friction coatings. I know the exhaust stuff is fantastic for reducing underhood temps.

                                Comment

                                Working...
                                X