
Well, finally got around to finishing the Lukebox install in my wife's 87 325 DD'er. Sorry for the long read. Trying to help out with a semi-diy.
CAUTION: If you plan on running rear seats without armrest, DO NOT under any circumstances listen to the box/sub before putting everything back in. You will hate yourself, and possibly the setup, until you get a rear seat with armrest. At least, I know I do.
Having said that, I am a semi-pro installer and was really looking forward to hearing Luke's box. Before buying this box I built a rear-firing sealed enclosure that sounded decent. A little muddy, but not bad. My major beef with this setup was the SERIOUS amount of trunk rattle. I am so used to my 91 318is with a sealed enclosure that fires forward through holes in the rear seat and is sealed to the cabin that I am used to pretty accurate bass and zero trunk rattle.
So that's the background. Here is the relevant equipment:
12" Lukebox ported through rear deck
12" RE Audio Rex12d4 @ 2ohms
POS Sony 800w peak (yah right) XM-1252GTR 170w RMS @ 2ohms
Kenwood KDC-X889 Excelon MP3 Receiver
First impressions upon receiving. Quality is top notch. This just made me more anxious to hear it. Luke also includes carpet and a beauty board template which is very nice for the non-installers that purchase. I did not test the template as I did not use it, but judging from the rest of the work, it would have been great. I did not use the carpet either as I buy big rolls (250ft) of black and grey from a local supplier. This is a VERY good kit to buy for the DIY'er, no having to hunt down anything or make templates.
Installation:
First thing to do is decide where your amp will be mounted so you can locate your hole for your wiring. Drill it. Seal it up with caulk and use a zip tie on each side to prevent your wire from moving once installed. This will also help to keep the wire from moving while your caulk is drying. Now pull out the back half of the factory sound installation if you have it still in or don't drive a 318. It will not fit with the insulation in unless you hammer in your rear deck speaker bulges. Then you are going to want to cut out the rear deck sheet metal for the ports. There are some factory dimples that make a nice reference for you on location of the holes. I wish I would have taken pictures of this part for you guys, but did not. The holes don't have to be perfect, I just cut 2 nice squares that I knew would be big enough for the ports and would be over the port holes in the box.
Next step, install the sub box AND shoot 2 long drywall screws or wood screws through your back firewall and into the box. This will pull the box into it's final position (sealing it to the cabin as well) and make it possible for you to get accurate locations for the ports. Install your amplifier in it's final location. Then put the ports into their position through the metal rear deck (through the holes you cut). Put painter's tape on the tops of the ports and run a bead of "monkey snot" AKA "gorilla snot" around the tops of them. Then put your carpeted rear deck on as if reinstalling it. Press down on where the ports are from the top. When you pull the deck back off the monkey snot will stay attached to the rear deck giving you some nice circles locating your port cuts. Cut them out.
Now you can put your rear deck back in and put the ports through. Optional: install some closed cell foam around the bottom of the ports to seal them in the box. I did not do this yet, but will as there is some leakage into the trunk. Install the rear deck and rear seats. If you want to punish yourself go ahead and listen to it before putting the back seat on. I did, and wish I hadn't. I lost a minimum of 20% spl even with pulling out as much foam as I dared from behind the rear seat. That foam is dense as hell.
Lastly pretty up all your wiring and use Luke's template to make your beauty board. I used my old beauty board as a template since my box and Luke's were almost identical in depth and very similar in the other dimensions. There you go, DONE. You now have a custom ported $500 - $800 install for much less. My buddy paid $800 (before I started doing audio) at a Custom Sounds for something VERY similar to Luke's kit.
Audio Performance:
Now bear in mind I am comparing this setup to a MUCH more powerful one in my car. We're talking 10x the power and a sub that cost 6x as much as this one. I'll also compare it to the same sub in my sealed enclosure. Compared to the rear firing setup this is a much more accurate and pleasing reproduction of frequencies. Much tighter and definitely louder as well with the rear seat out. With the rear seat in my rear firing setup was louder but the bass was muddy. No extra trunk space was sacrificed to accommodate the Lukebox as our boxes were remarkably similar in dimension. Obviously the ported design is MUCH more efficient than either one of my sealed setups. I'm only throwing 170w RMS (doubt it, this battery runs at maybe 13.5v) according to Sony at this setup and it has good results. Will have to bust out the cheesy radioshack SPL meter once the fold down rear seat comes in.
Now, compared to my more expensive build... this setup leaves a bit to be desired. Keep in mind I am an audiophile, not just a bass head. I run my setup at maybe 40% of it's capabilities. I just like very clean sounding music with a small emphasis on the bottom end. My sealed setup reproduces everything but the lowest frequencies very well. Luke's box covered those lows better, but fell off on more punchy bass. Again trunk space is very similar as my box is ~1.2ft*3 and Luke's can't be far from that. I should have measured it. With the power level and sub that are in the box it would be unfair to compare SPL differences. My sealed enclosure is very easily capable of roof flex while this one (at least with the rear seat in) won't even come close to 120db.
Bottom line: I am very happy with the purchase. If you plan on getting a fold down rear seat or doing something custom to your current one, this is the best bang for the buck you can get. I highly recommend this kit. Thanks Luke for saving me tons of time and money on this car...
Let me know if you have any questions about the install or anything really.
On to the pictars. :-D


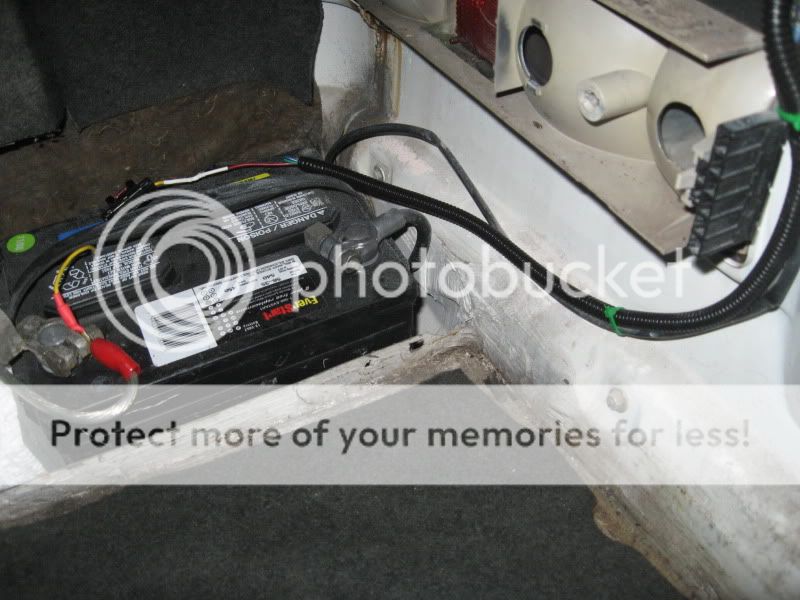
I also installed a keyless entry system which the wife is already loving. I guess it makes the car feel "not-so-old." Look at the sexy wire loom... I :wub: cable management... it's the geek in me.


CAUTION: If you plan on running rear seats without armrest, DO NOT under any circumstances listen to the box/sub before putting everything back in. You will hate yourself, and possibly the setup, until you get a rear seat with armrest. At least, I know I do.
Having said that, I am a semi-pro installer and was really looking forward to hearing Luke's box. Before buying this box I built a rear-firing sealed enclosure that sounded decent. A little muddy, but not bad. My major beef with this setup was the SERIOUS amount of trunk rattle. I am so used to my 91 318is with a sealed enclosure that fires forward through holes in the rear seat and is sealed to the cabin that I am used to pretty accurate bass and zero trunk rattle.
So that's the background. Here is the relevant equipment:
12" Lukebox ported through rear deck
12" RE Audio Rex12d4 @ 2ohms
POS Sony 800w peak (yah right) XM-1252GTR 170w RMS @ 2ohms
Kenwood KDC-X889 Excelon MP3 Receiver
First impressions upon receiving. Quality is top notch. This just made me more anxious to hear it. Luke also includes carpet and a beauty board template which is very nice for the non-installers that purchase. I did not test the template as I did not use it, but judging from the rest of the work, it would have been great. I did not use the carpet either as I buy big rolls (250ft) of black and grey from a local supplier. This is a VERY good kit to buy for the DIY'er, no having to hunt down anything or make templates.
Installation:
First thing to do is decide where your amp will be mounted so you can locate your hole for your wiring. Drill it. Seal it up with caulk and use a zip tie on each side to prevent your wire from moving once installed. This will also help to keep the wire from moving while your caulk is drying. Now pull out the back half of the factory sound installation if you have it still in or don't drive a 318. It will not fit with the insulation in unless you hammer in your rear deck speaker bulges. Then you are going to want to cut out the rear deck sheet metal for the ports. There are some factory dimples that make a nice reference for you on location of the holes. I wish I would have taken pictures of this part for you guys, but did not. The holes don't have to be perfect, I just cut 2 nice squares that I knew would be big enough for the ports and would be over the port holes in the box.
Next step, install the sub box AND shoot 2 long drywall screws or wood screws through your back firewall and into the box. This will pull the box into it's final position (sealing it to the cabin as well) and make it possible for you to get accurate locations for the ports. Install your amplifier in it's final location. Then put the ports into their position through the metal rear deck (through the holes you cut). Put painter's tape on the tops of the ports and run a bead of "monkey snot" AKA "gorilla snot" around the tops of them. Then put your carpeted rear deck on as if reinstalling it. Press down on where the ports are from the top. When you pull the deck back off the monkey snot will stay attached to the rear deck giving you some nice circles locating your port cuts. Cut them out.
Now you can put your rear deck back in and put the ports through. Optional: install some closed cell foam around the bottom of the ports to seal them in the box. I did not do this yet, but will as there is some leakage into the trunk. Install the rear deck and rear seats. If you want to punish yourself go ahead and listen to it before putting the back seat on. I did, and wish I hadn't. I lost a minimum of 20% spl even with pulling out as much foam as I dared from behind the rear seat. That foam is dense as hell.
Lastly pretty up all your wiring and use Luke's template to make your beauty board. I used my old beauty board as a template since my box and Luke's were almost identical in depth and very similar in the other dimensions. There you go, DONE. You now have a custom ported $500 - $800 install for much less. My buddy paid $800 (before I started doing audio) at a Custom Sounds for something VERY similar to Luke's kit.
Audio Performance:
Now bear in mind I am comparing this setup to a MUCH more powerful one in my car. We're talking 10x the power and a sub that cost 6x as much as this one. I'll also compare it to the same sub in my sealed enclosure. Compared to the rear firing setup this is a much more accurate and pleasing reproduction of frequencies. Much tighter and definitely louder as well with the rear seat out. With the rear seat in my rear firing setup was louder but the bass was muddy. No extra trunk space was sacrificed to accommodate the Lukebox as our boxes were remarkably similar in dimension. Obviously the ported design is MUCH more efficient than either one of my sealed setups. I'm only throwing 170w RMS (doubt it, this battery runs at maybe 13.5v) according to Sony at this setup and it has good results. Will have to bust out the cheesy radioshack SPL meter once the fold down rear seat comes in.
Now, compared to my more expensive build... this setup leaves a bit to be desired. Keep in mind I am an audiophile, not just a bass head. I run my setup at maybe 40% of it's capabilities. I just like very clean sounding music with a small emphasis on the bottom end. My sealed setup reproduces everything but the lowest frequencies very well. Luke's box covered those lows better, but fell off on more punchy bass. Again trunk space is very similar as my box is ~1.2ft*3 and Luke's can't be far from that. I should have measured it. With the power level and sub that are in the box it would be unfair to compare SPL differences. My sealed enclosure is very easily capable of roof flex while this one (at least with the rear seat in) won't even come close to 120db.
Bottom line: I am very happy with the purchase. If you plan on getting a fold down rear seat or doing something custom to your current one, this is the best bang for the buck you can get. I highly recommend this kit. Thanks Luke for saving me tons of time and money on this car...
Let me know if you have any questions about the install or anything really.
On to the pictars. :-D
I also installed a keyless entry system which the wife is already loving. I guess it makes the car feel "not-so-old." Look at the sexy wire loom... I :wub: cable management... it's the geek in me.


Comment