

With our cars being more than 20 years old now, it's more than likely your blower motor will shit the bed soon.
IF YOU BLOWER ONLY WORKS ON SETTING 4, REPLACE YOU FAN RESISTOR.
Now lets say your blower motor goes kaput like mine did. Doesn't work on any speed. You have a few options:
1. Buy OEM blower motor for $300.
2. Buy aftermarket blower motor for $150.
3. Rebuild blower motor for $10 ($17 if you need contact cleaner).
4. Do nothing.
If you decide to choose option 3, horay for you smart man/woman!
The only limiting factor of these blowers are the brushes. They are over 100-year old technology. The blower motor itself has sintered bearings and is designed to easily outlast the brushes.
So lets begin.
STEP 1:
Remove said blower motor from your car. There are many ways to go about this, and many videos on how to do so. It's pretty straight-forward, so get to it.
STEP 2::
Inspect blower for damage. Check that the fans are not damaged. It should look something like this.

OPTIONAL: Flushing out the bearings. I recommend doing this, as the carbon dust from the worn brushes will easily make its way to the bearings and destroy them. Remove the fans from either side, this can be done by holding both fans and twisting while pulling. BE PATIENT, THE FANS ARE BRITTLE PLASTIC AND ARE EASILY BROKEN.
The fans are balanced, so mark a single fin on either side so you can line the 2 fans up again later. You can see the marked fins in the above picture.
Once one fan is removed, hold the shaft with a vice grip and pull the other side off. Get a can of WD40, and spray it into the bearings using the red straw at full blast. Try your best to get the WD40 to penetrate the bearings. DO NOT GET WD40 ON THE COMMUTATOR. If you do, spray down the conductor LIBERALLY with electronic contact cleaner that you will purchase in step 4.

STEP 3:
Now inspect the condition of the brushes. In my case, the fans on my blower had been damaged by a previous owner, so I went to the junkyard and pulled a random blower out to rebuild.
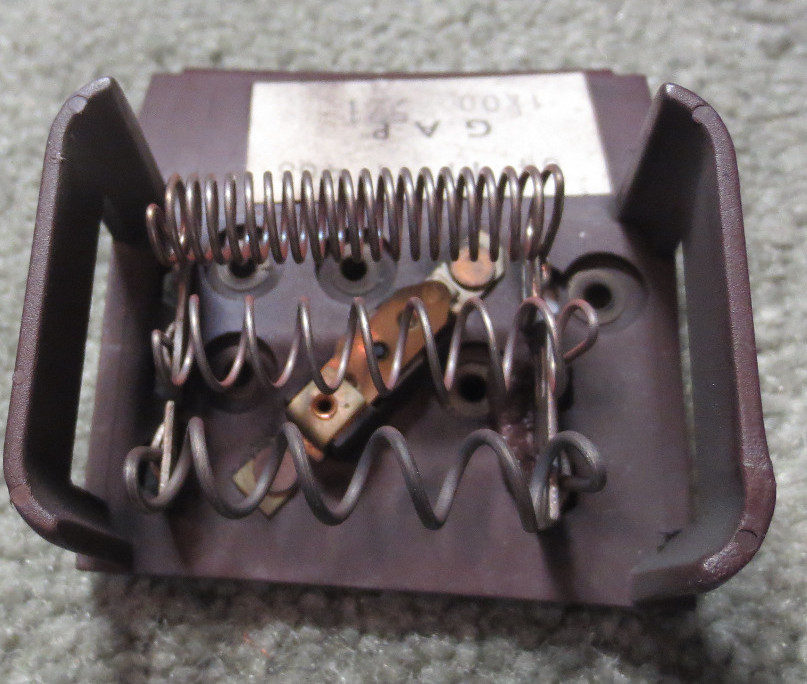
The brushes are housed in these rectangular slots, with 2 tabs on top. As you can see by the location of the copper wire coming out of the slot, the brushes on this motor are about half worn down. Yours may be worse.

STEP 4:
Go down to your local Ace hardware, and purchase a new set of carbon brushes. Here are the dimensions of the carbon brushes I bought. They required no modification to work.

While you're at it, purchase a can of electronic/contact cleaner. Ace hardware carries it.

Here is a comparison between the new and old brush. Yours may be more worn than mine.

STEP 5:
Remove the old brushes from the blower motor. Start by opening the tabs on the slot using some needle nose pliers. BE CAREFUL, DO NOT LOSE THE SPRING, IT WILL LIKELY SHOOT OUT AND YOU'LL BE BONED. Only bend these tabs open ONCE. They will snap off if you bend them repeatedly and you'll be boned, again.

Do this on either side. Set aside the springs and make sure you don't lose them, you will be re-using them and throwing out the springs the brushes came with. Take a look at each brush, you'll see a copper wire lead to a solder joint. On one side, the wire is soldered to a contact. The other side is CRIMPED. DO NOT ATTEMPT TO PULL OUT THE WIRE FROM THE CRIMP. The plate that holds the carbon brushes is brittle plastic, and you may break it if you tug on the copper wire.
Take some wire cutters and cut the copper wire, leaving about 1 cm protruding from the crimp. On the other side, simply de-solder the wire.

STEP 6:
Insert your new brushes. Ensure the wire coming off the brush passes through the BOTTOM of the spring. This is so that when the spring expands from the brush wearing, it will not pull the wire through the spring.
This is the tricky part. The aftermarket brushes are rectangular, the stock brushes are square. You must make sure the carbon brush's long side is parallel with the commutator's spin. In simpler words, the shorter sides of the brush should be facing the tabs.
Use a small flat head to hold the spring down while you push the tabs down with some pliers. BE CAREFUL, THE SPRING MAY SHOOT OUT AND YOU'LL HAVE FUN TRYING TO FIND IT.

STEP 7:
Resolder your new brushes.
Re-tin both sides and do a NASA approved solder joint by laying the wire on top of the remaining centimeter of wire. None of that twisting together bullshit.
The other side is a simple solder pad.
Pro-tip: Tin a little length of the wire beyond the solder joint to give the wire rigidity. This will ensure the wire doesn't fly around and short somewhere.
STEP 8:
Douse your brushes and surrounding area with electronic contact cleaner. Wash away all the old carbon dust.
Re-install the fans. The brush side fan DOES NOT go all the way down the shaft. Position it so the shiny part of the shaft is not visible.
STEP 9:
Re-install your blower motor. Or if you're like me, put it on the shelf with the rest of the shit you need to install.

Edit: your blower will make some noise when you reinstall it, this will go away once the brushes have worn in and contoured to the commutator
IF YOU BLOWER ONLY WORKS ON SETTING 4, REPLACE YOU FAN RESISTOR.
Now lets say your blower motor goes kaput like mine did. Doesn't work on any speed. You have a few options:
1. Buy OEM blower motor for $300.
2. Buy aftermarket blower motor for $150.
3. Rebuild blower motor for $10 ($17 if you need contact cleaner).
4. Do nothing.
If you decide to choose option 3, horay for you smart man/woman!
The only limiting factor of these blowers are the brushes. They are over 100-year old technology. The blower motor itself has sintered bearings and is designed to easily outlast the brushes.
So lets begin.
STEP 1:
Remove said blower motor from your car. There are many ways to go about this, and many videos on how to do so. It's pretty straight-forward, so get to it.
STEP 2::
Inspect blower for damage. Check that the fans are not damaged. It should look something like this.
OPTIONAL: Flushing out the bearings. I recommend doing this, as the carbon dust from the worn brushes will easily make its way to the bearings and destroy them. Remove the fans from either side, this can be done by holding both fans and twisting while pulling. BE PATIENT, THE FANS ARE BRITTLE PLASTIC AND ARE EASILY BROKEN.
The fans are balanced, so mark a single fin on either side so you can line the 2 fans up again later. You can see the marked fins in the above picture.
Once one fan is removed, hold the shaft with a vice grip and pull the other side off. Get a can of WD40, and spray it into the bearings using the red straw at full blast. Try your best to get the WD40 to penetrate the bearings. DO NOT GET WD40 ON THE COMMUTATOR. If you do, spray down the conductor LIBERALLY with electronic contact cleaner that you will purchase in step 4.
STEP 3:
Now inspect the condition of the brushes. In my case, the fans on my blower had been damaged by a previous owner, so I went to the junkyard and pulled a random blower out to rebuild.
The brushes are housed in these rectangular slots, with 2 tabs on top. As you can see by the location of the copper wire coming out of the slot, the brushes on this motor are about half worn down. Yours may be worse.
STEP 4:
Go down to your local Ace hardware, and purchase a new set of carbon brushes. Here are the dimensions of the carbon brushes I bought. They required no modification to work.
While you're at it, purchase a can of electronic/contact cleaner. Ace hardware carries it.
Here is a comparison between the new and old brush. Yours may be more worn than mine.
STEP 5:
Remove the old brushes from the blower motor. Start by opening the tabs on the slot using some needle nose pliers. BE CAREFUL, DO NOT LOSE THE SPRING, IT WILL LIKELY SHOOT OUT AND YOU'LL BE BONED. Only bend these tabs open ONCE. They will snap off if you bend them repeatedly and you'll be boned, again.
Do this on either side. Set aside the springs and make sure you don't lose them, you will be re-using them and throwing out the springs the brushes came with. Take a look at each brush, you'll see a copper wire lead to a solder joint. On one side, the wire is soldered to a contact. The other side is CRIMPED. DO NOT ATTEMPT TO PULL OUT THE WIRE FROM THE CRIMP. The plate that holds the carbon brushes is brittle plastic, and you may break it if you tug on the copper wire.
Take some wire cutters and cut the copper wire, leaving about 1 cm protruding from the crimp. On the other side, simply de-solder the wire.
STEP 6:
Insert your new brushes. Ensure the wire coming off the brush passes through the BOTTOM of the spring. This is so that when the spring expands from the brush wearing, it will not pull the wire through the spring.
This is the tricky part. The aftermarket brushes are rectangular, the stock brushes are square. You must make sure the carbon brush's long side is parallel with the commutator's spin. In simpler words, the shorter sides of the brush should be facing the tabs.
Use a small flat head to hold the spring down while you push the tabs down with some pliers. BE CAREFUL, THE SPRING MAY SHOOT OUT AND YOU'LL HAVE FUN TRYING TO FIND IT.
STEP 7:
Resolder your new brushes.
Re-tin both sides and do a NASA approved solder joint by laying the wire on top of the remaining centimeter of wire. None of that twisting together bullshit.
The other side is a simple solder pad.
Pro-tip: Tin a little length of the wire beyond the solder joint to give the wire rigidity. This will ensure the wire doesn't fly around and short somewhere.
STEP 8:
Douse your brushes and surrounding area with electronic contact cleaner. Wash away all the old carbon dust.
Re-install the fans. The brush side fan DOES NOT go all the way down the shaft. Position it so the shiny part of the shaft is not visible.
STEP 9:
Re-install your blower motor. Or if you're like me, put it on the shelf with the rest of the shit you need to install.
Edit: your blower will make some noise when you reinstall it, this will go away once the brushes have worn in and contoured to the commutator


Comment