-
I hope all goes well for you. It looks like your dealing with a lot of high spots, bondo, and glaze. -
NEVERMIND!!!!i used the gray primer. and it came out perfect. black sux. now i know why people are always using the gray(yes im a noob)....
Painting in progress. ill see if i can get picssLeave a comment:
-
my camera dosent work. bu
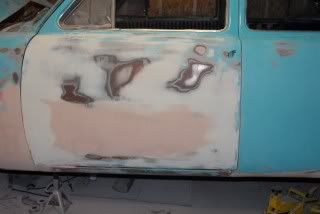
these are the spots that still show up after the primer
i think therre called. high sanding spots
Leave a comment:
-
ok.. i sanded down the bumper... i ran out of the gray primer on my fender. so i bought the black...
When i put the black primer i can see the spots that were sanded more....
could this b that only black prime does this???
(for as much as i tried. even with a sanding block some spots went deeper than others)Leave a comment:
-
I would suggest using the same grit profiles I listed in the other thread, but get a paint and primer meant for plastic.Leave a comment:
-
-
yes you can, but i can tell you right now that 30 year old paint wont look the same as 30 minute old paint. you will see a line where you didnt apply new paint. If you are doing any repairing to the bumper you are best off to spray the entire thing.if im correct. you said i can use the filler primer on single pieces rite? i dont have to spray the entire bumper
the best paint for the trim (IMO) is SEM black trim paint. it is designed for plastic and matches the factory color very well(you arent stuck painting every peice of black on your car afterwards so it looks right)
Im currently working on my bumpers too, retrofitting to fit an early model car... quite the taskLast edited by MattM; 11-15-2009, 10:18 PM.Leave a comment:
-
perfect.
The paint on one of them is bubbled and i can take off with my own two fingers...
the other has a few deep scratches..
Since i am using a duplicolor can..
do i absolutely have to sand between coats? cuz the can has a gloss to it. and then i was going to buy the duplicolor clear coat also...
if im correct. you said i can use the filler primer on single pieces rite? i dont have to spray the entire bumperLeave a comment:
-
the only time you want to use 80 grit is if you're shaping bondo...
Anything else and it can leave deep scratches which might be hard to get out without making your paint look wavy.
to take deep scratches out you either use filler primer or a special kind of bondo, depending on the depth and location. you only really wanna use bondo on surfaces that are relatively flat and allow you to use a long sanding block to make sure you keep the original radius of the body panels.
the process should be
strip everything possible off the piece you paint
sand w/ 220~ grit until everything is scuffed.
depending on condition, use bondo or filler primer on piece
sand w/ 80 then 220, or just 220 again depending on what you use.
Some people use a harder primer at this point, but usually if you aren't going to keep it unpainted you should be fine.
base coat
sand w/ high grit
base coat
wet sand w/ high grit
clear
possibly wet sand (if there are any imperfections)
clear
clear
you just have to make sure you do your sanding within a specific window of time. If you sand too early paint will be soft and you'll screw it up. If you wait too long between coats the layers might not react very well together and they might give you issues such as bubbling, orange peel, flaking off, etc.
you usually only wet sand the base coat and once in the clear coat to make sure everything is smooth. If you have everything nice and ready you might be able to skip the step.
If you make any larger mistakes (what we called tragedies at work) you usually gotta start over from the primer/bondo stage, or at least on that specific body piece.
EDIT:
I didn't see this, but if you're doing something small like a bumper, valence, mirrors, etc you DO NOT want to use a power sander. It wont really make it any faster or easier, and in reality it'll probably take off way more than you want. use a nice sanding block that spans all the way across the bumper. If you don't have a sanding block you can use a block of wood or something, but I prefer a nice FIRM foam block.Leave a comment:
-
-
oh i understand you. ill just use the block sander. to make sure.
Do you know what i should do to repaint the bumper/impact strips? the black is fadedLeave a comment:
-
by power i am assuming you mean a orbital sander(round) you can do the 180 with this, but unless you are taking heavy material off there isnt really a point, Also, the bumper is so uneven you wouldnt save yourself mush time at all, and after the sandable primer you should ONLY use a block and straight line sanding.. if you have air then a panel sander works, but even that is a little bulky for the small surface areas of the bumpers...
i did my entire car with nothing more then a block, its not that bad, the only times i used an orbital was when i needed to remove a lot of materal like getting down to bare metal or filler slop(no im not a pro and have done afew mess ups with the stuff).... the rest i did with block and powered panel sander.Leave a comment:
-
ok. i have both the bumpers now!
i have the sand paper. but my questoins is.
if i am able to get my hand on a power sander. can i do the 180 and 320 with that?
and what can i use on the inpact strips. im going to try sem black. but can i fine sand them?Leave a comment:


Leave a comment: