
Is this trim still available? Willing to try... also where to get clips, as I am missing a few.
Needing new rear trim only
Trying this:
https://www.ecstuning.com/ES75727/
-
From the reading I have done, it seems like the euro valence mounted fogs used with the mtech front piece and that they stay mounted to the euro valence behind the mtech front. Also, it seems like the early model US fogs differ from the euro ones. I cannot seem to pull up part numbers for the early IS fogs on realoem, but my research points to early euro / US m3 / e28 535is fogs all being the same size.Leave a comment:
-
Are those Fogs thinner or something? I think you will still have problems with them hitting the old US valance (although it isn't entirely necessary to keep the US metal valance). Even so, its not a big deal to cut a little sheet metal that is out of sight, even with hand shears.Leave a comment:
-
Nice again! I think I will use the euro front valence and m3/535is fogs, so the fogs should line up correctly.Leave a comment:
-
I did a front valance on my car as well (Hartge, but it mounts exactly the same). It was much more straight forward. For the front, simply pull the bumper off. Once the bumper is off remove all the trim (front, sides, and turn signals). The valance goes between the bumper and the trim, just like in the rear. Put it all back together, minus the trim that needs to be off to get the bumper mounted up to the mounts.
The studs on the front bumper brackets are not long enough to go through both the valance and the bumper. You have to put the nut between the valance and the bumper (the hole in the valance should be big enough so that you can get a socket on it) so that you can tighten it down on the bracket when you hang it up.. This method is ok because the bumper attaches to the valance in plenty of other spots.
I also had problems with the fog lights and the stock US metal front valance. The fog lights were hitting the valance and keeping it from mounting up. To get away from this, I used electric shears to cut out parts of the valance until the fog lights cleared.
Just like in the rear, you need a fairly straight bumper (mine is hardly straight, but it can't have big problems). There is also m-tech trim pieces for the front, just like the rear. The difference is that the bumper will mount up and look correctly without gaps using the non-mtech pieces. It won't fit perfectly if you look closely, but there wont be any gaps.
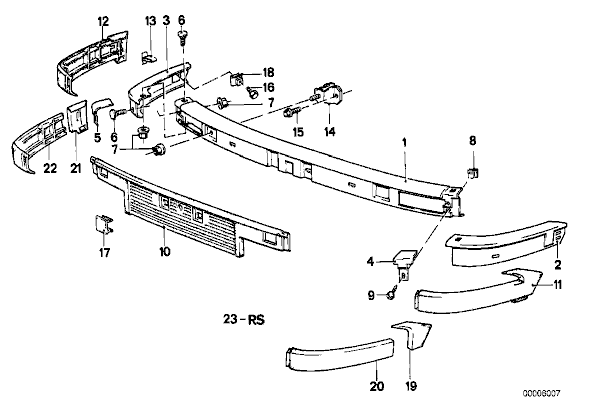
In my case, I needed nothing more than what I already had (bumper, mounting stuff, various extra bolts and nuts, and trim). If you're wanting it to go together very easy (and look exactly right), order all pieces for the front bumper that say "mtechnic", which are 10 (51111953715), 11 (51111953713), and 12 (51111953714) below. I might still end up doing this because from Tischer BMW, all three pieces are are $80 + shipping. I would especially do this if you are using old faded trim.
 Last edited by netcsk; 02-24-2009, 06:39 AM.
Leave a comment:
-
Nice to hear. I think I will be going this route shortly. Now if only there was this kind of write up for the front...Leave a comment:
-
I've got an update guys.
It is amazing how well things go together with the proper parts.
If you go with ANY rear valance for the euro bumpers that goes between the bumper and the rub strip, the proper rub strip is needed.
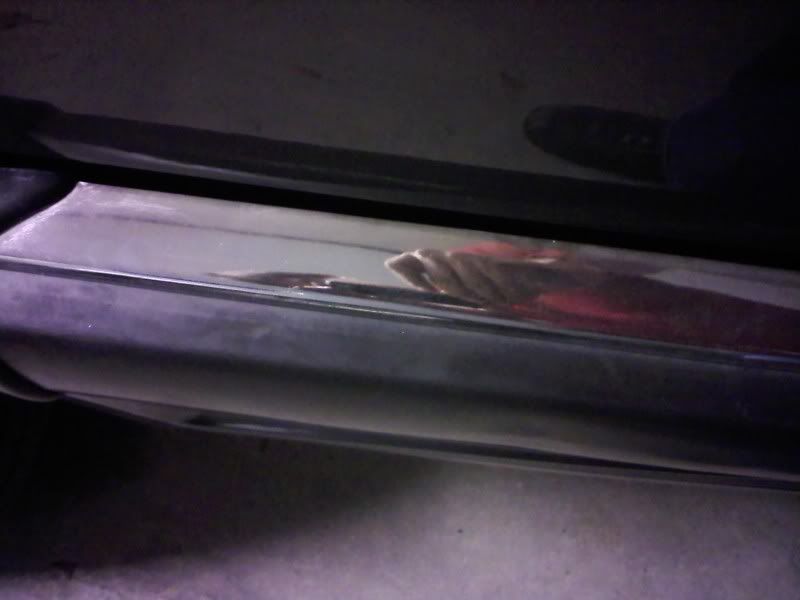
I bought one to get rid of the gaps (top and ends) you'll see a few posts before. It worked great as seen in the picture. I paid ~$95 from Tischer BMW for the strip. I had planned on replacing it for a new strip that looks better anyway.
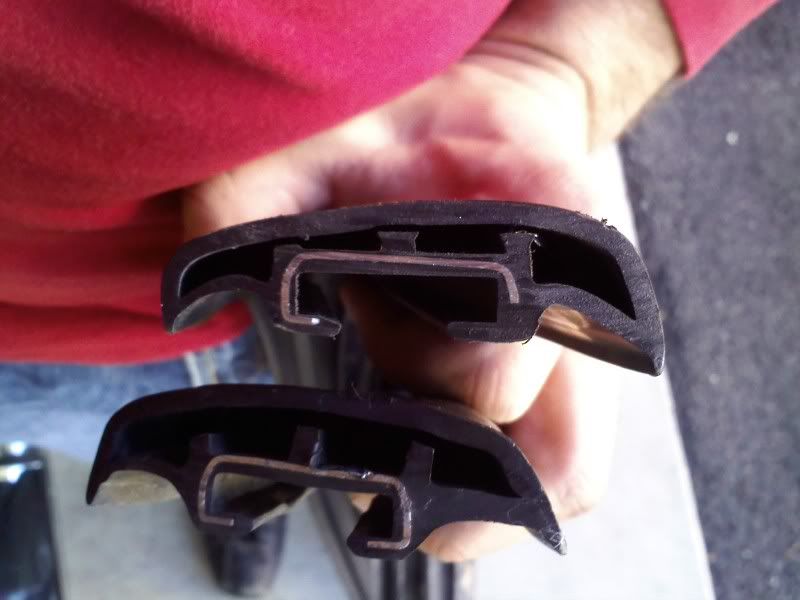
This shows the difference between the two strips. The correct strip for a rear valance is the one that has less medal in the middle. Make sure the part of the strip that is "longer" goes on the top side. Start on one end (with minimal clearance at the end of the bumper) and work all the way around, putting a bolt and nut at every point..
In short, to do the change to a rear valance (specifically the euro-stop and/or mtech 1), you'll need the following from this diagram:
Bumper strip #8 (x1): 51121953890
End Pieces #13 & #14: 51121953711/...712
You can reuse the end pieces for the non-mtech bumpers by using a hacksaw to cut off the bottom parts of the end pieces. I cannot comment on how well this works because I did not try it (I didn't really know about it before hand). It would be worth a shot as these pieces are ~$45 a piece.
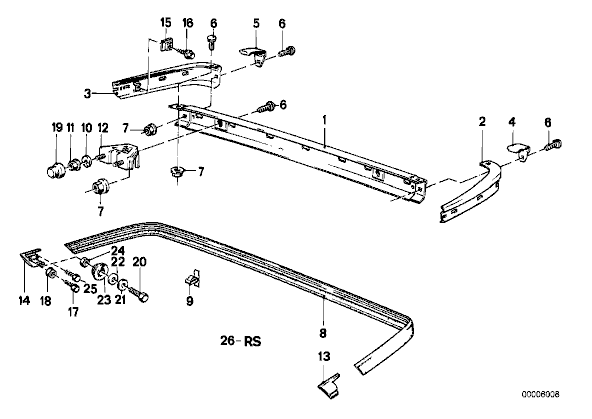
And the following from this diagram:
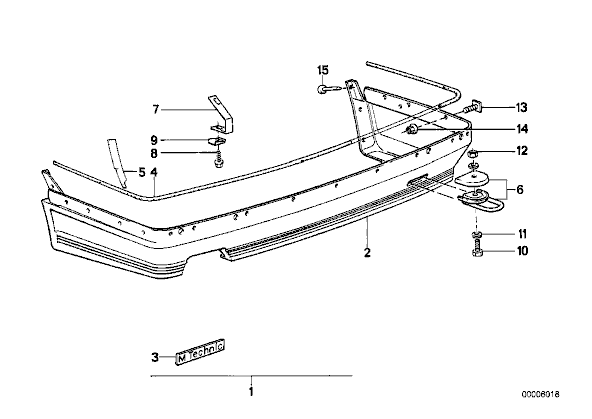
bolts to tie everything together #13 (~15x): 51121932230
Nuts for the bolts #14 (~15x): 51451868108
Of course you'll also want number 3 (the sticker) if you want to have bragging rights. If you want your toe hook to be accessible without destroying paint, you'll also want all of the parts to extend it out (I opted not to -- I don't park illegally and if I get in a wreck, I'll make sure it doesn't get hooked up without a strap).
The bolts/nuts. I don't remember exactly how many I needed, but I know it was at least 15. They are cheap and you don't want to run out (I did). I have a couple spots that have a slight space between the strip and the bumper, and this is caused directly by running out of the bolts/nuts.
If you have any questions, let me know!Last edited by netcsk; 02-21-2009, 08:02 PM.Leave a comment:
-
Best form of flattery...? I'm tellin yah, our cars would make a killer photoshoot
Side skirts came from Germany a few months back from one of our great members here.
Yes, this will not work for diving boards. It would require extensive work (cutting and re-glassing) and still probably wouldn't work right.Leave a comment:
-
-
I assume you mean the rear valance, as that is the only thing not original. I am very impressed with the workmanship on the valance. The fit was correct and the lines and everything are perfect. Can't say anything bad about it.Leave a comment:


Leave a comment: