-
I also received my part and although it won't be going on the car until I pull it apart for it's next checkup in a few months, the part is really well made. All the edges are properly chamfered and the surface finish is great. I have no doubt it'll work better than the 3d printed block off plate I'm running now! -
I must have been one of the first to see this thread as I replied to the request asking for someone to test one. Now, full disclosure. I do not know "THE DUDE ABIDES" nor have I had any contact with him concerning what I am about to say in this post and I also have nothing to gain from what is said. He has not contacted me in any way at all other than to tell me he was sending one and gave me the tracking number. Having said that, I received my part yesterday. Mine looked exactly like the ones in the posted pictures and seems very well made. I put mine on a surface plate with a piece of 400 grit sandpaper and eliminated all the machining marks (only took a couple of passes), and made a gasket. I had to pull my throttle body off the intake in order to remove the fasteners as there was considerable corrosion on the threads. Once the fasteners and the holes were cleaned the new piece fit like a glove. I have driven the car approximately 10 miles to ensure everything was up to temperature and pressure and there have been no issues. Part looks great and functions as it should. Tomorrow I will be driving around 100 miles so that will be the true test. Will let all know my results. I took pictures but for some reason, I can not upload them.Leave a comment:
-
-
Wow nice machining! Are you making your cuts all in on feed and speed or are you roughing and then finishing?
Looks like a really nice finishLeave a comment:
-
Crankcase vent block-offs are now available! Designed to work with the oem gasket and screws. Sorry, the pictures aren't super good.
Last edited by THE DUDE ABIDES; 03-08-2019, 03:29 PM.Leave a comment:
-
-
Also, for those of you interested, I rigged up a test on one of the ported covers. I put a closed-loop hose system on it with a dial gauge and dropped the whole thing in boiling water. After it was completely heated up, I pressurized the hose to ~15psi and closed it off. Bolted onto a stock throttle body with an oem cork gasket and no additional sealant. I left it submerged in the boiling water for two solid hours. At the conclusion of the test, pressure had not dropped any appreciable amount.Leave a comment:
-
-
-
Nice. Turbo guys would benefit from completely sealed block off plates (removes center fitting), since that's where the crank case gets reintroduced into the motor which needs to be vented elsewhere.Leave a comment:
-
Throttle body coolant block-offs are now available! Compatible with all M20 engine throttle bodies. Looking at $11 with free shipping to the continental US.
Leave a comment:
-
Thanks! Correct. They are milled on a 3 axis vertical mill. Indeed, if someone walked in and asked for a quote on this as a one-off custom part, I would probably quote it somewhere in the $300+ range considering programming, setup, machine time, etc.
Do machinists ever get paid what they're worth haha? Thank you!
Yes, three different OPs. Custom cut jaws are hugely beneficial. This is definitely an example of a part where a few extra hours and dollars spent on programming, setup and specialized tooling allows you to make parts at an economical price.
I work with fairly complex parts often so this isn't too far off the beaten path for me.
I'm actually working on a list of some custom E30 products currently, though I'm not too sure how much demand there is for some of them.
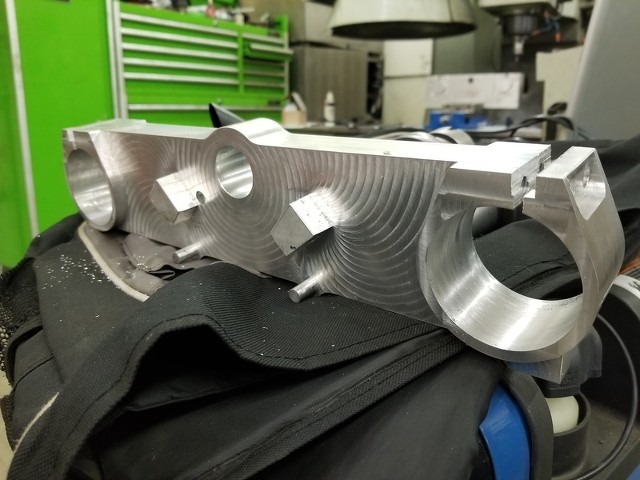
What did you make there? It looks like a motorcycle fork triple clamp.Leave a comment:
-
Well done sir. I think it's a great idea, especially if you plan on making the block off plates too. This obvious isn't something you're going to get rich on, and you'll probably never get paid what you're worth on the time you spent designing/ programming/ setting up, but as far as the cool factor goes, looks awesome.
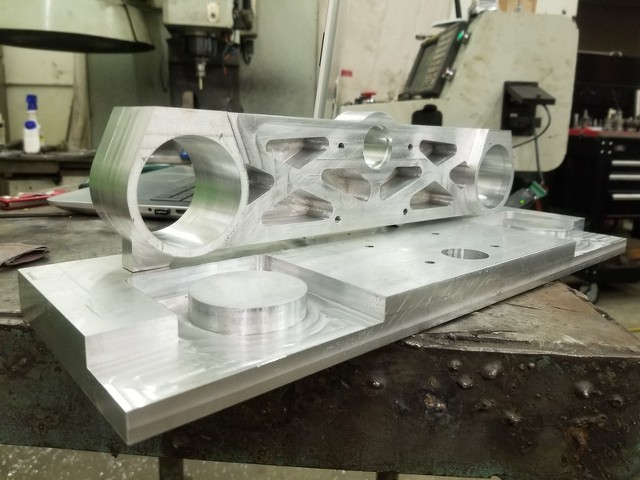
3 position op with a good fixture setup, doesn't seem completely out of the realm of being cost effective at $25 a unit if you're running a couple of these on the same fixture. It's not like they need to be +/- .0005 or anything. A couple Miteebite expansion pins and a locating surface.. Or a boss and some clamps until you poke holes then throw some cap screws through.. p2 and p3 can be done without anything crazy, just flip the fixture 90 degrees after p2, have a vise stop and some quick Z offset math you could spit em out quick. Kinda similar to what I did here, albeit with a much larger part:
Leave a comment:


Leave a comment: