
is the input fitting to the rail a sharp angle bend like the one coming out to the FPR or a radius one?
I knew the cast log manifold was good for something.....
-
Mostly stuck working on the chicken coop this weekend, but I did manage to rough out a fuel pressure regulator mounting bracket and get the coils all mounted. Coil mounting panel still needs a few adjustments (probably going to bolt on a strap to keep it under tension, right now it will likely 'flap' a bit which I obviously don't want. Also need to redo the plate-to-engine bay mounting holes, I need it about an inch further back).
I also almost managed to get to degreeing my cam... feel like every time I get started something comes up. Soon. Catch can also arrived, so I am at the point now where I need to pull the booster, get the Massive pedal kit in, then mount the E85 sensor, fuel filter, catch can (going to try and plumb both coolant overflow and valve cover vent to this), new power steering fluid reservoir, and somewhere to stick some relays. Will also need to get the electric fan mounted and then go through the joys of measuring, cutting and getting connectors on the fuel lines.
Finally, need to figure out a solution for a few last little bits. Primarily running AN-4 for all my vacuum lines (hopefully less of a pain in the ass at 30PSI) and I need to get some BSPP 'G' fitting to AN adapters, as well as a couple of bosch M10x1.5 to AN adapters. Of course I found a company in Australia that has literally everything I need, and at a great price to boot, but they are only shipping stateside at the moment due to the pandemic, so I will likely need to figure out a US-to-Canada mail forwarding setup of some sort. Also need a couple electrical connectors, but digilkey has me covered there.
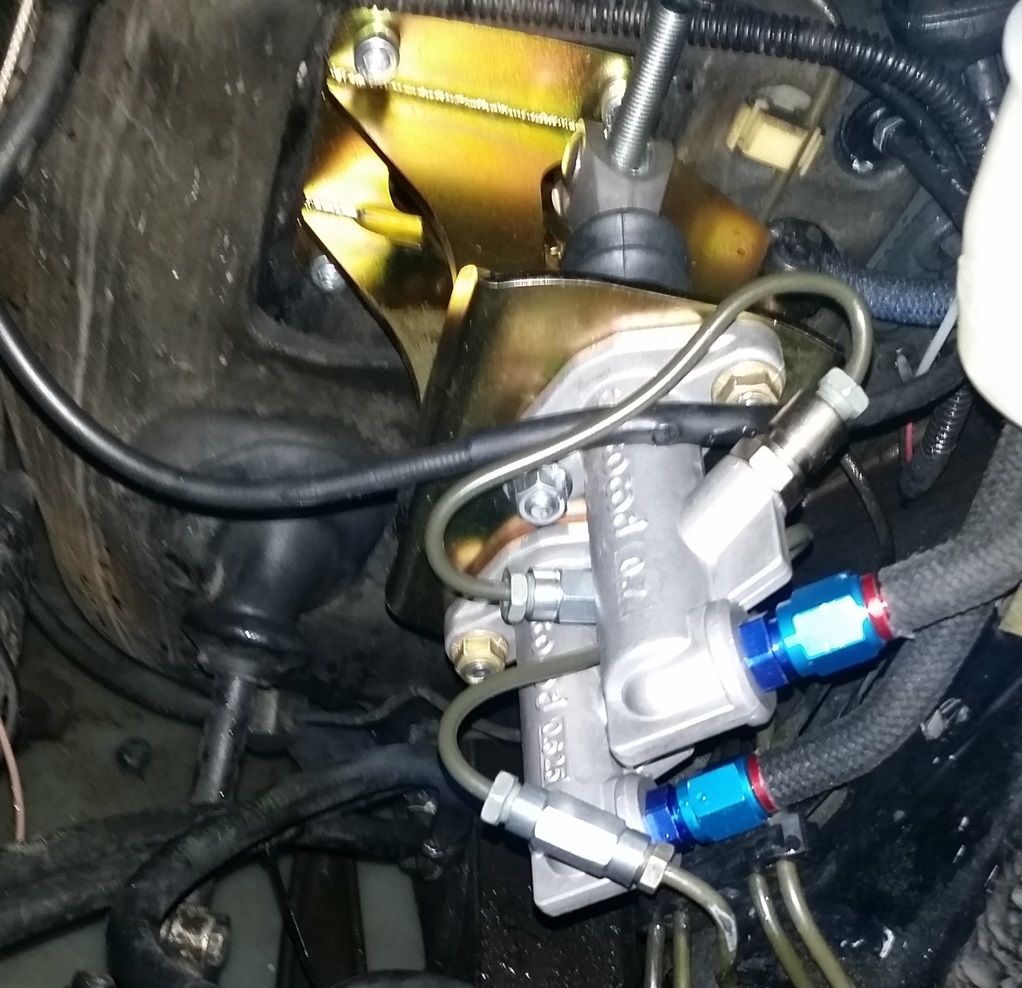
Fuel pressure reg with a rough bracket I put together (still needs some cleanup and paint). I suck at bending metal, maybe because I just have a bench vise, but overall could have been a lot worse:
I am almost completely happy with how coil packs turned out. Once again, using a vise and angle grinder to cut steel is not a core component of my skillset, but for now it looks okish enough I can live with it:
I came so close to actually degreeing the cam today... friggen chickens. Probably a waste of time at this point, but I figure it is a good exercise to do regardless.
Attached FilesLeave a comment:
-
-
Sorry that is a bit confusing, I was running behind and a little too quick to reply. 8^(Originally posted by digger View Post
I meant bigger size in general, without a lot of mechanical advantage the pedal is too hard and no modulation. Even with the max leverage setting on this bracket (7:1) it was still not good for me with the .700 and .625 MCs and the stock calipers. When I went to the M3 brakes the fluid ratio of those MCs and the M3 calipers made it usable again. I ended up using a .750 and .625Last edited by whodwho; 05-23-2020, 07:29 AM.Leave a comment:
-
I ended up picking a 0.75 for the fronts and 0.625 for the rears - they actually just arrived today. I think I probably went to big on the fronts, looking over it again.
Also, quick build update before dinner:
Plan B for fuel pressure regulator will work well I think. Going to cut and fab up a little bracket to mount to that stud on the IM this weekend.
Throttle body modifications are not quite there yet. I am pretty much perfectly happy with how the intake air temp sensor worked out (little copper tube with protective heatshrink boot on the tip). Ended up tapping throttle body for 4-AN and getting a 4-AN smooth hex plug, which I then tapped to 1/16NPT. I know the o-ring is visible in that picture, I am actually relying on red loctite to make the seal. The IAT itself will be sealed into the 1/16 NPT with blue loctite. Came out as well as it could have, not perfectly straight but I don't have a drill press.
The right angle 4-AN to 6-AN fitting is too big by a friggen hair, which figures. Need to find a different 4-AN fitting I suppose, but not the end of the world. That fitting will be providing manifold vacuum/pressure reference to the vacuum station, which will feed the MAP sensor and probably get tied into some turbo goodies later on down the road.
And yes, I know throttle plate screws are missing.
These are the sensors: 2 combination pressure/temperature and the air intake temp/ IAT shown above. The PTS's will be going on oil and coolant respectively, another is already present on the fuel rail.
Leave a comment:
-
They were all up when I was looking at it earlier - good old photobucket.Originally posted by whodwho View Post
I may end up downsizing front cylinder more then. Do you remember what your pedal ration was? I know 6 is probably more ideal for 'feel' (based on some random thing I read on the internet) but I was planning on setting the massive kit up for 7. Maybe I am having trouble wrapping my head around going from single cylinder to dual; if I apply X lbs of force at the pedal with a given ratio and bore size, do I run the numbers for the twin cylinders assuming that force X or do I need to assume % of X (based on balance bar setup)?. Because a quick run of the numbers with a 0.75" bore and 7:1 ratio gives me 1100 PSI out at 70lbs in, which doesn't sound so bad to me (950PSI at 6:1 definitely does not sound nearly as good). That said to get 1100PSI on the 0.625" with the same ratio is a hair under 50lbs, which leaves me thinking - if I apply 70lbs at the pedal, am I getting 35lbs across both cylinders (assuming 50/50 balance)? Thinking back to free body diagrams, I think yes, but I write software for a living and dropped out of uni so all my mech E friends could make fun of me. So lets say I bias balance bar to get equivalent brake cylinder pressure (which in itself may not be ideal, realistically I probably want a bit more at the fronts, which means these numbers should be worse than a worst case). Ratio is ~0.71, not actually sure if I can set the balance bar accordingly (seems like a lot) but lets say we can. So if I apply 70lbs, I am now seeing 71% of that at front MC and remainder at rear - and the brakes should be at equal pressure front and rear. This means my comfortable 70lb number I pulled out of my ass is really only 50lbs. To get back to that I probably need almost 100lbs of pressure which does start to sound a lot like a workout. And 1100psi is probably not gonna be enough to lock the tires, but then again given the shit rubber I have on those 14"s maybe I am worrying too much. This comes into the second part -
Of course that is all kind of moot because we aren't looking at piston sizes in the calipers - which is key because front vs rear calipers piston size differences will result in different wheel clamping forces/ability to lock the tires, which is what we actually give a shit about. Ideally we should set balance bar based on that. This probably does not tilt it more in our favor though, because smaller rear pistons is going to work out to less actual force applied to the rear caliper, which is why I went with two different sized MCs to begin with (i.e. so balance bar can sit at roughly 50%).
Anyway probably buggered some numbers in that rant, but oh well. I figured for street driving the 0.75 would be fine with the 7:1 ratio, maybe not ideal, but it sounds like I might be changing my mind once I have to drive around for an hour or two and start regretting skipping leg day so often.Leave a comment:
-
The fluid ratio of the stock brakes and bigger masters made for a very hard pedal with minimal travel. It probably would be ok for a track car but on the street I was not very comfortable with it especially if I needed to panic stop.
Looks like many the pics are down today, hopefully they were working when you viewed that thread? Photobucket sucks with their bandwidth limitations, I will have to recreate the thread here with re-hosted pics.Leave a comment:
-
Yeah, I am in a similar boat. Trying to get a bit more space so I can comfortably mount an E85 sensor and fuel filter, never mind all the room the 8AN lines and fittings eat up. That and fully independent braking circuits is nice.Originally posted by digger View PostLeave a comment:
-
i have the Massive 280mm street kit which is the most that fits under the Alpina's. Calipers are Wilwood dynapro 1.5" pistons iirc. Stock rears calipers. I am going to at least try it out i may not like it in which case id just go back to the boostered setup or perhaps shifted slightly. My only reason for doing this is coming up with a better airbox for the ITB.Originally posted by JehTehsus View PostLeave a comment:
-
Are you planning on running it with IS stock sized brakes? If so that makes me feel a little more optimistic. With the way shipping/deliveries are going it is looking like I won't even be able to get on the road for a while here anyway...Originally posted by digger View Post
Leave a comment:
-
I have that Massive kit but haven't installed. i chose 2 x 3/4" inchLeave a comment:
-
This is great, thanks. Another reference should make my install even more painless, not that it seems very complicated from what I was looking at.Originally posted by whodwho View Post
It definitely strikes me as very solid, I am looking forward to getting it in. Maybe even this weekend if the MCs and other bits arrive.
What was your issue with the feel on the 0.625 and 0.7 with stock brakes? I was planning on running stock for a little while at least, I ended up settling on a 0.625 and 0.75 tilton, was planning on using the 7:1 pedal ratio offered in the massive kit. Based on some of your comments in another thread I am worried this is going to be really unpleasant to drive, and I may have to adjust front MC for now. At this point I am definitely not going to be on the track, just street cruising while I get everything together and running.Last edited by JehTehsus; 05-20-2020, 08:47 AM.Leave a comment:
-
That Massive bracket is a quality piece, you will like it 8^)
I haven't seen many running it, I recreated an old thread that was on tech and fixed the pics - https://www.r3vlimited.com/board/for...f-r-conversion
I went with the offset one for the extra room
 Last edited by whodwho; 05-24-2020, 07:32 AM.
Leave a comment:
-
Took a very quick look this long weekend, valve cover seems to sit OK on top of the gasket, I did not torque it down. That said, I may run into issues, because I tried it without a gasket and it definitely sits up off the head surface maybe a hair... with the gasket in place though I am not sure if this will be an issue or not (uncertain of compressed thickness and I didn't want to torque valve cover down), but I do believe the studs are making contact and holding the cover up a touch. I wonder if some very selectively drilled holes will significantly hamper the baffle/make a difference in terms of liquid oil reaching the breather hose. I have a catch can that will be right there anyway.Originally posted by mikey.antonakakis View Post
In other news, waiting on parts. COVID shipping fun times, UPS has apparently had one of my packages in the city for an entire week, but it is still 'delayed due to events beyond our control'. At least until Friday, when they updated it to 'delayed due to severe weather'. It was lightly raining. Not sure if there is a frowning, flat palms up emoji somewhere here or not but that is exactly how I feel at the moment.
This did show up from Massive Lee though (and ahead of schedule, hard to believe):
So once my new tilton MC's/balance bar arrive I will be pulling the booster and getting it in.
Also, the lady realized I apparently don't have enough to do with my car build (you know, waiting on parts and all that) so I have been enlisted in the caretaking of these little buggers:
Wish me luck.
Leave a comment:
Leave a comment: