Announcement

Collapse
No announcement yet.

Auto to 5speed Transmission Conversion Write up(56k no

Collapse
X
 
  • Filter
  • Time
  • Show
Clear All
new posts

    #16
    Hmm, figured i'd post this in here- The manual pedal set i ahve is for the older non-airbag E30s. It uses a fat spring below the clutch pedal. Looking at an airbagged 5 speed parts car, it uses a spring from above, like the brake Pedal. I'm going to have to pull the pedal box out of that, aren't I? Or is it just like this because it's a 318is?

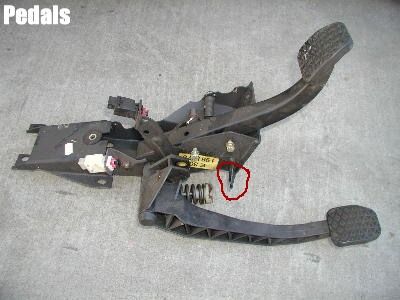
    *edit* ok, this is really confusing me. According to the ETK, the part #s for the pedal box is the same for Manual vs Automatic trasmissioned cars. However, looking at Marvin's pictures, and looking at my pedal box, i see that i do not have the flange the clutch spring sits on. I've circled it in red, in marvins picture. Looks like the pedal boxes aren't the same?

    Comment


      #17
      Marvin, I'd be very careful about using that much grease on the input shaft and release bearing, it should be a very thin layer in order not to get on the clutch surface and ruin your new clutch!!!

      Also, you didn't mention the squishy thing inside the shift coupler! Many times they do not come with the coupler when you order it, which could be misleading to others using this thread as a reference. That is, if you have one yourself. Also note that it should be soaked in oil before being put in

      Comment


        #18
        Originally posted by BS87
        Hmm, the more i look at this, the mroe it confuses me. Marvin's pedal box that he swapped the pedals into doesn't seem to have the little ledge either. Where do you plan to mount the clutch spring marvin?
        Hey BS87...

        I actually end up using the pedal assembly from the 5speed, I also notice that the auto pedal assembly doesn't have the little ledge that your talking about. you can see the pic, that i cut the top part of the pedal assembly to make it fit...


        Sorry for not updating my progress...I've been so busy at work and also been raining here lately...
        Marvin
        89 325ic
        89 325i
        03 baby girl
        San Jose, CAlifornia

        Comment


          #19
          Hey TJ, Do you need the exauhst bracket from a manual, or can you just re-use the automatic one?

          Comment


            #20
            Before installing the transmission, i went ahead and install the shift console


            I used a jack with a lot of padding to lift up the front of the engine. This gave me some extra room during the installation of the transmission.


            Sorry, i dont have any pics during the installing of the transmission. I didn't have any transmission jack and its kinda hard when your lifting the transmission and also take pics:)


            The transmission support mounting bolts


            I temporarily attached the support. I still need to bolt on the starter from the transmission


            Pic of the shift console installed


            Pic of the clutch pedal over-center helper spring and the spring guide


            Connect the hose to the master cylinder


            Pic after installing the pedal assembly


            Pic after installing the brake pedal return spring


            TO BE CONTINUED......
            Marvin
            89 325ic
            89 325i
            03 baby girl
            San Jose, CAlifornia

            Comment


              #21
              I ended up removing the slave cylinder in order to install the metal hose


              Bolted up the slave cylinder to the transmission.


              Installed the electrical connetors to the Back-up light switch


              Pic of the shift lever and shift rod


              Pic of the Driveshaft with vibration damper


              Here's a pic of the shift rod (using Z3 3.0 shift lever) hitting the vibration damper


              Removing the vibration damper by knocking out the (3)bolts


              Install the new flexible coupling using a new self-locking nuts. If the coupling has arrows on it, they should face the flange arms.


              Here's a pic of the shift rod (using Z3 3.0 shift rod) without the vibration damper.


              Install the bolts that hold the flexible coupling to the transmission output flange


              Install the bolts that hold the rear of the driveshaft section to the final drive


              Now for the shift mechanism


              Boot installed


              Pic of the back-up light harness connector


              Pic of the shifting assembly installed:)


              TO BE CONTINUED......
              Marvin
              89 325ic
              89 325i
              03 baby girl
              San Jose, CAlifornia

              Comment


                #22
                Originally posted by BS87
                Hey marvin, how did you hold the flywheel still while removing the torque converter bolts? Mine just spins, and when i hold it still with a 22mm wrench on the cranknut, i don't have enough leverage to break it free.
                Hey BS87,

                use a wrench to hold the crankshaft bolt so the flywheel wont spin, then u can go ahead use a "breaker bar" on your rachet (using a pipe to extend the rachet for better leverage)
                Marvin
                89 325ic
                89 325i
                03 baby girl
                San Jose, CAlifornia

                Comment


                  #23
                  What wires did you guys jumper/connect? I've tried every combonation, even the supposedly "Correct" ones, and i'm getting power, it just fails to start.

                  Comment


                    #24
                    This is really pissing me off. The thwo green wires are connected, i'm getting power to everything, the car will just not crank. The only thing i can think of, is that either i missed tightening a ground or something when re-installing my dash, or that little bracket that holds the auto dipstick is important somehow.

                    Comment


                      #25
                      I jumpered 3 wires. There were 5 wires in the loom IIRC, and 3 of them are the ones that did it.

                      RISING EDGE

                      Let's drive fast and have fun.

                      Comment


                        #26
                        The two are for the reverse lights. The connector for those is already plugged in. That leaves 2 green wires and 1 brown wire. I had all three together at one point, no go :?

                        Comment


                          #27
                          Originally posted by BS87
                          The two are for the reverse lights. The connector for those is already plugged in. That leaves 2 green wires and 1 brown wire. I had all three together at one point, no go :?
                          Thats what I did, the 2 green and one brown.

                          RISING EDGE

                          Let's drive fast and have fun.

                          Comment


                            #28
                            Solder together the green/yellow and green/black wires
                            this make it start.


                            For the reverse lights, you will need to tap into the green/yellow wire
                            to power up the reverse switch. And the blue/white wire together.
                            Marvin
                            89 325ic
                            89 325i
                            03 baby girl
                            San Jose, CAlifornia

                            Comment


                              #29
                              I honestly don't know what the fuck is wrong. The reverse lights are plugged into the connector (there is a connector after the big auto console plug that they fit right into) yet they wont work, and the green wires and the brown one for the hell of it, are connected. The thing just doesn't want to crank. Maybe i fucked up installing the starter somehow, but it would atleast attempt to crank, right?

                              Also, i don't have a green/yellow wire, i have two green/black wires.

                              Comment


                                #30
                                AUTO TO MANUAL TRANSMISSION CONVERSION WIRING.

                                Solder blue/white wire (reverse switch) and blue/white wire (original harness) together

                                Solder (2) green/black wires, red/white?? wire (reverse switch), green/yellow wire together. This should start up the car and working reverse light.

                                goodluck!!!


                                Marvin
                                89 325ic
                                89 325i
                                03 baby girl
                                San Jose, CAlifornia

                                Comment

                                Working...
                                X