Announcement

Collapse
No announcement yet.

'90 Euro BMW 318iS M42 M-Tech 2 - Lazur Blau

Collapse
X
 
  • Filter
  • Time
  • Show
Clear All
new posts

  • PieterVN
    replied
    Small update and some questions cornering my differential swap.

    On Monday I went to my local 2nd hand E30 parts supplier. I was searching for a 4.10 open diff (original spec for 318is) for quite some time. He received some new stock and I immediately went to pick it up.
    He told me if I tried it and it was not good that I could just contact him and change it for an other one. Let's keep our fingers crossed that this one is good.

    So my plans for now are to swap the diffs to check if it runs fine with no noises. If the 'new' one is good, I'll change the output seals, cover seal & washers for the oil plugs. I don't want to waste money on a bad diff.

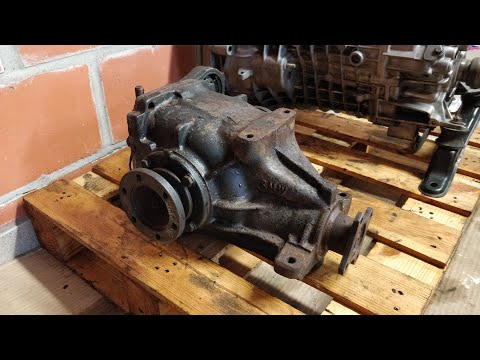
    Before pressure washing:

    IMG_20201226_100105 by Pieter Van Nevel, on Flickr

    IMG_20201226_100112 by Pieter Van Nevel, on Flickr

    After a pressure wash:

    IMG_20201226_103244 by Pieter Van Nevel, on Flickr

    I then proceeded and opened the speedsensor to check for amount of metal shavings. I thinks the amount of small flakes are okay. Does not seem like any excessive wear has happened. Also the oil in the diff was quite black and old. I changed it while it was out of the car.

    Speed sensor magnet from the 'new' differential
    IMG_20201226_125657 by Pieter Van Nevel, on Flickr

    Speed sensor magnet from my 'old' differential that was installed in my car. It's hard for me to compare with anything else, these are the first differentials I check myself but I got a feeling that this is a bit too much to be good.

    IMG_20201226_162322 by Pieter Van Nevel, on Flickr

    It's quite pleasing to see that the original diff still was in quite a good shape. No excessive rust on the outside. The car was originally a Spanish car, so never seen road salt and I think little or no rain.

    IMG_20201226_161204 by Pieter Van Nevel, on Flickr

    When comparing the two differentials it is obvious that the old differential has more bearing noise, a metallic dragging noise which make me really think this one has seen its better days.
    I must say that there is also a big difference in the amount of force you have to put on the input shaft to make it turn. The old one does turn nice and freely despite the noises. The new one is a lot rougher to turn but does not make as much noise.
    I'll add a video to show the differences in sound. I'm looking for some of your more experienced inputs & remarks about these parts. Thanks in advance, it is really appreciated!

    Left is the old differential that came out of the car. Right is the one that will be going in.

    Last edited by PieterVN; 12-26-2020, 11:01 AM.

    Leave a comment:


  • PieterVN
    replied

    Originally posted by 2mAn View Post
    Always fun undoing the previous owners' mods... Rear panel looks good
    Originally posted by Northern View Post
    Rear shelf repair looks great

    Absolutely! First thing i did was remove the complete aftermarket sound system and the alarm system. It was a total mess but i loved doing it and give me some insight on the basics of the wiring loom.

    IMG_20200516_144323 by Pieter Van Nevel, on Flickr


    Not much to update at the moment.

    I almost finished my parcel shelf. I installed these OEM Speaker covers i found in Germany. I'm just waiting on some clips to finish of the installation.
    Must say i'm quite pleased with the end result. I can't wait to fit her in my car.

    I love the before and after comparisons

    Before cleaning:

    IMG_20201219_105855 by Pieter Van Nevel, on Flickr

    After cleaning:
    IMG_20201219_111120 by Pieter Van Nevel, on Flickr

    Another one!

    Before:

    IMG_20201212_122853 by Pieter Van Nevel, on Flickr

    After:

    IMG_20201219_134824 by Pieter Van Nevel, on Flickr

    I also have some more parts that arrived. I have a new front crank seal. I got quite a big oil leak coming from the front. I allready changed the oil filter housing seal and dipstick seal a couple of months ago. So crank seal is the next on the list. I read that the crank bolt is quite a b*tch to get loose?
    Also got myself a set of new belts for alternator, AC and power steering. And last but not least i collected a spare open 168mm 4.10 differential to swap out. I got some bearing sounds coming from mine. I figured it is cheaper to swap a diff than to replace bearings. Updates on this topic will follow soon!

    Leave a comment:


  • Northern
    replied
    Rear shelf repair looks great

    Leave a comment:


  • 2mAn
    replied
    Always fun undoing the previous owners' mods... Rear panel looks good

    Leave a comment:


  • PieterVN
    replied
    A brief update on parts i received and small jobs i did.

    6 x NOS NLA 65 13 1 370 834 Speakers. (4 for me and 2 for my nephew)


    My period correct BMW-Blaupunkt Reverse RDS Radio in mint condition. I was very happy to receive it in 100% working condition. But i figured out quickly that i neede a new connector to hook up this system to my original wiring loom.
    So i ordered a female BMW radio connector to DIN adapterpiece. I will be cutting the DIN connectors and soldering the rest of the adapter into my wiring loom to get the original connector back in my car.
    I ordered this connector 4th of december only to get a message that my part will be delivered at earliest the 26th of december..

    Also when i received the radio i was bummed that it did not have the cover pieces to cover the holes needed when you want to remove the unit. So i contacted my friend Martijn and asked if he could help me with 3D printing these parts.
    So i started searching for a 3D-file for this piece. He printed a couple of pieces for me to testfit and adapt to fit my radio. I sanded the pieces to fit nicely, now i only need to fill them to get the printing lines out and respray them in matt black.
    This is still on the to-do list. But allready a big shout out to Martijn for helping out! I you don't know him allready check out his big topic on his 325ix Touring. Lot's a pictures and cool information, definitely worth the read and checking out.


    The 3D-printed part.


    I labelled all my wiring in my dash to make the installation of the connector easier and faster. What a mess...


    I also gave my brake discs front and back a new coat of Zinc coating. To stop them rusting. This is a nice neat little trick to keep your rotors cleaner looking.
    Also one of the things Martijn taught me

    Before:


    After:


    I also wanted to install some original speakers in the rear parcel shelf. Problem was: previous owner butchered the shelf by cutting huge holes for somekind of oval shaped speakers. But wait...even worse he even cut op the metal shelf itself..


    So after some thinking how this could be repaired i figured i didn't want to spend much time on repairing these ugly holes. I would just repair the 'hardboard' shelf. PO recoverd the shelf with a nice fitting cloth cover, but just put it above the old cloth...
    I pulled the old brown-stained cover and started repairing as much as i could. After all i'm quite happy with my first recovering job. I'll let the pictures do the talking.


    The finished product at the moment. I ordered some OEM BMW Speakers covers from Germany. If i receive these i will cut some holes to get an original looking parcel shelf with the basic speaker set up.
    i must say this is was a very fulfilling job to do. Can't wait to install the speakers and get it my in my car. I will be so happy if i can my my Phil Collins cassette trough my new old speaker system.


    Leave a comment:


  • PieterVN
    replied
    The weekend was filled with a bunch of fun things to do on the 318iS.
    I brought my convertible to my garage at home and decided to pull some parts i would love to keep on my two-door. It's really enjoyable that these cars are just plug-and-play.
    The things i did can be summarized in three steps.


    1. 6-button OBC installation

    I started by pulling the panel under the dash. Removing the gauge cluster, removing the OBC by pulling the front plate on the middle console. It's a pretty easy job.
    After these things were removed just start tracing the wiring for the OBC. It connects to 4 different locations/plugs (OBC plug, gauge cluster plug, plug for the gong and the outboard temperature wiring loom.

    I removed al the sticky, tacky, gross cloth tape and rewrapped it with new fresh cloth tape. Better than new.


    Temp sensor before and after cleaning


    Fresh wrapped wiring loom. The yellow connector goes in the back of the gauge cluster, green in the OBC, black to the gong and white to the temp wire.


    I also cleaned the temp sensor loom. This is wrapped in a heat shrink type of material, so no need to replace that. It still looked nice and had no damages.


    Then i just pulled the temperature sensor from the brake cooling duct in the front of the car. Traced the loom, gave it a clean and installed all these things on the IS.
    When installing the OBC wiring loom back in the IS, i tried following the original routing to keep it as original looking as possible.

    It just a couple of months ago that i changed the screen on this unit. That's also one of the reasons i like to keep this one over the Euro Clock.
    Everyone that has a failing screen i really suggest getting the repair kit from Gearworks/Partsworks in Germany.

    Hmm, i love the look of the repaired screen.


    2. Premium Sound Speakers installation

    Second thing i did was check the BMW Premium sound system on my car. In the past someone remove the original BMW Amplifier and just put in a headunit without an amplifier.
    Meaning these are just the Premium speakers running straight from the HU. That's why i decided to pull these parts and install them in my coupe. I ordered some OEM NOS speakers for the convertible to put in to replace the premium set.

    I got the Premium speakers out because they have the crossovers built in which you need to run the tweeters. I read that if you do not run a crossover system you have the chance of blowing up the tweeters.

    Taking the parts from the convertible was easy. Installing them in the other were...also pretty straight forward. I just had to remove the doorcard and get the tweeter wires hooked up. Otherwise all was plug and play. Same colourcoding, same everything. Easy peasy lemon squeezy..
    Only thing i'll have to do is plug on some new flat connectors. Someone put on these round connectors on one of the tweeters.


    The tweeters on the left door were just plug and play. I had to loosen the wires and run them to the top of the door.


    Lovely:


    Speakers in the back will be installed next weekend. I allready pulled them from the donor car.

    3. Seat heating wiring loom restoration.

    This was by far the most frustrating job of the weekend. Every job that needs the carpet to be removed is such a PITA. I just lifted the back of the carpet. Traced and pulled (read yanked) the wires. All came out after some cursing, sweating and meditation.
    Same as the wiring loom for the OBC i cleaned the wires and put on new cloth insulation tape. Everything is ready to install. I just need to find some sport seats with seat heating. I think i will allready install the center console with the heater buttons. I like the look of a full option car even the heater is not attached

    The seat heating harness, what a sticky piece of...I started peeling it and and rewrapped it. Before picture:


    Covered in little pieces of carpet insulation..


    To clean the wiring of their stickyness i use a product called HG Stickeroplosser. (translates to stickerremover). Very effective

    And voila, after picture. I really like redoing these. It such a difference and i really got the hang of it. If you put the loom under tension while wrapping them it goes quite easy.


    I did not receive my BMW Reverse headunit yet, but it should arrive this week. I can't wait to see how the dash will look when everything is fitted.
    In the next couple of weeks i'll start recording some casette tapes to keep in my car. I think i'll go with one of the playlists from my BMW Music Edition Topic (check my signature to find out all about these rare BMW OEM Cassettes).


    To be continued

    Extra photo of the cars as a reward to those who read to the end.

    Leave a comment:


  • PieterVN
    replied
    This week i bought an original working Blaupunkt BMW Reverse RDS Radio. It's on its way from Germany to Belgium.
    I'm also in contact with somebody to buy a OEM NOS NLA E30 speakerset.


    I've made an offer on an original Alpina 380mm 4-spoke wheel and 2 convertible sport seats.
    The guy that sells the steering wheel is not reachable, no phone and no response to my messages. Maybe he regretted advertising the wheel for almost close to nothing.


    The other person that was offering the sport seats sold them to someone else. The leather was a pee-coloured yellowish tint of regret.
    I was allready hoping for a nice reupholstery project with new leather covers but it'll have to wait untill i find myself a price correct set. It's a shame a couple of sport seats are hard to find in EU for an okay price.

    When i ordered the radio i started thinking. I still have my convertible parked and i'm planning to sell it in the spring/summer of 2021. This car has a BC1 installed and premium sound system with tweeters on the doors. I'm tempted to pull all these cool parts and retrofit them to my coupe.
    Also my convertible has a wiring harness for the heated seats but someone replaced these heated seats with non-heated ones in the past which leaves the wiring useless at the moment.

    Should i take my BC1, Premium Sound System and Heated seat wiring and retrofit this to my coupe? I'll keep an eye out for leather seats to reupholster and it would be nice to install these heater pads afterwards.
    I'm also interested in the 'Uberkaro' sport seat but people seem to be asking extravagant prices even for ripped up pairs.

    On the left my Brilliantrot 318i M40 Convertible, middle my 318iS and on the right my buddy's Michiel his 318iS. He has these original tinted Hella Smilies installed, they are quite rare to have.
    This week his car went to the body shop to get its IS-lip, mirrors and some other pieces colour matched. I think it will look great on this car. Gives it an extra sporty look.


    A couple of weeks ago i had a nice day with some of my friends. We went for a drive in Zeeland (translates to Seacountry), The Netherlands. One of them took this cool picture.
    From left to right: E30 318iS in Brilliantrot, E30 318iS in Lazurblau, E30 325i in Delphin Grau, 325i Coupe in ?Sterlingsilber? and 325i in Calypsorot.

    Last edited by PieterVN; 11-25-2020, 10:26 AM.

    Leave a comment:


  • Northern
    replied
    I've seen some people replace that foam with rubber before for something a little stiffer.

    Leave a comment:


  • PieterVN
    replied
    Originally posted by mjweimer View Post
    Great looking car.

    In case you want to replace the foam in the shift coupling, the p/n is: 25111434194

    I don't know that it makes a difference in feel, but it does help keep that assembly tight and likely is only for stopping any rattles from the pin to coupler interface.


    MJ
    Hi MJ, thanks.
    Yeah, i'll probably end up ordering the foam. It makes sense if you tell me about the rattling etc..
    Thanks for the information!

    Leave a comment:


  • mjweimer
    replied
    Great looking car.

    In case you want to replace the foam in the shift coupling, the p/n is: 25111434194

    I don't know that it makes a difference in feel, but it does help keep that assembly tight and likely is only for stopping any rattles from the pin to coupler interface.


    MJ

    Leave a comment:


  • PieterVN
    replied
    Today i did some small things on my car & spare gearbox.
    First thing i did was clean my gearbox with just a wire brush. I did not need a factory fresh look, but i need to get all the grime and oily dirt gone.

    Personally i think it allready quite an improvement in comparison with the previous pictures. Only thing i was thinking is that i really want some kind of parts washer. Would be even better.


    Out came the input shaft flange. I tapped out the old seal, and replaced it with the new Elring seal. This was actually my first time ever that i replaced an oil seal.
    Getting them out went pretty smooth without damaging any parts. Also tapping in the new one by using my 32mm socket went just the way i wanted it. I took my time because i did not want to damage the new seal by butchering it in crookedly.


    When installing this flange i did not use any kind of sealant. Is this the correct way to go? There was no paper seal or fluid kind of sealant in before.
    I guess this big shim also works as some kind of 'seal'? Also the small aperture seems to supply gearbox oil to the input bearing. I was kind of afraid that by putting some fluid sealant this would start getting in the oil.

    Please give me your advice or opinion. Gearbox is not in the car yet, so i can still easily apply some sealant if needed.

    Then i started on the selector shaft seal. Not as easy to get out because it being so small. One of my friends told me to just let the old seal in and just tap the new seal into it. There should be enough place to get both seals in.
    To be fair i'm not really a fan of this method. I prefer doing it correct. So i tapped in my smallest screwdriver. The seal crumbled into pieces.. I just kept tapping and eventually i got it out. Installed the new one and was very happy.


    New oil seal installed. When cleaning the shifter rod coupling i found all this oily, spungey kind of dirt inside of it. I cleaned it out. Seams that originally there is some type of 'spunge' installed?
    I did not feel any difference in the coupler movement with or without this substance in it.


    I did not get to the output shaft oil seal yet. I do not have the 30mm socket yet. This one i need to clear the shaft itself.
    I was also missing the 17mm alan key to remove the sump and filler bolt on this gearbox. My cousin had one laying around so went over there to get one. If i reinstall these bolts do i use some kind of sealing product or do i just put them on?

    After cleaning a bit i did find some goodies in my box of goodies. I still have some new gearbox mounts laying around that i ordered for my convertible but did not end up installing.


    When visiting my cousin to get the alan key my uncle and him tried some of their Bumper & Trim conditioner on my plate filler and window trim. Turned out pretty good.
    They gave me a small bottle to finish of the complete car. Nice to see the car in the daylight after being fully polished and with the trim reconditioned. It was the first time i saw the car in the daylight after my compounding and polishing work of previous weekend.
    My cousin also bought himself a nice E30 318i 2-door a couple of weeks ago, i went by to polish a part of his bonnet/hood. In the next weeks we will try to get the car fully polished..

    Picture of the car to end this post. .
    I love the look of the fresh polished taillights with the reconditioned black plate filler.


    Last edited by PieterVN; 11-21-2020, 03:35 PM.

    Leave a comment:


  • mike.bmw
    replied
    PieterVN , fantastic information. Thank you!

    Leave a comment:


  • PieterVN
    replied
    Originally posted by mike.bmw View Post
    Great detailing work. The reproduction gauge is super cool. I've seen that on one other R3V member's ride ( D.Martijn) and I'd love to get one at some point. Was it fairly easy to hook up to the M42 or did it require new sensors to be added?
    Hi Mike, thanks! I also have a weak spot for this cool gadget. Martijn and me met for the first time this summer through mutual friends and i was so impressed by his gauge that i ordered it myself a couple of months later.
    Multiple reasons made this attractive to me, the fact that i can measure oil pressure and oil temperature anytime and the car still retains it 'period correct'-look. Also the guy who builds these did a price promotion for a short amount of time...D.Martijn made me do it .

    The installation is super easy, the gauge comes with a complete set of sensors, wires and hose for vacuum pressure.
    You'll have to drill a hole behind the gauge to run all the cabling through and to the bulkhead. For installation i went with the oil filter housing lid that has 2 x M12x1.5 plugs, one i used for the M12 oil temp sensor and the other one i used for the oil pressure 1/8NPT with an adapter piece.
    If you ever decide to order one, i made a small summary of adapters and where i connected them.

    Sensor (specs) Adapter piece Attaches to
    Oil Temperature M12x1,5 - M12 x 1,5 Oil Lid cover
    Oil Pressure 1/8 NPT 1/8NPT to M12x1,5 M12 x 1,5 Oil Lid cover
    Differential Temp M12x1,5 Included in the kit Lower diff plug
    Vacuum pressure Hose attaches directly to gauge unit T-Piece included in the kit Fuel pressure regulator hose

    Simple DIY task, only remarks i would make is that i did not know beforehand that i needed a different oil filter cover and the adapter piece for the NPT thread. This was not clearly mentioned on the site at the time.
    Also oil temp jumps quite a bit because the sensor is on top of the filter housing. So its not soaked in oil but i gets some gulps of oil over itself.
    So to make it real precise it should be mounted somewhere on the block or on the drain plug, but the drain plug makes it quite for delicate for damage.

    But still i would definitely recommend it. It makes me more relaxed to drive and brings me ease of mind.

    Originally posted by D.Martijn View Post
    Nice work on the paint correction, looks a lot better! Also the rear lenses, major difference

    mike.bmw It's such a cool extra, it should be fairly straight forward to install, the kit includes every additional sensor needed.
    If I recall correctly Pieter needed a new oil filter housing lid/cover to house the extra sensors for oil temp and pressure.
    Thanks! I though so too, it's nowhere near perfect. But it is such an improvement over the unpolished, sanded and scratched paint that it used to be.
    Another thing that i can remove from my to do list. Also you're exactly right about the lid.

    Leave a comment:


  • D.Martijn
    replied
    Nice work on the paint correction, looks a lot better! Also the rear lenses, major difference

    mike.bmw It's such a cool extra, it should be fairly straight forward to install, the kit includes every additional sensor needed.
    If I recall correctly Pieter needed a new oil filter housing lid/cover to house the extra sensors for oil temp and pressure.

    Leave a comment:


  • mike.bmw
    replied
    Great detailing work. The reproduction gauge is super cool. I've seen that on one other R3V member's ride ( D.Martijn) and I'd love to get one at some point. Was it fairly easy to hook up to the M42 or did it require new sensors to be added?
    Last edited by mike.bmw; 11-17-2020, 05:43 AM.

    Leave a comment:

Working...
X