Announcement

Collapse
No announcement yet.

Something Something Tony G's E30 Sedan (we're using a coupe now) - S54 Swap

Collapse
X
 
  • Filter
  • Time
  • Show
Clear All
new posts

    Something Something Tony G's E30 Sedan (we're using a coupe now) - S54 Swap


    The time has finally come for me to start a build thread. I’m about to go on a build up rant so if you want to jump then go to the second post.


    I’ve been on R3V officially for over 10 years now just lurking, reading through everyone’s builds, and (mostly) dicking around in the off-topic section. I mean I was still in high school. Holy shit.


    I've been waiting a long time to finally do something significant enough for me to post my own thread. I know everyone here welcomes sharing of anything e30 related, but this is a big one for me. Sure things have gotten “quiet” on here in more recent years, but fuck em’. This forum has proven time and time again that R3V holds the ultimate wealth of knowledge out there. At this point I realize that getting a thread started is one thing, but maintaining it is another. So if anyone is remotely interested in what is to come then please feel free to pester me about it.


    To provide more context about myself I’ve only had a couple e30s, but my brothers have owned a few as well. First is my E30 Vert. My dad owned this thing since ‘91 and I loved it to death even though it was rusty. Sadly it was sold because it was just sitting for too long. I’ll own a vert again one day.


    FB_IMG_1559602631934 by Tony Gomez, on Flickr


    My current e30 is a late model sedan. I inherited this one from one of the brothers and it’s been reliable after some work. It’s been covered in chalkboard paint as a cheap paint solution, but I’ve recently sanded the car down to bare metal. I’ll talk about the plan for that later.


    DSC00068 by Phillip Keefe, on Flickr


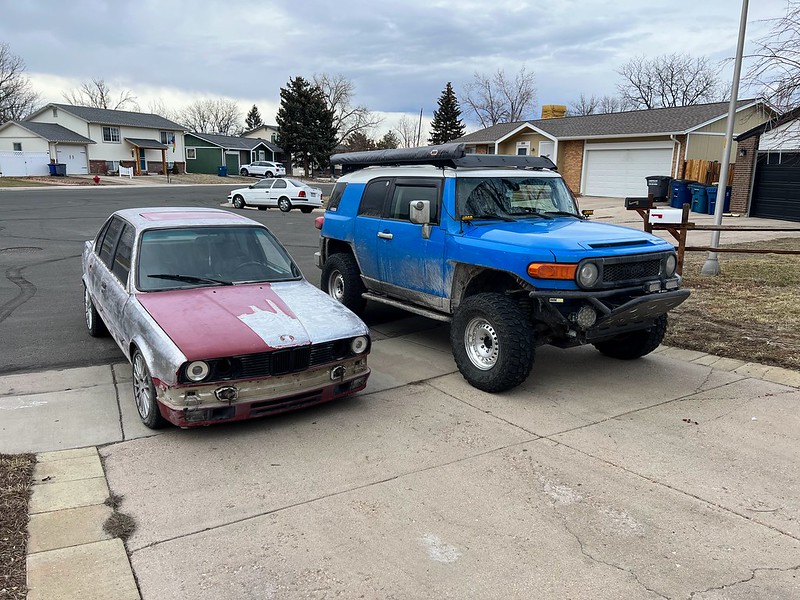
    IMG_0528 by Tony Gomez, on Flickr


    When I first graduated college in 2016, I was really eager to make some money and pour it into the sedan, but not too long after I started my job in ATL they asked me to move to Colorado. Sure NBD, but who moves to Colorado and doesn’t take advantage of the outdoors?! This is where the FJ came into play. Became a bro with lambo and did broverlander things. Gotta be some of the best memories I’ve ever made. I’ve got plenty of photos in the Toyota off-topic thread.


    DSC_4030 by Anthony Gomez, on Flickr


    DSC_9791 by Anthony Gomez, on Flickr


    So obviously the FJ got in the way of the e30 build for almost 5 years, but I’m now back in Atlanta where there is way less offroading and camping so we’re back on track. I spent a lot of time reading on R3V deciding what build I wanted to build. Turbo m20? S52? V8?! My possibilities seemed endless since I’ve waited so long and felt less hesitant to hold back. This also made things a bit overwhelming. What did it come down to? I found a deal I just couldn’t pass up. One of the most celebrated motors made by BMW that also doesn’t seem too “overkill” in an e30 swap. Sure it can get expensive, but to me it seems like a great engine to swap.
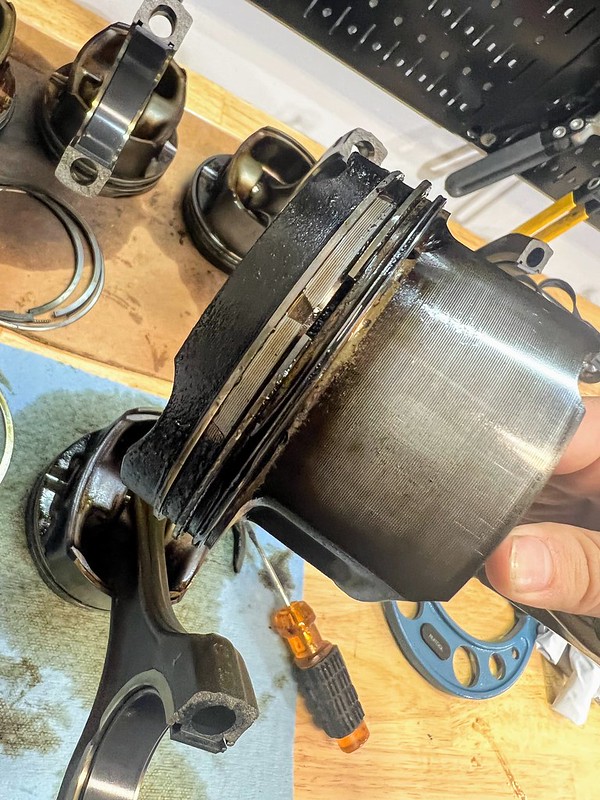
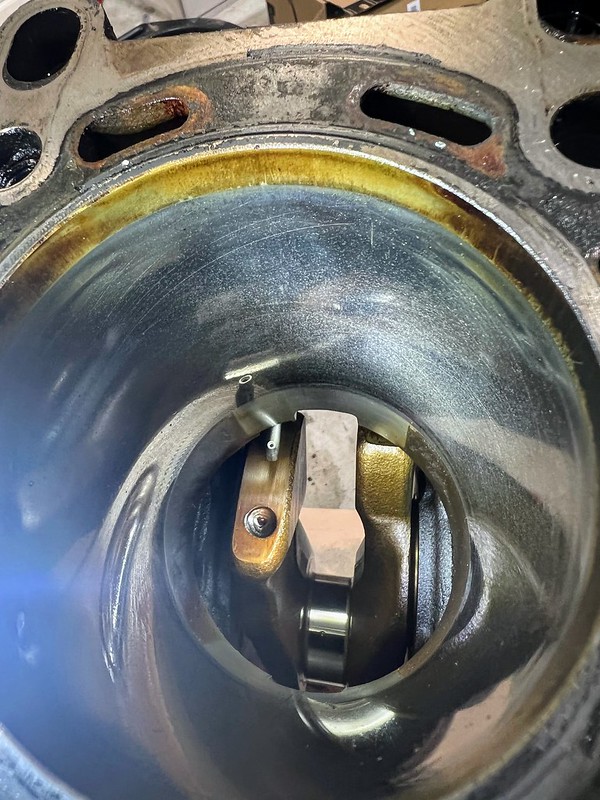

    THE S54


    Before I start getting into the meat of the progressive updates, I’m going to cut this post. If you actually read this whole post, thank you. I will try not to sidebar as much through the rest of this. I’ll begin on my findings with the engine tear down in the next post. Remember that I decided to post a build to begin getting feedback from others so please chime in!
    Last edited by spike68; 05-18-2023, 07:08 PM.
    I don't even own this car anymore, but I'm too lazy to change the picture.


    #2
    THE ENGINE


    IMG_0768 by Tony Gomez, on Flickr


    I picked this thing up from Denver Beer and Oil a month before I moved back to ATL. A leakdown test before purchasing the motor indicated that cylinder 3 or 4 (“or” because I don’t remember) had air passing into the crankcase. I figured maybe it was a failed piston ring so I took the risk. At the price I got the engine at I figured if the block was trashed I could sell parts to breakeven if needed.


    On to the breakdown. Some of these images are from a headcam I was wearing during the teardown process. I’ve been taking video of the whole thing so I can refer back to the way things came apart. I may also turn it all into a video at some point.


    THE HEAD


    DSC_1500 by Anthony Gomez, on Flickr


    Breakdown was fairly straightforward and I didn’t get many photos. Had to look up a couple things in getting the vanos pulled out since I’m only familiar with m20s. Speaking of which, does anyone know the common upgrades are with the system? I know theres an anti-rattle kit out there, but I may have heard something about replacing the exhaust vanos hub as well? Feel free to chime in so I can get those things added to my purchasing list.


    A couple items for me to refer back to during disassembly:
    1. Vanos valve body - Dropped on the ground and potentially damaged. I’ll need to analyze later and determine if a replacement unit is needed.
    2. Rocker arm shafts - I kept getting a lot of binding on some rocket arms while trying to slide them over out of the way of the valve spring. In some spots it was so difficult that the rocker shaft got scored up a little bit. Will analyze this later to determine if replacement shafts are needed. I was most likely being too forceful with them.


    Once I got the head off I spent a decent amount of time placing parts and pieces in bags, labeling them, and placing them in a storage box. If it’s one thing I hate the most it’s misplacing little detail things like nuts and bolts. With how complex this engine is I’m hoping this will come to my advantage during reassembly.


    IMG_0827 by Tony Gomez, on Flickr


    Parts Storage by Tony Gomez, on Flickr
    I don't even own this car anymore, but I'm too lazy to change the picture.

    Comment


      #3
      THE BLOCK


      IMG_0826 by Tony Gomez, on Flickr


      VID_20220627_210207_00_001_2022-07-19_21-27-39_screenshot by Tony Gomez, on Flickr


      Lmao look at me working hard in my Crocs.


      Took a couple evenings after work to get the block torn down. When I started all this I still hadn't had any indication of how this motor failed. Aside from carbon build up (probably because I heard the engine was burning a lot of oil before it got removed) and some light scoring in cylinder 1 everything looks good so far.


      So I went ahead and removed the pistons.


      VID_20220627_210207_00_001_2022-07-19_20-55-29_screenshot by Tony Gomez, on Flickr


      And what did I find? Someone has torn into this motor already.


      IMG_0904 by Tony Gomez, on Flickr


      IMG_0919 by Tony Gomez, on Flickr


      Found some fresh con rod bearings and ARP hardware. Does this help me find out what happened to this motor? Not yet.


      Took the pistons out and looked at them for a while. At first I noticed this on piston 3.


      IMG_0925 by Tony Gomez, on Flickr


      At first it felt like a layer of metal fell off, but after some further investigation by pulling the rings off I discovered this


      IMG_0948 by Tony Gomez, on Flickr


      IMG_0946 by Tony Gomez, on Flickr


      IMG_0955 by Tony Gomez, on Flickr


      All six pistons had cracks on the ringlands. You can see all the metal pieces in the middle of each set of piston rings in the image above. Luckily none of the cracks had actually formed into separated pieces, but I did find some scoring in the cylinder walls.


      IMG_0953 by Tony Gomez, on Flickr


      IMG_0952 by Tony Gomez, on Flickr


      IMG_0951 by Tony Gomez, on Flickr


      This is where my experience comes to an end. The first image is cylinder 1 and is the worst example. My nail barely catches, but I’m unsure what starts becoming “bad”. Either way I’m taking the block to the machine shop to get checked out. If they just hone the scoring out then awesome. If it needs a bore then I’m buying forged pistons. Anyone with experience here feel free to chime in on how this looks or best options.


      The last thing I examined was the crank.


      IMG_0987 by Tony Gomez, on Flickr


      First off, I never realized these were that heavy. I mean it makes sense, but I’ve never held a crank before so it was eye opening.


      As for my examination, I don’t see damaged scoring, but I did find what looks like “pitting” on one of the connecting surfaces. Will also be taking this to the machine shop for their evaluation. It’s hard to see but here is a photo.


      IMG_0970 by Tony Gomez, on Flickr


      The main bearings look fine with the exception of 1, but I don’t see damage on the crank itself.


      IMG_0964 by Tony Gomez, on Flickr


      So this concludes my findings for now. Next step is disassembling anything remaining on the block and further breaking the head down to take to the machine shop.


      Thanks again for reading.
      I don't even own this car anymore, but I'm too lazy to change the picture.

      Comment


        #4
        Hey Tony, thanks for making a thread! In this age of constant media bombardment I find it relaxing to read (and look at pictures) in a build thread.

        Good job with the bag n' tag. I do the same thing, and it makes putting something back together after a length of time much easier.
        Had most of my car blown apart and an engine build going at the same time, pretty sure without being organized I would be missing a lot of bits.

        Interesting idea about using a body video cam to keep track of how something comes apart.


        Think I said "WOW" out loud when I saw the ringland pictures.
        What causes that kind of failure? Detonation?

        Sounds like you got a deal on the S54 because of the condition, which will give you some room to rebuild.
        They go for 8k+ here in Canada in "running" condition just as a point of reference.

        I've subbed to your thread, excited for updates!
        Last edited by Panici; 07-20-2022, 08:31 AM.

        Comment


          #5
          First off, love the FJC.

          I agree with Panici, getting an S54 even if you have some time and effort into a rebuild you'll likely come ahead. Complete engines have shot up to a point where I don't think they will be on my list.

          Great stuff, and looking forward to more posts.

          Let's bring back r3v, even if it's slow and steady.
          Project Thread | Instagram | Phoenix, Arizona Events Thread

          Comment


            #6
            Originally posted by spike68 View Post
            This forum has proven time and time again that R3V holds the ultimate wealth of knowledge out there.
            Simon
            Current Cars:
            -1999 996.1 911 4/98 3.8L 6-Speed, 21st Century Beetle

            Make R3V Great Again -2020

            Comment


              #7
              FUN!

              Crank will probably polish out. It's not a bad thing to get a little more clearance in the s54 crank bearings anyways, BMW made them too tight IMO. They left the rod clearance at .001" when they bumped the crank pins up to almost 2" (rule of thumb is .001" clearance for every 1" diameter).

              I always cringe a little when I see ARP hardware on broken cap rods. There's no easy way to re-size the big end, and ARP fasteners generally oval the holes. Whenever fasteners are changed (rod or main bolts) to something with more clamping force, the caps will distort, naturally.
              john@m20guru.com
              Links:
              Transaction feedback: Here, here and here. Thanks :D

              Comment


                #8
                Thanks everyone! Love the feedback.


                Originally posted by Panici View Post

                Think I said "WOW" out loud when I saw the ringland pictures.
                What causes that kind of failure? Detonation?

                Sounds like you got a deal on the S54 because of the condition, which will give you some room to rebuild.
                They go for 8k+ here in Canada in "running" condition just as a point of reference.
                I said wow because it was the day after taking the pistons out for me to notice. To answer your question though, from what i've read detonation would be one of the glaring causes. However I'm not convinced all six died by detonation. What I also read was that the casting for the s54 pistons isn't the greatest and since the ringlands of any piston is the weakest point thats why it went. Maybe someone decided to do a phat revlimiter burnout.

                And yes was a steal. Like I was trying to get the whole thing out the dude's garage fast before he changed his mind. The engine with accessories, DME, intake, 420G trans, headers, and light weight clutch and flywheels were still less than the cost of just a motor on ebay.


                Originally posted by ForcedFirebird View Post
                FUN!

                Crank will probably polish out. It's not a bad thing to get a little more clearance in the s54 crank bearings anyways, BMW made them too tight IMO. They left the rod clearance at .001" when they bumped the crank pins up to almost 2" (rule of thumb is .001" clearance for every 1" diameter).

                I always cringe a little when I see ARP hardware on broken cap rods. There's no easy way to re-size the big end, and ARP fasteners generally oval the holes. Whenever fasteners are changed (rod or main bolts) to something with more clamping force, the caps will distort, naturally.

                I was figuring the same for polishing. I'll let the machine shop do their thing and check it for round. If they take some material off then great.

                Whats the solution for the hardware then? run OEM?
                I don't even own this car anymore, but I'm too lazy to change the picture.

                Comment


                  #9
                  Ive probably logged 400+ hours with Genuine WPC and ARP hardware. M10 or M11s, Journals 1.9275, and clearance around .0018-.002 Every once in a while .00175, As good as you can refrence that in car with Plastigauge.

                  I keep these on the shelf at the shop, those motors ran 50w Race redline for 8+ hours strait.

                  If it its in pieces and you can be more accurate, might as well shoot for that .001 per inch. The rods can be torqued and measured on the bench for out of round. I assume they could hone them back?

                  Vac has CP pistons, I have had good luck with them. Lang Racing and Achellies has CP also. Hope the cylinders only need 87.5 as not much meat between the walls. The deck should get machined down with another finish good enough for another MLS

                  Are all the piston squirters still connected? Id get new ones.

                  Was the head gasket blown?

                  I was up above it, Now I'm down in it ~ Entropy - A Build thread.
                  @Zakspeed_US

                  Comment


                    #10
                    Very neat! That Phil guy is pretty awesome sauce. GL with the build! Stoked to see it come along.
                    ~ Puch Cafe. ~ Do business? feedback ~ Check out my leather company ~

                    Instagram: @BWeissLeather

                    Current cars:
                    ~ '87 325 M30B35 swap
                    ~ '87 535
                    ~ 01 540 Msport 6spd
                    ~ '06 X5 4.8is

                    Comment


                      #11
                      Too cool! cannot wait to see more!! I have a sedan myself too :)

                      Comment


                        #12
                        Originally posted by spike68 View Post
                        Became a bro with lambo and did broverlander things. Gotta be some of the best memories I’ve ever made. I’ve got plenty of photos in the Toyota off-topic thread.
                        Miss you too

                        Glad you actually started this lol. Accountability to actually follow through lmao

                        Originally posted by SpasticDwarf;n6449866
                        Honestly I built it just to have a place to sit and listen to Hotline Bling on repeat.

                        Comment


                          #13
                          Originally posted by moatilliatta View Post
                          Ive probably logged 400+ hours with Genuine WPC and ARP hardware. M10 or M11s, Journals 1.9275, and clearance around .0018-.002 Every once in a while .00175, As good as you can refrence that in car with Plastigauge.
                          What bearings? I tore down a virgin s54 and there was much less than .0018! EPIC was the first I saw adding more clearance into the replacement bearings.

                          Plasti-gauge doesn't show roundness, only clearance in the one spot it's applied. I've home-brewed many engines with ARP that lasted, but as you said, this one is in pieces. Heck, I changed m20 rod bearings mid-race in the parking lot of Road Atlanta, and it was even snowing, lasted the last 10hrs of the race haha!

                          john@m20guru.com
                          Links:
                          Transaction feedback: Here, here and here. Thanks :D

                          Comment


                            #14
                            Genuine bearing, WPC treated.


                            I was up above it, Now I'm down in it ~ Entropy - A Build thread.
                            @Zakspeed_US

                            Comment


                              #15
                              Originally posted by ForcedFirebird View Post
                              Heck, I changed m20 rod bearings mid-race in the parking lot of Road Atlanta, and it was even snowing, lasted the last 10hrs of the race haha!


                              Comment

                              Working...
                              X