-
Got my aluminum sheet for the sunroof patch today. 24" by 36" of .0625 (1/16") sheet, $30 from Metal Supermarket. I'm in the process of drilling rivet holes and rounding corners. Still deciding what color(s) to paint the roof and patch. I'll post pics when I'm done and make one consolidated post.Leave a comment:
-
Not only that, probably the "least likely to pop off in a hard shift to 2nd" shift knob out there.Leave a comment:
-
Now you got me wanting a pool ball. Probably the cheapest shift knob out there, actually.Leave a comment:
-
I haven't had a chance to really try it out, but when I do I might want it to be lower, in which case I'll shorten the lever. I'll use a jam nut either way, though. The thought of that thing being bottomed out doesn't seem right, and a lockwasher in there will keep it tight.Leave a comment:
-
Nice!! I wouldn't have expected the pool ball to thread that easily!! dang!
Also, what you can do to get rid of threads is simply chop the shift lever shorter by the required amount. Also, this eliminated the need for a jamb nut, because you can measure and cut off the right amount of the lever so that the ball bottoms out with the "5" being straight. Also, use thread lock tape so that it doesn't vibrate free, maybe even mild thread lock goo instead of the tape.
It DOES look like the pool ball needs to be lower on the shifter...Leave a comment:
-
5-Ball Shift Knob
My 5 ball for a shift knob replacement showed up today:

The "M" knob the previous owner had on kept pulling off since the retaining clips were broken. So, I figured I might as well do something cool instead of tracking down a stock replacement.
My order of operations was as follows:
1.) Thread the shift lever with a 9/16"-12 die
2.) Drill the pool ball
3.) Tap the pool ball
4.) File a flat around the hole for a jam nut to sit against to allow me to index the ball (can't have a crooked "5")
5.) Install
I first threaded the lever. This was made difficult by the slotted design; I ended up having to file it down into a cone shape to get the die to work at all. Once I got it started, it threaded just fine. After using the die I followed up with a thread restorer, which I ran up and down the threads with a wrench until I could do it by hand (5-6 times). Here's how it came out:

IT was then time to drill the ball. I'd recommend finding a drill press to use for this. Trying to drill a hole straight into the center of a sphere would be almost impossible without one. I was able to flip the tray on mine over to use the center hole to locate the ball as I drilled, thus keeping it dead center. Here's my drill setup:

I wasn't smart enough to do this, but I'd also find a sock or some other rag to put between the ball and the plate so it doesn't get scraped up during drilling.
For a 9/16"-12 thread, my tap set recommended a 31/64" drill bit, which is fairly close to 12mm. Your tap set should also tell you what to use.
The ball drilled like butter and generated copious orange shavings. I left the drill press set to a medium-high speed, but it would have been better to have it a little slower. I also had to empty out the hole a few times as the shavings were filling it up and grinding into smelly dust. I drilled probably 1 1/4" into the ball
Here's how the hole turned out:
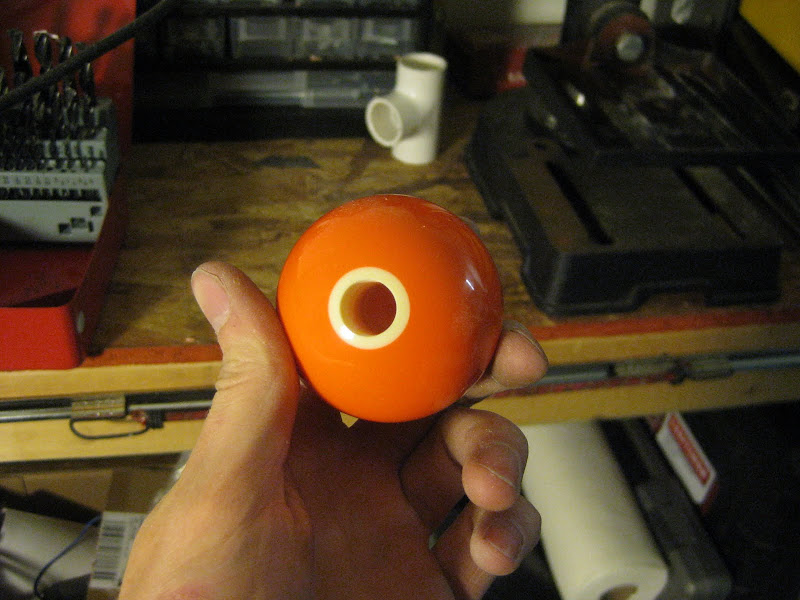
And yes, I am proud of my aim. I then stuck the ball wrapped in a sock into a vise for tapping. Make sure not to clamp the vise down too hard as the ball is now just a hollow piece of brittle plastic. I could see mine start to deflect with just a moderate force.

The ball tapped beautifully using the one turn forward, one quarter turn backward routine.
I didn't have any 9/16" nuts hanging around to use as indexing jam nuts, but I threaded the ball onto the lever just to see how it would look and feel:

Contrary to what you might expect, it feels great, is the right size, and the weight is perfect. The only thing I'd do differently would be to only thread the shift lever down as far as the ball would thread. I went all the way down to the collar thinking there wasn't any reason not to, but now my fingers end up hitting the threads and they are sharp! I'll cover them up, but it would have been easier to just thread less.Leave a comment:
-
And you're damn right it's a hood vent in your door, not a door vent in my hood.
Measured up the hole; looks like a 24" by 36" piece of aluminum will do nicely, which is fortunately a standard size so I shouldn't have to pay for cutting. Not going to do too much work tonight, driving the 'vette up the mountain instead.Leave a comment:
-
I have one of those hood vents in my bedroom door so the farts can escape. Nice!Leave a comment:
-
I would consider that if the original panel weren't so heavy... aaaand if I had some way to weld. But I don't right now, so it's rivets ftw.
Pulled all of the speaker/amp/head unit wirng today, probably about 5 lbs of it. There is noticeably less wiring in the car and under the dash now. Also started thinking about removing all the stalks from the column to get them out of the way of my hands. I'd go with momentary switches for the turn signals, single/several setting wipers with pushbutton spray, and ditch the cruise control. I should probably fab up a console switch panel first... which means going down to HF and shopping for sheetmetal tools. Man, everything I want to do involves a trip to HF.Leave a comment:
-
You can weld in the original sunroof panel and it looks factory from the outside. I ended up doing that, but then Bondo'd it so it looks like it never had a sunroof to begin with. My Bondo skills aren't top notch, and you can see it if you look at it through a certain angle, but it still looks cool.
I agree on the PITA-ness of removal. Damn, I never want to do that again!Leave a comment:


Leave a comment: