The Ugly E30

Collapse
X
 
  • Time
  • Show
Clear All
new posts

  • tspangle88
    replied
    Back to the carpet. Here it is after a couple of days of drying in the sun:


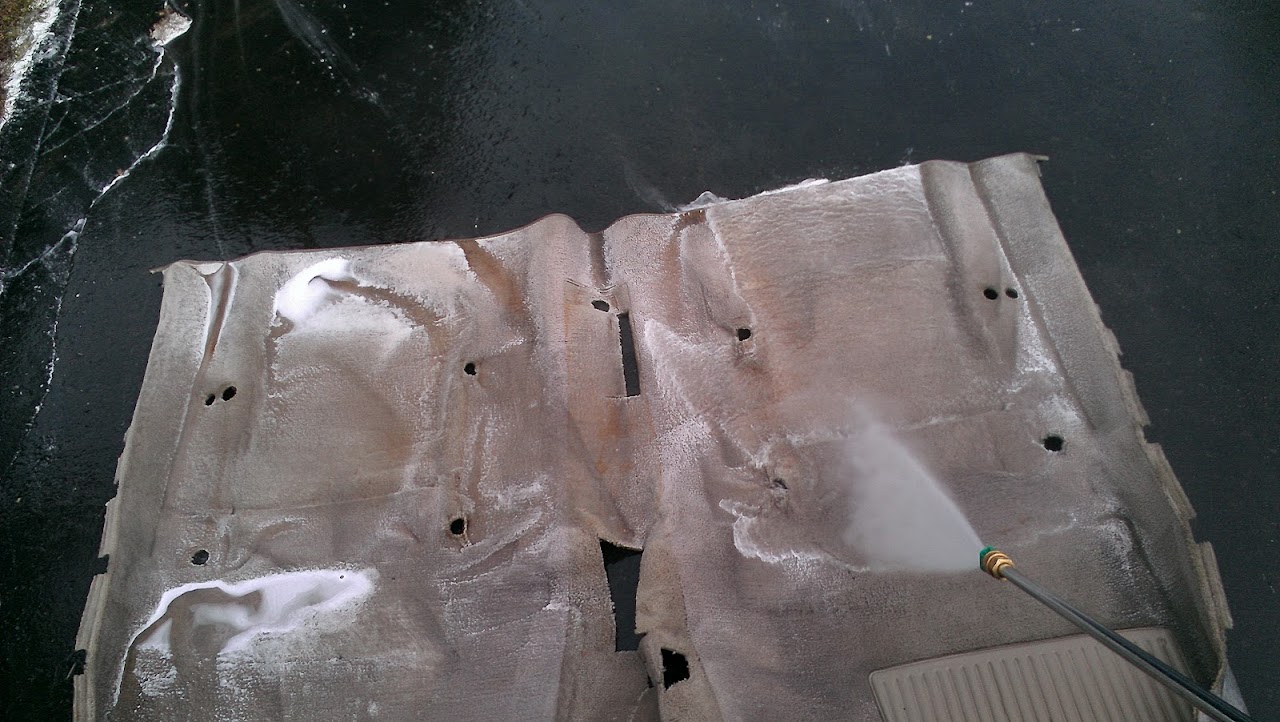
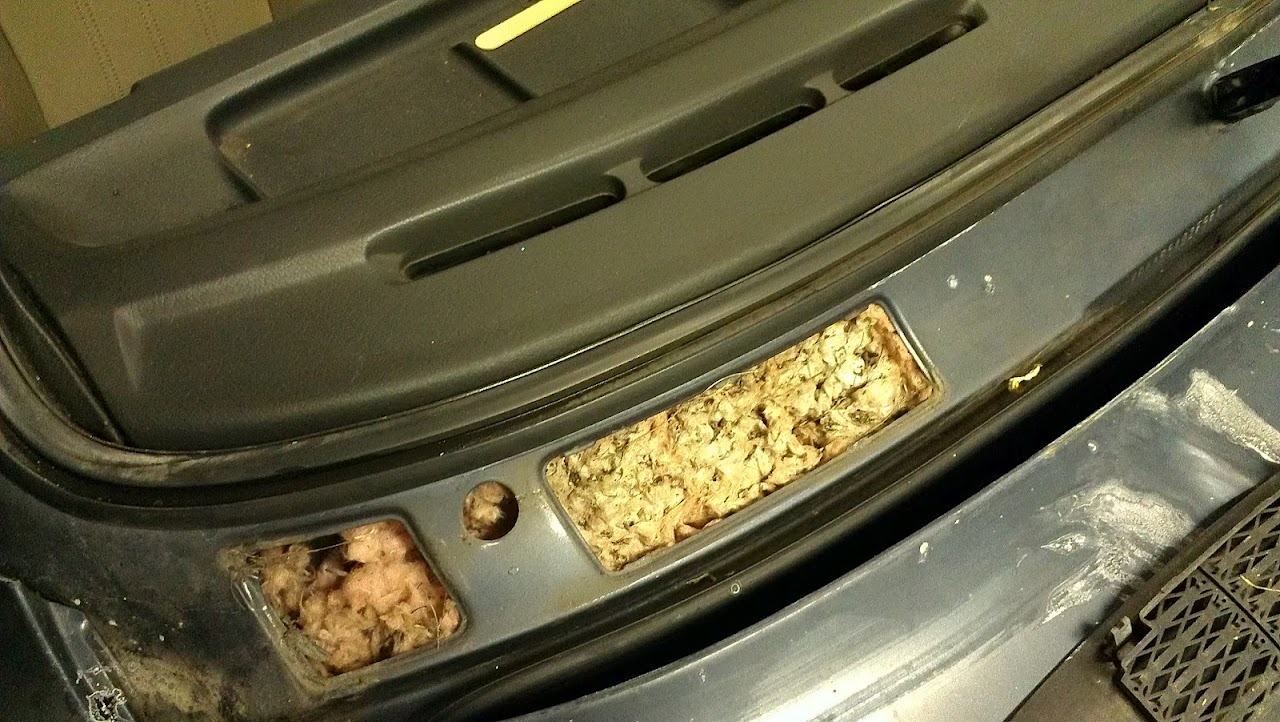
    I then vacuumed it again, just to make sure there was no more sand or grit, and to get the fibers kind of "standing up" for paint. I decided to go with Duplicolor Vinyl and Fabric paint in gloss black. Here I am applying the first coat:


    Halfway done with the first coat, shows the contrast:


    After 3 coats:


    It's going to need one more at least. I didn't use as much in the places where you won't see it, but I still want more coverage. You need to brush the stuff, for several reasons. For one thing, you want to brush in one direction, paint, then brush in the opposite, to try and get all sides of the fibers. Also, the stuff dries pretty hard and crusty, so you need to soften it up.

    Here's the bit of carpet from in front of the rear seat, this is 4 coats, looks pretty good, I think:


    More to come. Need to get some more paint to do a final coat, and I need to order my ignition parts. I think I'll also install my crack-free dash while everything else is out. Might as well.....

    Leave a comment:


  • tspangle88
    replied
    Continuing on with my interior refresh. Rear seat, rear deck, and carpet are all out of the car:


    I decided to remove the middle seat belt. I can't imagine I'll ever try to cram 3 people back there, and it just cleans things up a bit:


    My headliner isn't completely horrible, but it's not the greatest, either:


    So for now I just scrubbed it with carpet cleaner. I know I should probably dye it black to go with the rest, but eh, it'll work for now:


    Time to start installing parts! To review, my parts car was an 87 325is with a nice black leather interior, most of which I'm able to use. Here's my old decklid with the new one:


    Slightly better, eh? The old one would have needed new carpet, much easier to swap in this one, plus it has a CHMSL, though I haven't hooked it up yet. Only issue is that the seatbelts come out 90 degrees off, but I fed them through and they seemed to move fine. Not going to worry about it for now.

    Installed:


    Pretty big improvement, I think.

    Leave a comment:


  • Rose E30
    replied
    Really enjoying the project so far. Good job with it!

    Leave a comment:


  • tspangle88
    replied
    So I decided to start on my nasty, nasty interior. Here's my carpet:


    There are dark brown stains all around the center console on both sides. Either there was one hell of a coffee spill in this thing, or someone was brutally murdered in it. I'm going with the former.

    Carpet removal wasn't too bad. I read all the threads on here, which helped a lot. Basically, remove the seats and the seatbelt rods, pull off the door jamb covers, remove the center console, cut around the HVAC stuff where the console covers it, pull off the two side carpet bits on the kick panels, cut around the steering column, and wiggle the thing out. Here it is, ready for cleanup:


    As I said, nasty. So I mixed up a 50/50 solution of Simple Green and hot water:


    And set upon it with a stiff nylon brush and lots of elbow grease. Here's what it looked like when I was done scrubbing:


    Then it was power washer time. What a wonderful tool that is:


    So, it's a lot better now. I'll take another pic after it's done drying in a couple of days.

    Since I'm going to be putting in the black interior stuff from my parts car and because I knew I'd never get this carpet completely clean anyhow, I'm going to dye it black. I've read some threads on that and have a pretty good general idea of how to do it. Multiple coats, brush in between in different directions so that the dye gets down into the fibers, etc. Sounds like the big brands are VHT, Duplicolor, and SEM. I need to do some more research on them, but I welcome any input.

    Leave a comment:


  • tspangle88
    replied
    Continuing on my quest to find out why I don't have spark, I pulled the cap and rotor. Yeah, that cap is pretty shot:


    I got a cap and rotor with my parts car, but when I check them, I saw this:


    That ain't gonna work. So I guess I'll order all new ignition bits and go from there.

    Leave a comment:


  • tspangle88
    replied
    Brief update time. As you can see in my other thread, my fuel pump issue turned out to be a wiring problem, which I've since fixed. I now have two operational fuel pumps, which I've verified by removing the fuel line while cranking and having it pump fuel into a bucket.

    However, somehow along the way, I've lost spark. To reiterate, when I first got the car and was trying to diagnose the fuel issue, it did have spark because it would run (briefly) on starting fluid. Now, nothing. Last night I pulled the plugs and they all looked fine. While I was in there, I decided to check the compression, too:

    1 - 180 psi
    2 - 165
    3 - 170
    4 - 170
    5 - 165
    6 - 160

    Engine is a 221k mile eta that hasn't run in an indetermined amount of time. Seems like a bit more variation than I'd like to see, but at least I know my timing belt isn't broken and that I should at least have enough compression to make it fire.

    I then started on the Bentley procuedures for checking the coil. I verified that Terminal 15 is getting battery voltage with the ignition on, and that the internal resistance is within spec.

    Next I decided to take a look at the cap and rotor. Which is actually kind of a PITA to get off, so I ended up removing the hood, by which time it was getting pretty late, so I bailed for the night.

    More later.

    Leave a comment:


  • tspangle88
    replied
    Got back at it last night, and I'm still struggling with diagnosing my fuel system problem. I have started a separate thread for that here: http://www.r3vlimited.com/board/show...24#post3315424

    Leave a comment:


  • tspangle88
    replied
    Originally posted by MattAvino
    How were the doors? I coulda used em...
    They were junk. Tons of rust along the bottom, and bad Bondo work. Trust me, if I thought I could use or sell them, I would have grabbed them.

    As for the wheels, yes, I have the basketweaves that came with the car. The ones that were on it when I junked it were some kind of fake BBS wheel, and they were obviously not a real E30 wheel, because they were double-drilled. Anyhow, not sure what I'm going to do with the basketweaves. They don't have center caps. The project car has an OK set of bottlecaps on it. Eventually I'm going to go to some kind of 15x7 wheel, but I will probably keep at least one of these other sets as spares or possibly rallycross wheels.

    Leave a comment:


  • tspangle88
    replied
    Originally posted by efficient
    lucky you had better luck on taking the windshield out cus i broke a couple of them trying to take them out.
    did you take it out yourself or did you have an extra set of hands? any suggestions?
    I did it myself. Honestly, I found it really easy. I removed the retaining strip, then I just pushed on it from the inside in the upper left corner until it popped out. It didn't take much force. Once that corner was out, it was just a matter of going around the rest of the perimeter of the windshield. Once it was popped out enough, I was able to grab the edge from the outside. I wore gloves, but the edge of the glass is rounded, so it's not sharp.

    I can see how it would be harder if the rubber seal was dried out and stiff. Both of mine are still pretty pliable.

    Leave a comment:


  • MattAvino
    replied
    Also, did you save the wheels?

    Leave a comment:


  • MattAvino
    replied
    How were the doors? I coulda used em...

    Leave a comment:


  • efficient
    replied
    lucky you had better luck on taking the windshield out cus i broke a couple of them trying to take them out.
    did you take it out yourself or did you have an extra set of hands? any suggestions?

    Leave a comment:


  • tspangle88
    replied
    Bye bye to the parts car:


    In case anyone was wondering, this car, which had a gutted interior, no engine/trans/driveshaft/diff, no trunklid or hood, and various other miscellaneous bits removed, and had a healthy dose of ferrous oxide lightening, weighed 1560 pounds. The fenders and windshield were inside the car when I junked it. They picked it up right off my trailer with this giant forklift thingy with like 25-foot arms. Pretty impressive. And I got $109.20 for it. A rare positive entry in the log for this project.

    Leave a comment:


  • tspangle88
    replied
    Continuing to strip the parts car. This is a good exercise, because not only am I getting a huge pile of parts, I'm learning a lot about how these cars go together.

    I decided to install the cracked windshield in the parts car just for the practice. I didn't want to screw anything up with my good windshield. It wasn't too bad, took me about 45 minutes:


    Lessons learned: Use LOTS of soapy water to lubricate it, use a plastic putty knife or similar to work the glass back into the rubber, and go slow and be patient.

    With the interior done, I moved to the engine compartment to grab what I can and make more room to get the engine out. Figured I should grab the blower motor and wiper motor. Kind of a PITA, but not too bad:


    Getting ready to pull the engine and tranny together, I crawled underneath to disocnnect and unbolt the tranny. I found this:


    Say, isn't that supposed to be connected on BOTH sides?

    Not that I've heard any of this talk, but just in case anyone was concerned about me stripping out a "nice" 325is and hauling it off to the crusher, I give you this view from underneath it:


    Laying under the car, there are at least 5 places where I could clearly see into the interior. This car is a total loss. Thank you, Michigan roads.

    Getting ready to pull the engine. With no head, there was no place to really attach a lift plate or anything, so I just did it the old-fashioned way and wrapped a couple of chains around it:


    After a bit of wiggling and maneuvering, it was out!


    After the engine was out, I took a quick look at the mounts. I didn't think I'd want to use them, and looking more closely at the passenger's side one confirmed it:


    This is the passenger's side mount, same side as the broken trans mount bolt. So the engine and tranny were pretty free to rotate that way. Yikes!

    So, pretty good progress overall. I just need to go through the parts car one more time and make sure there isn't anything else I might need, then I can haul it away and get to work on the project car again.

    Leave a comment:


  • tspangle88
    replied
    Did a little bit last night, but as it was 100 degrees outside, I didn't get too ambitious. My main priority at the moment is to finish stripping the parts car so I can get it the hell out of my barn.


    Given that the fuel pump on the project car is a known issue, I decided to grab the one from the parts car:


    As I think I mentioned earlier, the project car's windshield is badly cracked, so I was budgeting a couple hundred bucks to take it to a glass shop to get a new one. Then I read that removing E30 windshields is pretty easy, so I decided to give it a go. Turns out it's only slightly less complex than falling off a log. Pop up this clip:


    Then pull out the center band of the molding (the cracked, nasty-looking thing in the pic), give the window a gentle but firm push from the inside on the corner, and it'll pop out. Heck, it's a one-man job! Project car sans windshield:


    Woohoo! I love E30s! I'll pop the good windshield in tonight, need some soapy water to get it in there.


    While poking around this area, I noticed some insulation under the cowl cover on the passengers side. I figured it was part of the car's insulation, then I noticed that the parts car didn't have it. Incidentally, it's nice to have two E30s to compare between to check things like this out. So I popped the cover off and found this:


    Yeah, that's a mouse nest. The car was living in a barn when I bought it. Like literally a barn, with a dirt floor and horses and such, on a farm. So, no big surprise. Need to shop vac that out.


    That's it for now, next step is to get everything out of the engine bay, grab the engine and trans, then I'm done stripping the parts car!

    Leave a comment:

Working...