Announcement

Collapse
No announcement yet.

1995 e34 540i/6 *m60b44* - Return to Some Kind of Glory

Collapse
X
 
  • Filter
  • Time
  • Show
Clear All
new posts

    Originally posted by AWDBOB View Post

    Sign up for AutoGeek’s email blast- they have regular 20 and 25% off coupons and you can save a decent chunk on the more expensive compounds/pads/etc.

    yeah you’re not gonna have much paint left, but as long as you do a solid coating it’ll last! The new hybrid ceramic stuff is nice and easy to use if you don’t want to go full ceramic.
    You are the man! I'll look into the hybrid ceramic sealers out there.

    I made another Amazon order for these. I hope 20 of them will be enough for this car.

    One bright side to me getting the 32oz bottles of M100 and M205, I will be selling the Jetta Sportwagen soon and it could use some cosmetic love too. I don't plan on starting a detailing business lol, but its good to have this stuff on hand!

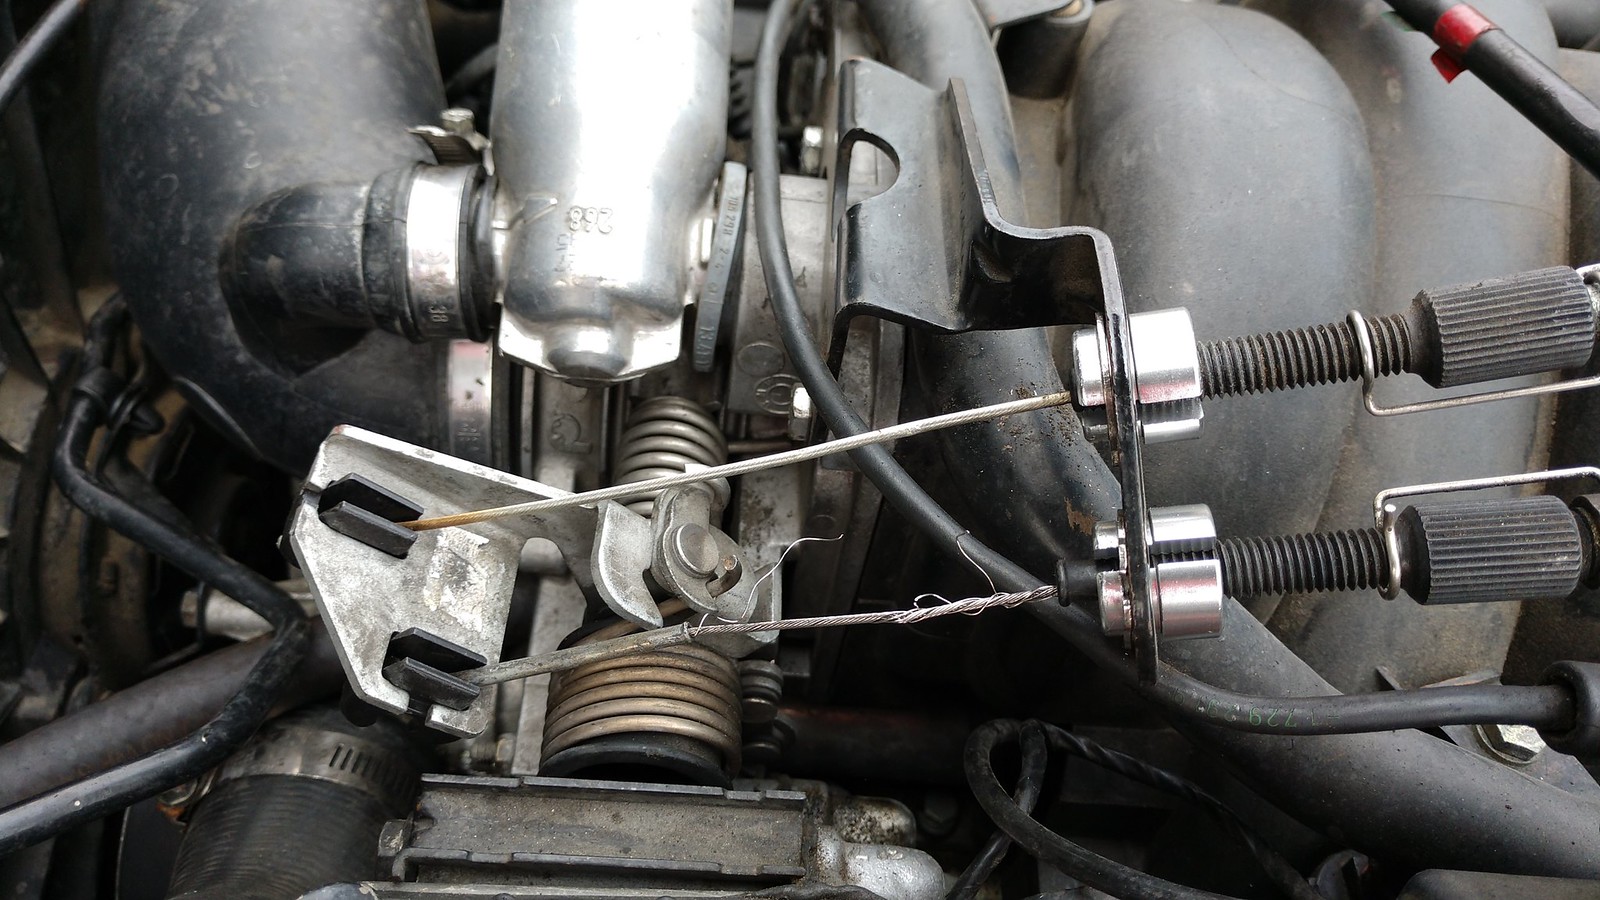
    I also fixed the throttle cable bushings too.
    IMG_20191112_082214185 by Paul Abbott, on Flickr
    Si vis pacem, para bellum.

    New Hawtness: 1995 540i/6 Claptrap
    Defunct too: Cirrusblau m30 Project
    Defunct (sold): Alta Vista

    79 Bronco SHTF Build

    Comment


      Holeee shite!

      I got some time spent on the paint and I am impressed. Pics will show later tonight probably. Maybe Sunday.

      AWDBOB...thank you for your recommendations.
      Si vis pacem, para bellum.

      New Hawtness: 1995 540i/6 Claptrap
      Defunct too: Cirrusblau m30 Project
      Defunct (sold): Alta Vista

      79 Bronco SHTF Build

      Comment


        OK here is some fruit for ya.

        These are the materials I started off with. Some Lake County foam pads. Meguiars M100 for cutting and M205 for polishing. Some 6" hook and loop 1500 grit sand paper and your usual micro fiber towels.
        IMG_20191115_135159381_HDR by Paul Abbott, on Flickr

        Here it is cleaned before wet sanding.
        IMG_20191115_135835856 by Paul Abbott, on Flickr

        Another angle.
        IMG_20191115_135843912_HDR by Paul Abbott, on Flickr

        Half trunk lid with DA Polisher and the 1500 grit sand paper and wet sanding. Its here I had to break out the sand paper and do some hand work.
        IMG_20191115_141023488 by Paul Abbott, on Flickr

        Close up. The wet sanding did remove the deeper scratches. Funny enough, the effluence coming off the sand paper didn't strike me as overly black. There might be some clear coat there.
        IMG_20191115_141027817 by Paul Abbott, on Flickr

        Trunk lid and rear right quarter wet sanded.
        IMG_20191115_143142218_HDR by Paul Abbott, on Flickr

        First go at it with the M100. Since I am a novice, I just went slow and double checked my work. It needed more for sure.
        IMG_20191115_144129261 by Paul Abbott, on Flickr

        Same as above but different angle. You can see some scratches still present to the left.
        IMG_20191115_144547482_HDR by Paul Abbott, on Flickr

        So I spent more time on the trunk lid and it did a remarkable job. And I moved on down to the quarter panel. This is where I wasn't happy with the 1500 grit sand paper on the DA polisher. I wound up polishing anyway but I am going to go over it again with the wet sanding because the hard backing of my DA Polisher only works on a flat surface. Which the trunk lid isn't even flat, but it was flat enough to get it done. I ordered up a 1" "interface" pad so the sand paper can move over contours way easier. Its that or I just sit there using tons of M100 and tons of time on the DA. I don't want to take forever so...

        But what the M100 did on the quarter, even though you can't see the scratches I see, is remarkable.
        IMG_20191115_155643706 by Paul Abbott, on Flickr

        IMG_20191115_155653990 by Paul Abbott, on Flickr

        I believe this is the trunk lid after an applicaiton of M205. You can feel the difference more than see it in my opinion.
        IMG_20191115_162542707 by Paul Abbott, on Flickr

        Trunk lid is M205 and the quarter is M100. You can see how much more defined the reflection is of the Bronco's hard top compared to when I started.
        IMG_20191115_162548804 by Paul Abbott, on Flickr

        This is a good angle.
        IMG_20191115_162712183 by Paul Abbott, on Flickr

        So that's the skinny so far. I am really impressed with what the right tools can do.


        Si vis pacem, para bellum.

        New Hawtness: 1995 540i/6 Claptrap
        Defunct too: Cirrusblau m30 Project
        Defunct (sold): Alta Vista

        79 Bronco SHTF Build

        Comment


          Wow that is looking great, but damn a lot of work lol.
          Euro Delivery Thread///E30 Project Klaus///COTM August 2021

          Comment


            Originally posted by Staszek View Post
            Wow that is looking great, but damn a lot of work lol.
            You sir, are not kidding about the work. Sent from my Moto Z (2) using Tapatalk
            Si vis pacem, para bellum.

            New Hawtness: 1995 540i/6 Claptrap
            Defunct too: Cirrusblau m30 Project
            Defunct (sold): Alta Vista

            79 Bronco SHTF Build

            Comment


              Fun fact: Once you using these amazing cutting compounds...you best put some kind of wax on it. I didn't. But I wasn't REALLY ready to spend a couple weekends doing this whole job. Plus its been raining like crazy here.

              I have had a super annoying clutch pedal squeak that came and went. Then it came to stay. So I finally tore out the underpinnings and did some WD40ing.

              IMG_20191202_193905405 by Paul Abbott, on Flickr

              IMG_20191202_193900538 by Paul Abbott, on Flickr

              IMG_20191202_193856511 by Paul Abbott, on Flickr

              Turned out that the squeak was from the large clutch return screen in the background. I am debating on replacing the clutch master cylinder while I have it torn apart. Thoughts?

              I didn't get a picture of it, but apparently there is a steering shaft guibo that needs to be replaced as it is starting to tear. I had always thought my steering was REALLY tight at low speeds. So I shot some WD40 along the steering shaft and I was pleasantly surprised at how much easier it is to drive. Oh, and my steering wheel was rocking back and forth...because it was loose. I fixed that before my drive this morning. Airbag reset tool worked a treat again.
              Si vis pacem, para bellum.

              New Hawtness: 1995 540i/6 Claptrap
              Defunct too: Cirrusblau m30 Project
              Defunct (sold): Alta Vista

              79 Bronco SHTF Build

              Comment


                I went back through old photos and it looks like my car never had the correct windshield gasket installed (at least since I have owned it). So I went to the junk yard and tore a couple pieces off a 95 525i that i can use including the windshield gasket press in trim ring thing. Also picked up new front dash speaker covers, two A pillar covers and a cutout of the sunroof clip in area as my upholsterer removed mine unceremoniously and now the sunroof switch cover won't stay in place. Oh, and I need a new sunroof switch cover because every fucking piece of plastic retainer clips broke off.

                I am slightly annoyed with my Kenwood head unit so I am considering an Alpine HU to keep with the Bavarian theme.
                Si vis pacem, para bellum.

                New Hawtness: 1995 540i/6 Claptrap
                Defunct too: Cirrusblau m30 Project
                Defunct (sold): Alta Vista

                79 Bronco SHTF Build

                Comment


                  On the verge of hitting 260,000 miles on the car. Things were going swimmingly when I was heading to my Moms for some chores she needed done, but the alarm decided to lose its mind WHILE DRIVING. Fuck.

                  This was the first time the car left me stranded. After arriving at AM/PM for an energy drink, I shut the car off and thought that it was just a freak incident. Nope, the car was immobilized for some reason. I bought a new battery, nothing. I did the 15 minute alarm system disable thing, nothing. Got towed back to the house until I could deal with it. I was in the middle of doing an engine swap on my newly acquired truck and didn't want to dick around with it.

                  Then on Sunday I managed to pick up a 404 ECU out of a 94 740i. I snipped the green wire that heads to pin 66 of the ECU and had to jump the EWS wiring to allow the car to start. Finally, the car runs. But it has the typical automatic transmission hanging idle problem when you use an automatic ECU when you have a manual car. Not that critical, but annoying. What is more annoying is that even though I swapped ECUs, EWS must still be working somewhere in the car because I have no power windows, no central locking and my windshield wipers only work on fast.

                  I believe that I have a bad/split/corroded bundle of wires somewhere in the car. I am betting that when I find the bad wires, I will be able to make the repairs and stick my 484 ECU back in and be smiling again. The problem is that there are miles of wires in the damned car. So...stay tuned.
                  Si vis pacem, para bellum.

                  New Hawtness: 1995 540i/6 Claptrap
                  Defunct too: Cirrusblau m30 Project
                  Defunct (sold): Alta Vista

                  79 Bronco SHTF Build

                  Comment


                    Few updates for ya. The car still drives, but I hate the Auto ECU. NEvermind that, I still have the power window/power locks/windshield wiper freakout problem. I got pretty sick last week (no-Corona) and will have to have surgery in the coming month to make it go away, but it appears as though the general module is to blame. Apparently they lose their damned minds.


                    Bronco was sent away to a friend and I picked up a 95 F150. Man it is nice to have a truck. Sadly, had to replace the engine pretty much as soon as I got it. Also, got my job back at Spy and start work tomorrow.
                    Si vis pacem, para bellum.

                    New Hawtness: 1995 540i/6 Claptrap
                    Defunct too: Cirrusblau m30 Project
                    Defunct (sold): Alta Vista

                    79 Bronco SHTF Build

                    Comment


                      Went to Mouser and ordered up replacement electrolytic capacitors to the tune of $16 bucks shipped, half is shipping. I could not visibly see a failure, but there is so much coating on the board, its hard to tell. My nice multimeter shows the capacitors in the circuit exist, but that's about it. My experience with guitar amps says that they can look good but still die. So its a good practice on 25 year old cars too.

                      IMG_20200426_192504685 by Paul Abbott, on Flickr

                      IMG_20200426_192523868 by Paul Abbott, on Flickr

                      Si vis pacem, para bellum.

                      New Hawtness: 1995 540i/6 Claptrap
                      Defunct too: Cirrusblau m30 Project
                      Defunct (sold): Alta Vista

                      79 Bronco SHTF Build

                      Comment


                        Got a few updates. Medically, I have a surgery date. We are trying to get it bumped up sooner. I want it sooner than 6 weeks away, thats for sure. But we shall see. Covid isn't a driving factor and my surgery is not considered elective, it seems a scheduling issue with the machine that is going to be used in the surgery. Whatever, keep the stress low Paul. And I had to quit my job due to the stress affecting my condition. I narrowly avoided the hospital again last Friday through Sunday. Finally mending from that flare up. If you want details, you can PM me or ask here and I will divulge. Take your health seriously, but be aware that you are your own best advocate. I am nearing 40 and some of these things probably won't affect you younger guys yet, but the older we get, the more we have to take these things more seriously. I know I have.

                        Anyway, I replaced the capacitors. Took some pictures along the way of course.

                        Here is the top side of the board before I replaced the caps. Starting with the one on the left and higher. The dark blue cylinders in the bottom right side of the board. The solder lead is kind of pointing in the direction of the first cap i worked on.
                        IMG_20200429_192216479 by Paul Abbott, on Flickr

                        Here is a close up after I removed the cap. I just added a dab of solder to the original connection to get it to flow. Then heated it up while gently pulling up on one side of the old cap. Did the same on the other side of the cap and she popped out. You can see the factory sealer goo they used masks the color of the board. Took quite a bit to clean it up properly.
                        IMG_20200429_192925057 by Paul Abbott, on Flickr

                        Here is the back side of the board with the holes cleaned up for the new component. I just add some new leaded solder to the remnant and then the solder sucker can suck it all out easier.
                        IMG_20200429_193404730 by Paul Abbott, on Flickr

                        The new cap with the leads through the hole ready for soldering.
                        IMG_20200429_193529375 by Paul Abbott, on Flickr

                        Cut and cleaned up. Hardly tell it isn't original.
                        IMG_20200429_193554478 by Paul Abbott, on Flickr

                        Bad picture, but you can see the new cap is not resting on the board. This allows the heat that goes through the cap to breathe and not use the board as a heat sync.
                        IMG_20200429_193622896 by Paul Abbott, on Flickr

                        Top side. This cap was a bit longer than the original.
                        IMG_20200429_193630706 by Paul Abbott, on Flickr

                        So here is one of the 47uf caps that left it's sheathing after the component was removed. Which, basically crumbled away BTW.
                        IMG_20200429_193916469 by Paul Abbott, on Flickr

                        Here is the two 47uf caps replaced and the bigger 220uf (I think that's the value) removed. See the sheathing is still there? If you zoom in, you can read the value of the component still imprinted on the board by the sheathing that was left over. Very strange.
                        IMG_20200429_200625156 by Paul Abbott, on Flickr

                        Zoom in on this and you can see the 220 in reverse on the board.
                        IMG_20200429_200631083 by Paul Abbott, on Flickr

                        Big 220uf cap place cleaned up and the holes ready for soldering the new component in.
                        IMG_20200429_200911039 by Paul Abbott, on Flickr

                        All four caps replaced and airgapped.
                        IMG_20200429_201311369 by Paul Abbott, on Flickr

                        I took this out to the car and followed some oddly specific install order. No love. Oh, the green wire going to the ECU I snipped? I put that wire back together with a sealing butt connector.

                        So then I went out and started to look for bad fuses or something. Sure enough, fuse 33 and 32 under the back seat were shorted out. Ordered some new fuses and popped them in this afternoon. Bam! Central locking, windows, sunroof, lighting and wipers are back. I slammed in my 484 ecu and tried to start it. It flung over just fine but wouldn't fire. "Oh yeah!" i thought. I needed to hook up the yellow connector for the alarm system under the dash and remove my starter jumper I made. Did that and it fired up perfectly.

                        Its hard to tell what caused what problem at this point. I don't recall the fuses being bad before I did this repair or not, but I know that GMs tend to fry and my bet is the caps caused the fuses to short. Either way, the car is back to functioning 99% normal. The only issue I have electrically is one of those stupid microswitches in the passenger door that is preventing me from leaving the windows cracked and the sunroof tilted up. I just need to get into the door card and figure out where to mount it.

                        I am keeping my spare 404 ECU and jumper wire in the car in case I get stranded again. That way I can at least swap the computer out and force it to start so I can drive it back home if something else comes up.


                        Si vis pacem, para bellum.

                        New Hawtness: 1995 540i/6 Claptrap
                        Defunct too: Cirrusblau m30 Project
                        Defunct (sold): Alta Vista

                        79 Bronco SHTF Build

                        Comment


                          That's a far more intense repair than I would be able to manage, good on you for giving it a red hot go and actually succeeding.

                          sigpic

                          (clicky on piccy to get to thread)

                          Comment


                            Originally posted by econti View Post
                            That's a far more intense repair than I would be able to manage, good on you for giving it a red hot go and actually succeeding.
                            Thanks man! I figure It can't get more broken than it already is. I promise, you could manage this kind of repair. The buy in on an inexpensive variable heat soldering station and some decent leaded solder and solder sucker, is maybe $100. Take out a busted piece of electronics and tear that up!

                            Its not like I even did any diagnostics. I just knew from guitar amp repairs that those types of caps fail after 20 years or so. There were only four of them so replacing them all was an informed guess that it would fix the problem. There are some surface mount resistors on that board that couldn't be repaired easily, so you service what you can and cross your fingers.
                            Si vis pacem, para bellum.

                            New Hawtness: 1995 540i/6 Claptrap
                            Defunct too: Cirrusblau m30 Project
                            Defunct (sold): Alta Vista

                            79 Bronco SHTF Build

                            Comment


                              I have the 540i under a canopy in hopes of addressing the paint again. I am going to go back to the junkyard and purchase a new-to-me front and rear bumper and get to making it look a bit nicer. I also think I am going to have to get a new windshield from a better shop than the one I went to. The glass was cheap and they installed it like assholes, if you ask me. They couldn't be bothered to get a seal that works correctly and I can't get a newer seal to get on to the glass because of how much adhesive they used. Speaking of adhesive, they also managed to MISS about an inch up in the lower driver's corner so going through a car wash is a bit more eventful than it should be. Oh, and the wind noise from that hole. Pisses me off. Oh well.

                              I reinstalled all of my driver's kick panel stuff so its looking less trashy. Happy with that.

                              I topped off the r134a in my AC system. I am tempted with reinstalling the AC fan so it stays cold while at idle sitting in traffic. My original fan was dead so I just cut it out. I have to go to the yard and get those bumpers anyway. May as well. I also need some new rear trunk shocks so I am going to pick them off that same car.

                              I had a small leak from the thermostat housing. Most anyone with a m60 knows how much fun a couple of those bolts are that hold the thermostat in. Well, with an electric fan, it is WAY easier. Just pull that sucker out and get after it. Chasing down a $4 gasket was a bit of a pain, but I did it. No more leaks finally.

                              I have a couple of rattles coming from the back of the car that I need to figure out. While I had the front up in the air I did an inspection of the front suspension stuff and its good.

                              One thing I have been thinking about is suspension. Its getting a little bit wallowy and I'd like to cure that. I will be exploring coil-overs and seeing what the cost benefit is.

                              Oh, and I had my alarm do the same thing it did earlier. So it is clearly not a problem with the computer and those repairs weren't necessary. Not wasted time exactly, but it wasn't a cure. I believe that I have a bad wire somewhere that shorts under hard acceleration. That was the condition under which it reared it's ugly head again. Both of the 7.5 amp fuses in 32 and 33 popped. Clearly the problem is there. I popped in some 10 amp fuses (you know, to make the the prospects of a fire a little higher) and its been ok so far. But this is an issue I really need to solve. I guess the technical name for this junction box is the Rear Power Distribution Box.
                              Si vis pacem, para bellum.

                              New Hawtness: 1995 540i/6 Claptrap
                              Defunct too: Cirrusblau m30 Project
                              Defunct (sold): Alta Vista

                              79 Bronco SHTF Build

                              Comment


                                I did wind up getting the front and rear bumpers. The front has been primed and painted already. I haven't put it back on yet as I am letting it cure for a few.

                                While I had the front end off the car, I put a junkyard AC fan back in. Which is a pain in the arse when the condenser is installed. But if you fiddle enough, you can get it back in. The power steering cooler I installed a while ago had to be moved down and out a half inch or so. I fired it up and the fan works great. It is disconnected from the CTS in the radiator as the Volvo fan is using it and pulls way more CFM.

                                Also, while the bumper was off, I wanted to try and fix my hood's alignment. Part of it was related to the passenger fender too. I loosened those bolts, lifted up and shoved in the fender and that was way easier than I had thought it was going to be. I dread body work stuff.

                                And for giggles, I made a video of how you can adjust your hood on an e34. There isn't a lot of info out there that is easy to find. Hopefully this can help someone.

                                How I managed to align my hood better on my 1995 BMW 540i/6. I am definitely not a body-man so attempt at your own risk.


                                The rear bumper is pretty clean, but it does have one crack I need to figure out how to repair. Of to do some research...
                                Si vis pacem, para bellum.

                                New Hawtness: 1995 540i/6 Claptrap
                                Defunct too: Cirrusblau m30 Project
                                Defunct (sold): Alta Vista

                                79 Bronco SHTF Build

                                Comment

                                Working...
                                X