Announcement

Collapse
No announcement yet.

Project Armo "330i" M-tech 1

Collapse
X
 
  • Filter
  • Time
  • Show
Clear All
new posts

    I started mounting stuff in engine compartment and building brackets for them. I started with AC condenser. No need to build anything there.


    Next I mounted the radiator. It is a E36 328 A/C model. If I had a facelift car, it would fit right in the original mounts. As I have prefacelift I bought the 318is top mount and E36 bottom mounts and will build brackets for them. Turns out the E36 mounts did not fit without modifying I don't know why I didn't get the E30 ones but nevermind about that. I cut off the unnecessary part of the mounts.


    Then I built shelves for the mounts. My vise came with the house. House is built in 1957 but I think the vise is probably older.


    For motor cooling I've been thinking on electric fan. It will be easier to fit in the engine bay and reduces moving mass. I was just wondering if there's any sense in having two electric fans since there's already one for the A/C. I just need to think about the control. A/C fan runs 2-speed. It's on low speed whenever the A/C is turned on and on high speed when a sensor in A/C system gives signal. The engine cooling fan should be run by engine coolant temperature switch. If I use a single fan I need to allow both the A/C and the coolant temperature to switch it on. Anyone have experience on that? The A/C fan might not be enough to cool down the whole engine even though the same fan is used on M3 as the only fan (don't know about M3 with A/C though) I may need to switch into more powerful one. Of course I need to take care that the airflow will go through the radiator and not around it.
    Last edited by Skarpa; 08-10-2017, 09:45 PM.
    E30 Armo "330i"

    Comment


      Then it was the air filters turn. I had to cut off a corner of the filter housing to fit it as I wanted. I will glue straight plate there later.


      The filter housing has rubber mount in the bottom. I needed to put a pin or a bolt for the mount in the car body. For that I cut a circular piece of of 2,5mm steel plate, drilled a hole in the middle and welded 6mm screw on that. Then I drilled hole in car body to fit the bolt head and I will glue plate there with panel adhesive. I little complicated but I avoided any welding seams I can't clean and paint afterwards.


      For the top mount I will make a bracket and use the electric chip mounting screws plus one new on the engine compartment side.


      The garage where I have the car belongs to a house my relatives own. House is empty at the moment and I can use the garage in exchange of keeping an eye on the house. The view from outside the garage isn't half bad. I wouldn't mind living there but it's way out of my price range.


      PS. Do all the pictures show ok? Lately the photobucket has been pain in the ass when uploading or editing photos. It's slow as hell and gives more or less false error notifications.
      Last edited by Skarpa; 08-10-2017, 09:41 PM.
      E30 Armo "330i"

      Comment


        New pics are fine, I haven't checked the old ones. I really enjoy all the little fabrications you come up with. And I love that ITB setup. I want one. Keep up the awesome work.
        How to remove, install or convert to pop out windows
        http://www.r3vlimited.com/board/showthread.php?t=297611


        Could be better, could be worse.

        Comment


          Originally posted by rzerob View Post
          New pics are fine, I haven't checked the old ones. I really enjoy all the little fabrications you come up with. And I love that ITB setup. I want one. Keep up the awesome work.
          Thanks, will do. I finished the bracket for the air filter and welded a nut in the body for it. My pile of parts for powder coating keeps getting bigger.


          Then I had a look at the brake pipe fixing and realized that the parts I bought are not actually for fixing the brake pipes to body but just for tying pipes into one another. There are six slots in the bracket and I need five pipes so maybe I can use the area of sixth slot to mount it to body.
          Last edited by Skarpa; 08-10-2017, 09:37 PM.
          E30 Armo "330i"

          Comment


            My brother is coming over for Easter and promised to take some parts to powder coating (there's no reasonably priced coating shop anywhere near). I wanted to include all the parts that I know will be powder coated so I needed to finish the front subframe and the front struts. The sway bar fixing points were fairly corroded in the subframe so I cut off the lower plate and made new one. It's not clearly visible in the pictures but I tried to match the notch for the sway bar bushing.


            After some wire wheel, phosphoric acid and welding primer, the parts were welded together.


            On the top I welded the reinforcement plates I had had cut earlier.


            I made some reinforcement welding where the hook of the sway bar bracket will sit.

            In the front struts I welded brackets for the sway bar. At first I was going to use just 3mm bent angle but decided to weld them into U-profile.


            After welding I measured the position of the holes and drilled them.


            I decided not to think about the length of the sway bar links too much at this point. I placed the brackets as high as I reasonably could. When I have the struts under the car and loaded I will measure the necessary length to place the sway bar horizontally. If no links are available at correct length I will use adjustable ones.
            Last edited by Skarpa; 08-10-2017, 09:33 PM.
            E30 Armo "330i"

            Comment


              I finished modifying the coupe rear seat. Earlier I had cut off the raised section from the rear of the seat to fit it together with the sedan backrest. These modifications left the upholstery loose and unfitting at the rear.


              I made final trimming on the cushions and planned how I need to modify the leather. Then I separated the leather from the seat to be able to sew it with a machine.


              My trusty Husqvarna is certainly not industrial or upholstery sewing machine but it has a sturdy metal frame and a reduction gear and can take on most of the challenges I throw at it.


              The center section was shaped very differently from what it needed to be so I replaced it flat leather piece. New leather comes from a different animal and has a different texture but that doesn't really matter since it won't be showing.


              I cut the rear of the center bolster shorter so I needed to move the channel for the steel wire to match it.


              I also needed to make a steel wire in the seat frame to tie the leather to. I made it from 2,5mm wire and tied it to existing frame wires.


              While I had the upholstery removed I finished welding and grinding the seat frame where I had modified it. I also welded loops in the frame to accommodate the brackets in the car body. They fit nicely but I may still add something to them to make them fit even more snugly. I'm thinking on pieces of suitable hose tied around the steel wires.


              I cut a piece of polyester wadding to cover the areas where I modified the cushions to even out any imperfections in shape.


              I don't have the upholstery clamping rings or tongs for installing them and I was not going to buy them for this job so I used cable ties instead. They are probably not as long-lasting so perhaps I need to redo the seat in ten years or so.


              I'm happy with the result. Not perfect but not bad.


              The lip on the backrest sits just above the rear shelf and when viewed from right angle, the white strip at the back of the seat is just visible. I taped the surroundings and painted the strip black with matte black spray paint to hide it.


              Sorry for the potato-quality pictures
              Last edited by Skarpa; 08-10-2017, 09:27 PM.
              E30 Armo "330i"

              Comment


                Nice updates!

                That E39 airbox should look right at home once you're done it would seem, really neat idea

                Could you explain the thinking behind the high swaybar mounts on the struts though? I would've thought that inverting the links' mounting orientation, together with the increas in length would result in some unfavorable suspension geometrics?...

                Comment


                  Originally posted by NufnSus View Post
                  Nice updates!

                  That E39 airbox should look right at home once you're done it would seem, really neat idea

                  Could you explain the thinking behind the high swaybar mounts on the struts though? I would've thought that inverting the links' mounting orientation, together with the increas in length would result in some unfavorable suspension geometrics?...
                  E30 M3 as well as most of the newer BMWs, uses a sway bar mounted to the struts. There are two advantages. The movement of the strut mounting point is fairly linear during suspension stroke whereas the one in the suspension arm travels in an arc. The effect of the sway bar is more consistent and predictable when mounted on strut. The other advantage is that when the sway bar is mounted on strut, it has better leverage to control the suspension movement allowing a thinner sway bar to have more effect.

                  My sway bar links will likely be longer than the M3 ones because my brackets are actually welded a bit higher than in M3 and the car will be lower than a stock M3 so I need to further increase the length to keep the sway bar pointed horizontally. In theory, the longer links are a plus because the longer the links, the less their angle changes when turning the wheels -> more consistent sway bar action while cornering.
                  Last edited by Skarpa; 04-03-2016, 09:15 AM.
                  E30 Armo "330i"

                  Comment


                    I just bought a refurbished head when I came across one for a decent price.


                    I was thinking of building this head complete with re-ground cams and then just swap it onto B28. Then later I can tackle the bottom end and pump up the displacement and compression. In addition to what I already have, I need the exhaust cam tray and a set of lifters.

                    I'm also discussing on buying a cast iron sleeved engine block to work with the M54 internals. The European M52's have aluminum block with nikasil plating but there were problems with nikasil in some countries with lower quality fuel (mainly UK). If there was damage due to nikasil erosion, BMW replaced the block with cast iron sleeved one (the Z3 block for you Americans). That's the block I want because M54 piston rings are designed to work with cast iron cylinders.
                    Last edited by Skarpa; 08-10-2017, 09:22 PM.
                    E30 Armo "330i"

                    Comment


                      Here's where we are going now:

                      - Motor is stock and should be In good running condition. I will replace the auxiliary belt and the tensioner pulleys and check the hoses and such. Swapping in the refurbished head with re-ground cams and doing vanos service are optional extras that I may still do at first stage.

                      - The suspension parts are in powder-coating and I have all the bearings, bushings etc. to rebuild the suspension. I need to service the brake calipers and I think I'll have them yellow zinc chromate plated.

                      - 2.65 LSD diff is supposedly in good working order but I suspect the gear ratio will be tad too long so I agreed on buying 2.93 gearset and will swap that in, replace the bearings and check the condition of the LSD unit.

                      - All the interior and trim is mostly ready to go in. I will dye the carpet, rear shelf, trunk liners and probably also the headliner come the summer.

                      - Exterior trim will need some work but I should have everything acquired.

                      So all in all things are looking good and if I had the body ready the car would probably be running this summer. The thing is the body is not ready. Lately I've been keeping myself busy with non-sheet metal stuff because to tell you the truth, I'd grown a little tired of body repairs. Now I think I've got my motivation back for that. Earlier I had plans of test-fitting the engine but I already know it will fit right in. People shove in M50s and M52s all the time so at this point my time is better spent on bodywork. There is still quite a bit of work left but I also have a lot of it done.

                      Things I've done:
                      - Floors and rockers are ready save for some screws and brackets for fluid lines and insulation.
                      - Engine compartment and nose don't have anything major left.
                      - Rear spring mounts and the beam between them are done.

                      Things to do:
                      - Replacing the rear wheel wells. I will replace the right wheel well completely and the outer half of the left one using factory parts.
                      - Replacing the rear wheel arches using patch panels
                      - Replacing the rear face of the car using patch panel
                      - Replacing the battery pocket in trunk using factory part
                      - Replacing the cross frame beam with diff mount and sway bar mounts (new fabrication)
                      - Repairing small rust holes at the bottom of left A, B and C pillars
                      - Replacing all the brackets at the bottom of the rear seat.

                      So the rear of the car looks something like this:


                      Before I cut off the wheel arches I wanted to check that the rear wheels and tires will fit in. I need to roll the inner lip of the fender but otherwise seems to be ok.


                      I started the work on the right wheel well by tearing out the old one:


                      I also cut off the rear end of the frame beam. It is included in the factory replacement part with the battery pocket.


                      The trunk floor was rusty in a few places so I fixed it.


                      I will use factory pieces for the wheel well and glue them together with panel adhesive. I drilled holes in the pieces and in car body for pop-rivets to hold them together while the adhesive cures.


                      Next i drew a line around the wheel arch and cut it off. I will make an indent in the edge, overlap the patch panel with the car side and use panel adhesive for that joint also. The two halves of the wheel well will be quite difficult to join together when in car so I riveted them together with a couple of rivets and checked whether I can get the wheel well in as a single part. No problem.


                      Then I cleaned the joint surface and glued the two pieces together.


                      I also made small reinforcement welds for the shock towers. I've been told that newer models have these as stock.


                      When I get the tool for forming the overlap seam on wheel arc I will prepare the wheel arc piece and then start assembling the puzzle. I regret a bit that I didn't order the complete rear quarters from dealership. It would be less work replacing and I would have very good access to everything with the rear quarter cut off. I guess I could still get them but I don't want to wait for them and I've already done most of the repairs on my quarters. Also money.
                      Last edited by Skarpa; 08-10-2017, 03:40 AM.
                      E30 Armo "330i"

                      Comment


                        Last weekend I bought the tongs for forming overlapping seams


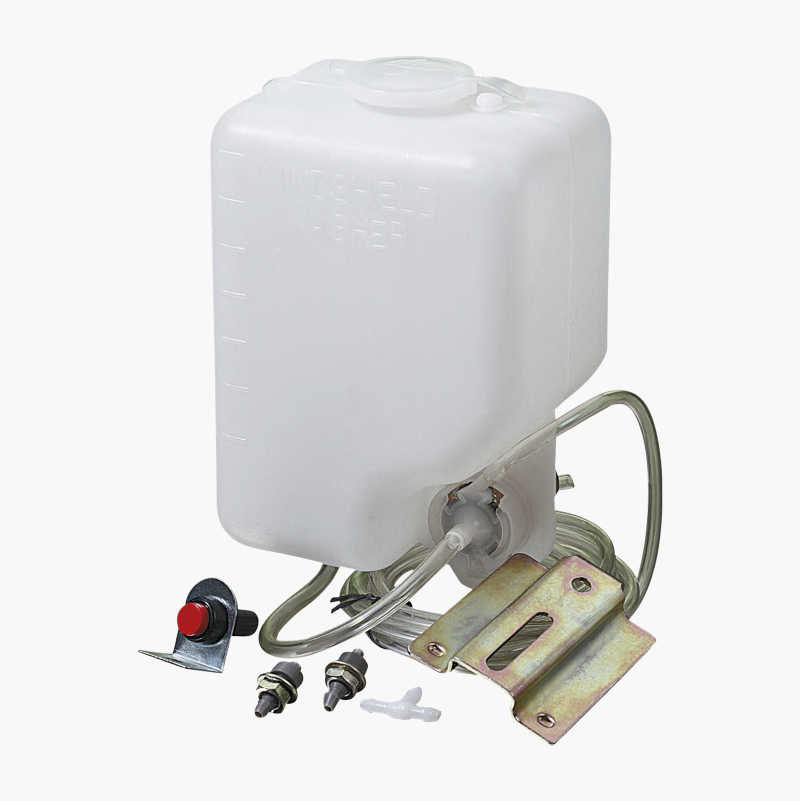
                        While I was shopping, I bought a small tank for windshield washer. In a summer car there's no use for a five liter tank. I think I will place it on battery shelf or in original location. I just need to check where it fits better when the M3 plastic cover on battery shelf and the plastic cover behind the headlights are in place.


                        By the way, this is the official windshield washer for hobby cars in Finland because it's small, easy-to-install and cheap. It actually comes with the pump, hoses, nozzles, wiring and a switch.

                        The front corner is finally cleaned and painted with epoxy primer so I can move on to wheel arch job with clean conscience.


                        I need to roll the rear fender lips double anyway so my brother asked me why would I keep the original construction and then roll it. That was a good point. I think I will cut off the lip from the wheel well panel and bend the one on the wheel arch panel around the new edge and clamp it down with glue in between. I think it's easiest if I first bend the lip almost double before installing the panel. I made a test bend to see if I can bend the lip nicely on a table with a rubber mallet.

                        Seems good. I dont know how I will remove the paint under the lip though. Oh well, luckily I have two patch panels for the right side.
                        EDIT: This was not a good technique. Bending the lip of a separate patch panel changes the shape of the wheel arch and the panel will no longer fit the car.
                        Last edited by Skarpa; 08-10-2017, 12:27 AM.
                        E30 Armo "330i"

                        Comment


                          What is the name of the washer bottle kit?
                          How to remove, install or convert to pop out windows
                          http://www.r3vlimited.com/board/showthread.php?t=297611


                          Could be better, could be worse.

                          Comment


                            Originally posted by rzerob View Post
                            What is the name of the washer bottle kit?
                            Mukana 1,5 l säiliö rikkoutumattomasta, pakkasta ja lämpöä kestävästä nailonista.  Toimitetaan sisällä pumpun, muoviletkua, T-putki, suuttimet, virtakytkin, johdot, kiinnittimet ja asennusosat.  Ainoastaan 12 V.


                            I think it's only available in Nordic countries, though.
                            E30 Armo "330i"

                            Comment


                              I already had the sealings for valve cover and vanos and now I bought the rest of the sealing kit for head. I bought the cam tray for exhaust cam as well as a set of hydraulic lifters that are supposed to be silent. The guy I bought the head from also found the lifters so now I have an ample supply. I took apart the lifters and put them terpentine bath to soak any grime. Getting the lifter cylinders out of the tappets is supposed to be hard but they actually came off easily. I had much more trouble getting the lifter pistons out of the cylinders. In the instruction videos they come off simply pulling by fingers but that certainly was not the case with my lifters. Eventually I was able to take apart 24 lifters and only managed to lose one tiny check valve spring.


                              Here's a good video about taking apart the lifters:
                              Edit: Please don't install them full of oil and purged of all air like I show in the video. Do this to check that they're sealing, but then remove the extra ...


                              I also continued with the rear arches. I decided not to cut off the bend from the edge of the wheel well but bend it double with glue in between.


                              I trimmed the edge of the surface panel and made a bend in the edge to form an overlapping seam. I tried to cut the patch panel in shape but realized that it was a mistake to bend that beforehand. The patch panel is so flexible that bending the lip changes the shape of the wheel arch and the panel no longer fit in place. Luckily I have another one to spare.

                              I mocked up the wheel well in place with a couple rivets and checked that the wheel fits. The edge of the wheel arch is not a problem but the tire rubbed higher up. I shaped the wheel well with a rubber mallet as much as I dared and now the wheel can travel all the way without rubbing. Although this is with stock rear axle. When the wheel cambers are corrected the top edge of the tire will come outwards but I think it should be okay with reasonable ride height. When I have everything put together I may still roll the inside of the wheel well to make a bit more room.


                              Replacing the rear arches is a bit complex process for an inexperienced person especially when I want to do it smartly and paint all the parts that I cannot access later. I took some time to think about the process and made myself a list of steps to make it more simple later. I ended up with 20 steps.
                              Last edited by Skarpa; 08-10-2017, 12:15 AM.
                              E30 Armo "330i"

                              Comment


                                Damn, that's a ton of work! Nice progress.

                                Comment

                                Working...
                                X