Announcement

Collapse
No announcement yet.

Project Armo "330i" M-tech 1

Collapse
X
 
  • Filter
  • Time
  • Show
Clear All
new posts

  • Skarpa
    replied
    Slow progress with the car a bit more with the wheels but you could count it here because that will be munnies for the car project.

    I painted the inside of the drivers side wheel arch so next time at the garage I'll be able to glue that one.


    I also took apart the brake calipers and cleaned them with a wire wheel to make sure there's no paint left. I didn't bother to remove all the rust because it will be taken care of at the plating shop. I seem to have misplaced one carrier, though. Hope I'll be able to find it.


    One of the pistons was pretty seized up. I tried different tricks for it. What helped in the end was I drilled some holes in the piston and put a steel bar through it. Then I clamped the caliper in vice, pressurized the cylinder with compressed air and started wiggling and turning the piston with the steel bar until it started slowly moving out and then popped free.


    The brake calipers will be yellow zinc-chromate plated as well as the bolts for the RC:s. The bolts initially looked like the left one in this pic.


    First I soaked the bolts and nuts in paint stripper to get rid of the thread locker and any remaining lacquer. Next I treated them with citric acid solution.


    Then I rinsed them, dried them in oven and gave them a light coat of oil to avoid further rusting.


    I gave the bolt heads a quick puff with cotton wheel and polishing wax to make sure they are presentable. Hope the shine wont be ruined in the plating process.

    That took about a week at work doing 20 or 30 bolts a day at lunch break.

    The wheel lips are mostly sanded up to 2000 grit using my ghetto wheel polisher:


    I still need to roughen up and paint the backsides before polishing the lips. So what kind what kind of idiot has the patience and stupidity for this kind of stuff you may ask? This kind:

    Last edited by Skarpa; 08-09-2017, 01:03 AM.

    Leave a comment:


  • Skarpa
    replied
    The RC centers came from the painter and look awesome. I need to be careful that these don't slip under Armo since I already have the RS's and plan to sell these. Now I need to get going with zinc-chromate plating the hardware and my brake saddles.

    Last edited by Skarpa; 08-09-2017, 01:03 AM.

    Leave a comment:


  • Skarpa
    replied
    Yesterday I was out drinking and today I had a hangover and worked on my car as a penance. I glued the passenger's side wheel arch in place. It was actually more work than I expected. I had to use quite a lot of rivets to get the part to sit right. The result is not perfect but quite good. If I was to do the same job now I would replace the whole rear quarters. It would be less work and give a better result.


    Last edited by Skarpa; 08-09-2017, 01:04 AM.

    Leave a comment:


  • Skarpa
    replied
    I cut the drivers side wheel arch in shape. Now the wheel arches are pretty much ready to glue and I borrowed the arch roller for the job so I think I'll try to do that on Sunday.


    I also removed the sealer and the surface rust from the rear edge and the underside of the trunk floor and was satisfied to see that it's in decent shape. There's a rust hole where the trailer coupling cable went through the rear face. Also the rear end of the frame beam will require some attention.


    There's rust under the rear flange so I think I'll remove it, clean it and weld it back. The screws for the heat shield have rusted away but otherwise the frame beam seems to be solid.
    Last edited by Skarpa; 08-09-2017, 09:50 PM.

    Leave a comment:


  • Skarpa
    replied
    Today I glued to drivers side wheel well in place. I'm counting down the remaining major bodyparts to go in. There are four left: wheel arches, rear face and the diff mounting cross member. Next week I need to get the wheel arch roller to be able to continue with the wheel arches.


    Last edited by Skarpa; 08-09-2017, 09:51 PM.

    Leave a comment:


  • Skarpa
    replied
    A lot of tedious preparation work goes down again. In the past Armo has been "rust-protected" meaning that there's this annoying, black, tarry gunk everywhere on the underside of the car. I hate it and want to get rid of it. In the end I'll apply new layer of 3M sprayaple sealer 08800 and paint the underside of the car zinnoberrot. In most of the places new stone guard would actually not be necessary because the factory stuff is just fine. It's just that it's nearly impossible to remove only the black stuff and leave the factory sealer and paint. You can wash it away with paint thinner or petrol but it takes gallons of that stuff and alot of rubbing so I've found it easier to just remove everything and start fresh. Nowadays I use grinder and steel wire wheel for removing. It produces a lot of mess but works well and if you do it carefully you can actually leave the original body primer pretty much untouched.

    Before coming to this conclusion I tried various methods of removal including blow torch and a chisel. That worked also quite well but it was a bit difficult with more complex shapes and the chisel tended to leave nicks in the surface. Drivers side wheel well is where I experimented with different methods before moving to other things. It had been exposed to air humidity for past four years and the chisel nicks had developed into rust spots so I had to clean it up and treat it with phosphoric acid and nylon wheel to get rid of the surface rust.


    The rear corner had some more rust so I replace a piece and also welded a couple of holes shut.


    Then I painted the wheel well and the inside of the wheel arch and a few other places where I had worked as well.


    The spare wheel well is not actually rusty. There's just loose steel dust from grinding that has rusted and coloured the surface. I need to clean up stuff like that before final painting.


    And then for something completely different:

    I have strange tendency to make things more complicated for myself than they actually need to be. I had perfectly fine transmission with suitable drive shaft, shifter linkage, flywheel, clutch and rear bracket. I decided to sell it and now I'm in search of one that will require modifications to all those things and also a new clutch friction plate. Makes perfect sense. To be more exact I'm searching for a six speed gearbox from a 330i or more likely from a newer four banger diesel engine since they are about half the price. Diesel engines have the same tilting angle as M20 so the gearbox will sit tilted and will require modification for shift linkage and the rear bracket. GS6-37DZ transmission has a shorter clutch shaft because the pilot bearing is located at the flywheel in those engines. Also it has a finer bore of 26x29-22N. I will most likely fabricate extension for the clutch shaft so before I parted with the 5-speed ZF I made measurements of the pilot bearing shaft location.


    I realized only later that I could also have measured the total length of the transmission from bell housing flange to output shaft flange to know exactly how much I need to shorten the drive shaft but I'm sure I'll find that information somewhere or just test-fit and measure it when I have the new tranny.
    Last edited by Skarpa; 08-09-2017, 09:59 PM.

    Leave a comment:


  • Skarpa
    replied
    Originally posted by petrolhead View Post
    No reason I can think of. Ofcourse if you look at the factory repair manual it says replace all worn/scraped parts. Did you measure the slip torque of the LSD before taking apart? Stock value for new parts is ~45Nm, and yours might have less.. I did one diff on a budget, to a friend of mine. We put in 3 pairs of used plates in, all stock thickness. Selected the least worn 3 from a pile.. That ended up having 100Nm of initial slip torque.
    My own has 140Nms. Your car will be way more powerful and with grippier tyres. Just food for thought. :)

    Jarno
    I didn't remember to measure the breakaway torque before disassembling the diff. You have very valid points. The car will also have wider tires and more torque than stock 325i or 325e. Jannmann on another forum raised also a good point about more discs equalling more durability and less wear per disc. I might look into building a three or four disc unit after all.
    Last edited by Skarpa; 05-29-2016, 08:19 PM.

    Leave a comment:


  • petrolhead
    replied
    Originally posted by Skarpa View Post
    Yeah, I'll of corse use new hardware when assembling the ring gear and the LSD unit. I think I'll go with two plate pairs as in original. I was thinking it might be possible to flip over the dog plates because the other side is fairly virgin. Is there any reason I shouldn't do that?
    No reason I can think of. Ofcourse if you look at the factory repair manual it says replace all worn/scraped parts. Did you measure the slip torque of the LSD before taking apart? Stock value for new parts is ~45Nm, and yours might have less.. I did one diff on a budget, to a friend of mine. We put in 3 pairs of used plates in, all stock thickness. Selected the least worn 3 from a pile.. That ended up having 100Nm of initial slip torque.
    My own has 140Nms. Your car will be way more powerful and with grippier tyres. Just food for thought. :)

    Jarno

    Leave a comment:


  • Skarpa
    replied
    Originally posted by petrolhead View Post
    Don't worry about stripping the heads of ring gear bolts. They MUST BE REPLACED anyway. Buy OEM part no's, get the right thread pitch and so forth.
    The iS I drove to Muurame meet and back has 10.9 bolts instead of 12.9 and held together just fine. But that's only because the longer iX ring gear bolts are not available OEM. ..it has an iX diff with swapped ratio.
    Really hard to say anything about dogplates from a picture. You could just sand them a bit smoother. You won't lose many 1/100mms that way. New ones are available 0,1mm thicker anyway. Were you going to replace the 4mm shim with a third plate pair?
    Yeah, I'll of course use new hardware when assembling the ring gear and the LSD unit. I think I'll go with two plate pairs as in original. I was thinking it might be possible to flip over the dog plates because the other side is fairly virgin. Is there any reason I shouldn't do that?
    Last edited by Skarpa; 06-30-2016, 08:39 PM.

    Leave a comment:


  • petrolhead
    replied
    Don't worry about stripping the heads of ring gear bolts. They MUST BE REPLACED anyway. Buy OEM part no's, get the right thread pitch and so forth.
    The iS I drove to Muurame meet and back has 10.9 bolts instead of 12.9 and held together just fine. But that's only because the longer iX ring gear bolts are not available OEM. ..it has an iX diff with swapped ratio.
    Really hard to say anything about dogplates from a picture. You could just sand them a bit smoother. You won't lose many 1/100mms that way. New ones are available 0,1mm thicker anyway. Were you going to replace the 4mm shim with a third plate pair?
    Last edited by petrolhead; 05-28-2016, 12:41 PM.

    Leave a comment:


  • Skarpa
    replied
    Today I started working on the diff. It's a typ 188 2.65 LSD diff from an E28 or similar. I bought the diff to get the case and the LSD unit for 2.XX diff. I calculated that with straight fifth gear and E30 tire size the revs would be 2300 at 100 km/h. I'm thinking that might be a bit too long gearing so I bought 2.93 gears and will swap the gear ratio and replace the bearings and sealings. I will also check the condition of the friction plates and the dogplates. So it was a time to take the diff apart.


    The LSD case is assembled with shallow head allen bolts. I just hate those things. I tried to be very careful but still the key slipped in one of the bolts and after that it's of course lost case with that bolt. With and impact driver it would propably still have been openable. I grinded off the bolt head and then undid the stud with pliers.


    All taken apart (except for the gears and bearings)


    I have no prior experience on the subject so I will need more experienced opinion on the condition of the fricition plates and the dogplates. Dogplates show some wear and I can just feel a small notch at the outside edge when dragging fingernail across it. When measuring with a caliber I couldn't find any loss of thicnkess. Probably you could with a micrometer.


    The friction plates show some polishing but are not completely smooth anywhere. Again, the caliber didn't show any loss of thickness.


    The center casings are polished at the outside edge. No notch.


    What's the verdict?

    Here's the 2.93 gears and the E36 rear cover waiting to go in.


    The RC lips received another round of stripper and are now clean.
    Last edited by Skarpa; 08-09-2017, 11:49 PM.

    Leave a comment:


  • Skarpa
    replied
    Last weekend there was a big E30 meet in Finland.

    My car's not ready yet so we went with my brothers E24. It's the wrong model but at least from the right era. My plan is to have Armo in driving condition for next years meet and once again I took some small steps towards that goal: I drilled the holes for rivets in driver's side wheel well, cut the top layer to size and made the recess for the overlapping seam.


    The RC centers I took to painter next to my workplace
    Last edited by Skarpa; 08-09-2017, 11:50 PM.

    Leave a comment:


  • rzerob
    replied
    Originally posted by Skarpa View Post

    This picture shows just how much work you have into this car. Great job.

    Leave a comment:


  • Skarpa
    replied
    Originally posted by Coyote_ar View Post
    making an e30 from scratch is likely less work than what you are doing on that car. great work, and great attention to detail.
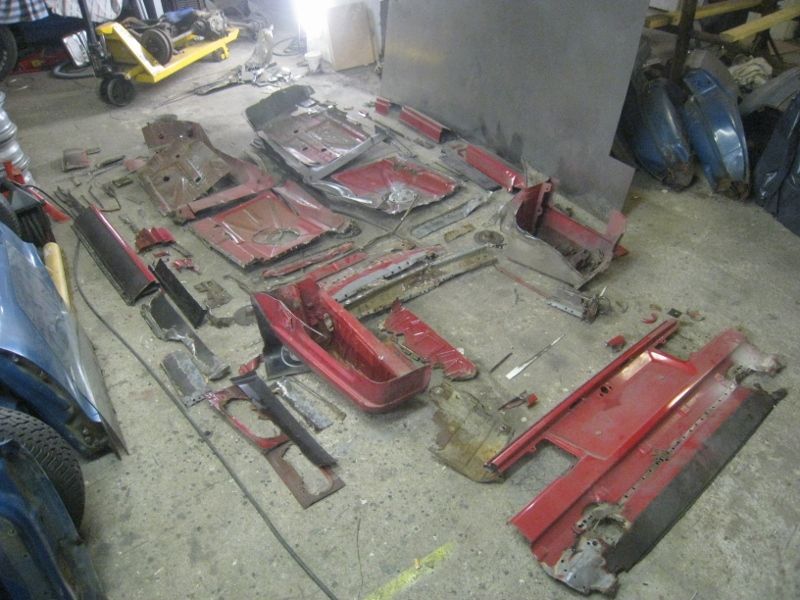
    Thanks. When I moved garage and gathered all the scrapped parts for recycling I was thinking you could just weld them together and have another rusty E30 ;D


    This week I've been keeping myself busy with a small side project. I came across a set of five BBS RC090's for too cheaply to let them go. I'll refurbish and sell them. I'm thinking nogarosilber centers, polished lips, gold(ish) bolts and red BBS badges.


    The spare wheel still had the tire on. I tried if I could get the tire off the bead myself and then just cut it off with angle grinder but it was a no go. (well I might have been able to do it with a jack but I decided you use professional help.


    It's a shame that one of the wheels was bent. Oh well, I still have four good wheels.


    Wheels came apart as they are supposed to. Bolts were seized with oxidization and took a fair beating to get them off.


    Bolts are rusty but I think I'll still go with them to keep some profit margin. I'll see what they look like after yellow zinc chromate plating. I should anyway take my brake saddles and a few other things to be plated.


    Then I took the wheels to have a lapdance from my favorite stripper. I think I should have put plastic over the wheels while they were sitting there. The day was sunny and the stripper kept drying on the wheels even though I added it from time to time so it will take another round until the wheels are clean.
    Last edited by Skarpa; 08-09-2017, 11:59 PM.

    Leave a comment:


  • Coyote_ar
    replied
    making an e30 from scratch is likely less work than what you are doing on that car. great work, and great attention to detail.

    Leave a comment:

Working...
X