
Originally posted by Alpina
View Post
-
Thanks a lot! Feedback like this makes it worthwile to keep on sharing my E30 endeavours. Also blasphemy on the homeland of Santa Claus! -
Holy Shxx........
I think honestly this is the most awesome rebuild i have ever seen on an E30 on the internet
ALL DONE BY THE OWNER !!!!!!!!!!!!!
really really impressive
I wish you all the best with this and i am looking forward
Regards from the REAL homeland of the Santa-Claus .................Leave a comment:
-
Wheel well glued in place and patch panel for surface cut to size.


I also test-fitted the end of the frame beam with the battery pocket and the tow loop. It fits like it's supposed to be here. Just need to drill a few holes for plug welds, replace the paint with welding primer and weld the part there.
 Last edited by Skarpa; 08-10-2017, 12:07 AM.
Leave a comment:
-
Thank you! I wanted to buy a car in a better shape than the previous one and I did but certainly not a mint one. Back then I was not as experienced as now and didn't know so well what to look for. The car had some questionable bondo work in the rear that I realized only later but apart from that this is the basic condition of an early model Finnish E30. Not the worst, not the best. (you could argue that the questinable bondo work is to be expected) If I was starting a similar project now I would take my time looking for a good car to start with. On the plus side I have no surprises awaiting and I know my car inside out. Also I've learnt so much on the way.Originally posted by Butler View Post
Thanks! It's always great to get positive feedback.Originally posted by sonomabimmers View PostLeave a comment:
-
Dammmmmmn This is as throughout as they come! Amazing attention to detail. I love how you've been doing it all. I'd like to take that philosophy for myself and my cars.
I am a little surprised at how much rust repair there was, because you bought this car because it was in better condition than the previous one? In the pacific north west we are really lucky and don't have many rusted cars. :D Keep us updated!Leave a comment:
-
Thanks! Yesterday I made some progress and was able to cross off quite a few things from my wheel well to-do list. Mostly small stuff: drilling, sanding, painting etc. Next time at the garage I should be able to glue and weld the wheel well in place.Originally posted by CorvallisBMW View Post


 Last edited by Skarpa; 08-10-2017, 12:09 AM.
Leave a comment:
-
I already had the sealings for valve cover and vanos and now I bought the rest of the sealing kit for head. I bought the cam tray for exhaust cam as well as a set of hydraulic lifters that are supposed to be silent. The guy I bought the head from also found the lifters so now I have an ample supply. I took apart the lifters and put them terpentine bath to soak any grime. Getting the lifter cylinders out of the tappets is supposed to be hard but they actually came off easily. I had much more trouble getting the lifter pistons out of the cylinders. In the instruction videos they come off simply pulling by fingers but that certainly was not the case with my lifters. Eventually I was able to take apart 24 lifters and only managed to lose one tiny check valve spring.

Here's a good video about taking apart the lifters:
I also continued with the rear arches. I decided not to cut off the bend from the edge of the wheel well but bend it double with glue in between.

I trimmed the edge of the surface panel and made a bend in the edge to form an overlapping seam. I tried to cut the patch panel in shape but realized that it was a mistake to bend that beforehand. The patch panel is so flexible that bending the lip changes the shape of the wheel arch and the panel no longer fit in place. Luckily I have another one to spare.
I mocked up the wheel well in place with a couple rivets and checked that the wheel fits. The edge of the wheel arch is not a problem but the tire rubbed higher up. I shaped the wheel well with a rubber mallet as much as I dared and now the wheel can travel all the way without rubbing. Although this is with stock rear axle. When the wheel cambers are corrected the top edge of the tire will come outwards but I think it should be okay with reasonable ride height. When I have everything put together I may still roll the inside of the wheel well to make a bit more room.


Replacing the rear arches is a bit complex process for an inexperienced person especially when I want to do it smartly and paint all the parts that I cannot access later. I took some time to think about the process and made myself a list of steps to make it more simple later. I ended up with 20 steps.Last edited by Skarpa; 08-10-2017, 12:15 AM.Leave a comment:
-
Leave a comment:
-
Last weekend I bought the tongs for forming overlapping seams

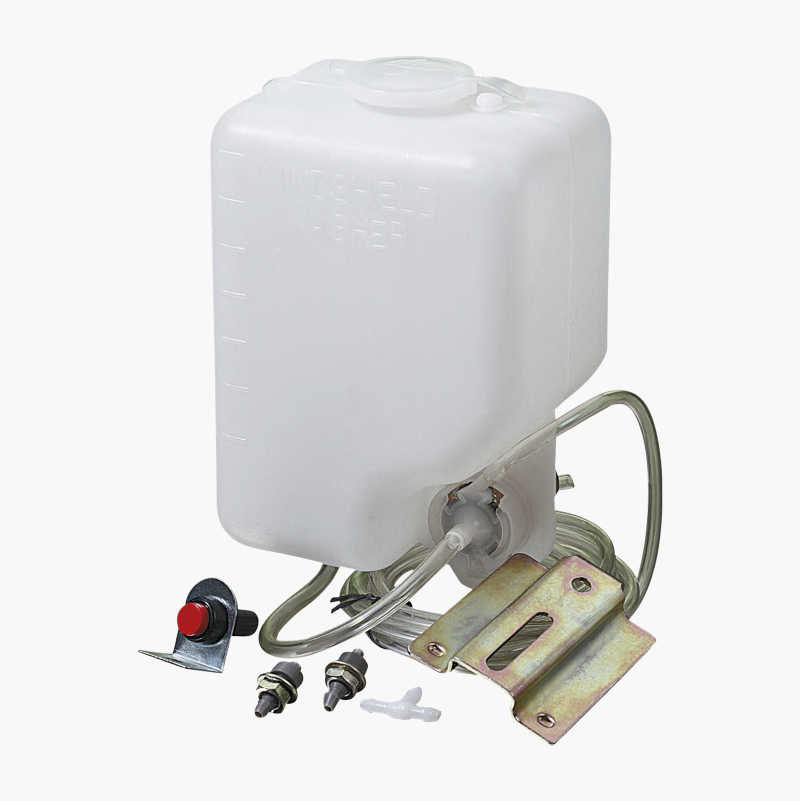
While I was shopping, I bought a small tank for windshield washer. In a summer car there's no use for a five liter tank. I think I will place it on battery shelf or in original location. I just need to check where it fits better when the M3 plastic cover on battery shelf and the plastic cover behind the headlights are in place.


By the way, this is the official windshield washer for hobby cars in Finland because it's small, easy-to-install and cheap. It actually comes with the pump, hoses, nozzles, wiring and a switch.
The front corner is finally cleaned and painted with epoxy primer so I can move on to wheel arch job with clean conscience.

I need to roll the rear fender lips double anyway so my brother asked me why would I keep the original construction and then roll it. That was a good point. I think I will cut off the lip from the wheel well panel and bend the one on the wheel arch panel around the new edge and clamp it down with glue in between. I think it's easiest if I first bend the lip almost double before installing the panel. I made a test bend to see if I can bend the lip nicely on a table with a rubber mallet.

Seems good. I dont know how I will remove the paint under the lip though. Oh well, luckily I have two patch panels for the right side.
EDIT: This was not a good technique. Bending the lip of a separate patch panel changes the shape of the wheel arch and the panel will no longer fit the car.Last edited by Skarpa; 08-10-2017, 12:27 AM.Leave a comment:
-
Here's where we are going now:
- Motor is stock and should be In good running condition. I will replace the auxiliary belt and the tensioner pulleys and check the hoses and such. Swapping in the refurbished head with re-ground cams and doing vanos service are optional extras that I may still do at first stage.
- The suspension parts are in powder-coating and I have all the bearings, bushings etc. to rebuild the suspension. I need to service the brake calipers and I think I'll have them yellow zinc chromate plated.
- 2.65 LSD diff is supposedly in good working order but I suspect the gear ratio will be tad too long so I agreed on buying 2.93 gearset and will swap that in, replace the bearings and check the condition of the LSD unit.
- All the interior and trim is mostly ready to go in. I will dye the carpet, rear shelf, trunk liners and probably also the headliner come the summer.
- Exterior trim will need some work but I should have everything acquired.
So all in all things are looking good and if I had the body ready the car would probably be running this summer. The thing is the body is not ready. Lately I've been keeping myself busy with non-sheet metal stuff because to tell you the truth, I'd grown a little tired of body repairs. Now I think I've got my motivation back for that. Earlier I had plans of test-fitting the engine but I already know it will fit right in. People shove in M50s and M52s all the time so at this point my time is better spent on bodywork. There is still quite a bit of work left but I also have a lot of it done.
Things I've done:
- Floors and rockers are ready save for some screws and brackets for fluid lines and insulation.
- Engine compartment and nose don't have anything major left.
- Rear spring mounts and the beam between them are done.
Things to do:
- Replacing the rear wheel wells. I will replace the right wheel well completely and the outer half of the left one using factory parts.
- Replacing the rear wheel arches using patch panels
- Replacing the rear face of the car using patch panel
- Replacing the battery pocket in trunk using factory part
- Replacing the cross frame beam with diff mount and sway bar mounts (new fabrication)
- Repairing small rust holes at the bottom of left A, B and C pillars
- Replacing all the brackets at the bottom of the rear seat.
So the rear of the car looks something like this:

Before I cut off the wheel arches I wanted to check that the rear wheels and tires will fit in. I need to roll the inner lip of the fender but otherwise seems to be ok.


I started the work on the right wheel well by tearing out the old one:


I also cut off the rear end of the frame beam. It is included in the factory replacement part with the battery pocket.

The trunk floor was rusty in a few places so I fixed it.


I will use factory pieces for the wheel well and glue them together with panel adhesive. I drilled holes in the pieces and in car body for pop-rivets to hold them together while the adhesive cures.


Next i drew a line around the wheel arch and cut it off. I will make an indent in the edge, overlap the patch panel with the car side and use panel adhesive for that joint also. The two halves of the wheel well will be quite difficult to join together when in car so I riveted them together with a couple of rivets and checked whether I can get the wheel well in as a single part. No problem.

Then I cleaned the joint surface and glued the two pieces together.


I also made small reinforcement welds for the shock towers. I've been told that newer models have these as stock.

When I get the tool for forming the overlap seam on wheel arc I will prepare the wheel arc piece and then start assembling the puzzle. I regret a bit that I didn't order the complete rear quarters from dealership. It would be less work replacing and I would have very good access to everything with the rear quarter cut off. I guess I could still get them but I don't want to wait for them and I've already done most of the repairs on my quarters. Also money.Last edited by Skarpa; 08-10-2017, 03:40 AM.Leave a comment:


Leave a comment: