Announcement

Collapse
No announcement yet.

Big Al's Revenge: an OEM+, MTech1 325e restoration

Collapse
X
 
  • Filter
  • Time
  • Show
Clear All
new posts

  • Albie325
    replied
    After some trials and tribulations I think I finally have the A/C working again for the first time in at least 4-5 years.

    I started out by rebuilding the compressor. It's a Bosch/Behr "wingcell" type compressor. I know I talked about doing this awhile ago but there were some issues as you'll see. Figured I'd post up the process in case anyone else is thinking of doing this themselves. I did use one DIY that I found (there isn't much out there) but otherwise I didn't find much in the way of how these things work:

    https://www.bimmerforums.com/forum/s...ressor-Rebuild


    Needless to say it was full of gunk from sitting idle for so long:


    I first cleaned up as much of the exterior as I could to prevent it from getting into the compressor. Then I started to break it down.

    First, remove the center nut, I used an impact gun. Otherwise the pulley wants to spin:


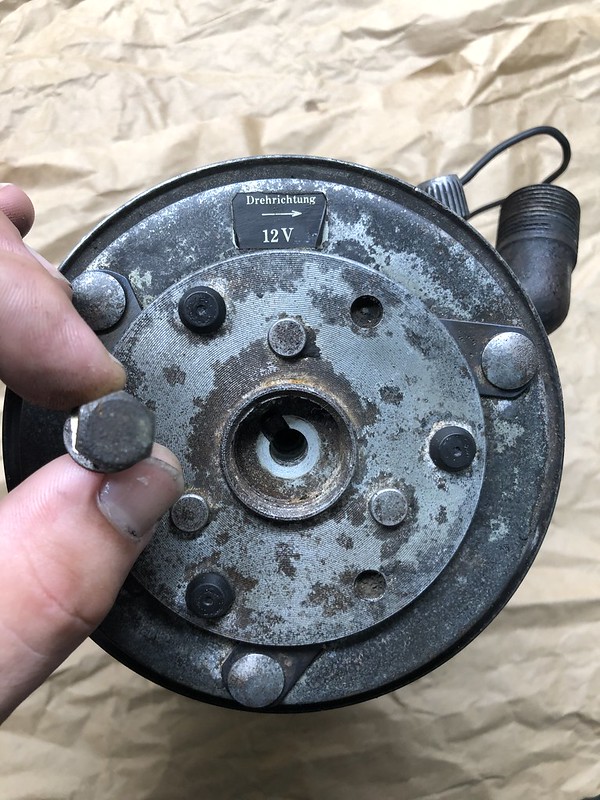
    Next you'll have to pry the clutch plate off using two thin flathead screw drivers. There will be some metal spacers in there when it comes out, don't lose these:


    Next, use a flathead screwdriver to knock the center nut loose to remove the pulley. There's a washer underneath that has little lock tabs on it, bend the tab down first to loosen the nut. I forgot to and broke one off.


    Then just wiggle the pulley off, you'll be left with the clutch magnet underneath (black donut thing):


    The magnet is held on by 6 Phillips head screws. Also note the location of the compressor wire and resistor, it will have to line back up in the same position later on:


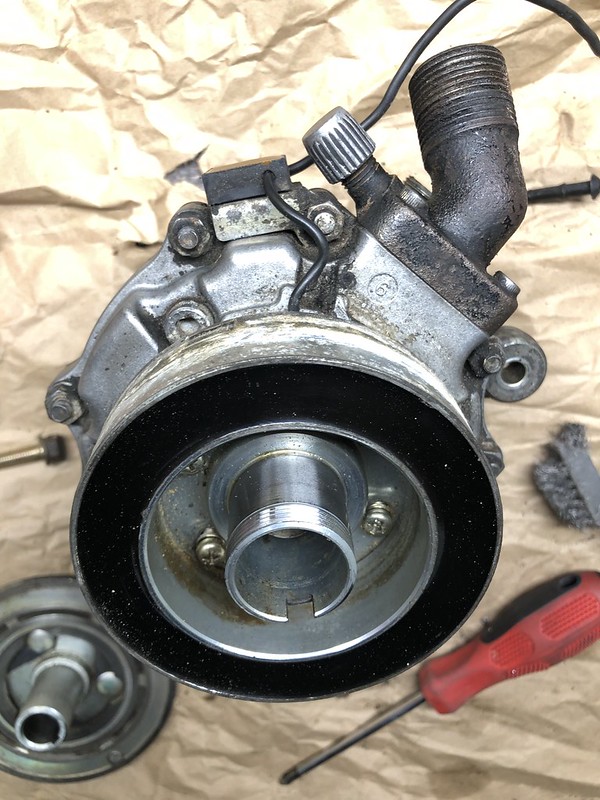
    Not sure what this little felt piece is but it just sits in that little groove on the faceplate, don't lose it:


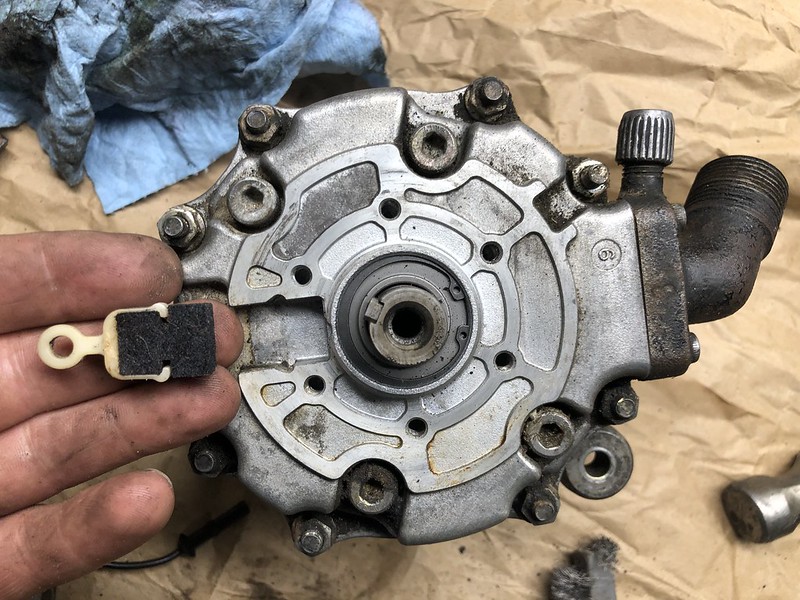
    To remove the faceplace, there are 8 outer 10mm bolts, as well as 4 allen head bolts on the inside. As you'll see, these align with the holes on the inner compressor mechanism:


    Take note of that little arrow on the inner mechanism and mark it's orientation, it has to point in the same spot otherwise your allen head bolts won't line up with the inner 4 holes when you put everything back together.

    With the faceplate off, I screwed the center nut in a few turns and pulled everything out, yuck:


    Backside of the innards:


    Got everything cleaned up:


    And used the "proper" kit to replace all the seals.


    Make sure you lube the seals with A/C oil prior to install, and I also coated all components with some while reassembling. Depending on the refrigerant you plan on using, you'll need to find out the proper oil to use. I went with PAO oil as it's compatible with both R12 and R134a.


    One correction in the below photo, the central green O-ring on the right should instead be placed into the center divot in the faceplate on the left rather than on the shaft for installment.


    Much better:


    Orientation of the arrow to the body of the compressor, basically points towards the high side inlet:


    Don't forget to remove the low-side inlet plate, there's another O-ring there. I missed it the first time and had a leak at this location:


    Reassemble, and you're done (or so I thought):


    I ended up getting the compressor filled with oil (200mL in my case) and U/V dye, and vaccing down. It held -30mmHg vacuum for a few hours so figured I was good. I started to refill with refrigerant and the compressor kicked on, nice! However as the compressor heated up, I started losing pressure and it eventually kicked off before the system was full. WTF. I was pissed. I was about THIS close to just saying fuck it, no A/C for me when the next day a guy posted an ad on the R3V FB page advertising that he rebuilds A/C compressors and a bunch of other components. I'll include a link to his ad. Jay was excellent to work with, even sent me pics/vids of him testing the A/C clutch etc.

    He told me that he's now repaired several compressors that have recently been rebuilt (by Omega and a few other companies, not just DIYers) where the rebuild seal kits have undersized O-rings in a few spots. In my case, I think that as the compressor warmed up, the undersized seal allowed the gas to leak out and kept the compressor running, eventually burning out a needle bearing.

    Here's Jay's ad:

    https://www.facebook.com/groups/R3VL...8924346917627/

    I got the compressor installed:


    And after installing ANOTHER receiver/drier (my 3rd by this point), I got the system vacced out:


    I left the vacuum on for 2 days to makes sure this time it was completely sealed, and it was.


    Refilled, and am FINALLY blowing cold air. I will say the air is cool, not as cold as I remember it being for this car. I may have overfilled the system by a few ounces so I may take it in to have some of the refrigerant vacced out as my low side pressures are a bit high (~50PSI when it should be ~30)

    Here's a really good link for the refilling process:

    http://www.rtsauto.com/how-to-rechar...d-pull-vacuum/

    I kept the system R12 but have retrofitted everything to be compatible with R134a as well (R134a expansion valve, O-rings, parallel-flow condenser, and PAO oil in the compressor). If I ever have more issues with this system and need to evacuate it again, I'm just going to convert it fully to R134a as the R12 was very expensive.

    Sorry for the long-winded post, but Phase 2 of Big Al is in the books! The next thing will be paint, euro bumpers and MTech 1 conversion, which I need to save up for. I'm hoping to get it done sometime over the winter or early spring. In the meantime, I have a few other smaller projects/upgrades to complete which I'll get to here and there.
    Last edited by Albie325; 10-08-2019, 09:35 AM.

    Leave a comment:


  • Albie325
    replied
    Can't believe it's been a month since my last update, I've been tinkering with a few things to try and get everything right with the usual setbacks.

    I finally got my cluster back from BavRest, was very pleased with the aesthetics:


    I took Greg's advice and rather than refurbing the early model MotoMeter unit that came in the car, I had a really nice spare late model MotoMeter cluster that he recommended I use instead. Apparently their inner workings are better made and more reliable. Only thing I needed to swap in was the fuel gauge and my speedometer.

    Unfortunately when I reinstalled it, the odometer worked for about 4 miles and then crapped out. I had been having an issue with intermittent odo function for a while which is what ultimately led me to have the cluster refurbed in the first place. That and some dead SI board batteries. I had already replaced the gears twice myself in the past (first set was a bad batch from Garagistic) and it still was touch and go no matter what I tried. I took the odo out again, tinkered with it a bit, reinstalled it again, and still no dice. I think the magnetic motor itself was bad because the gears always turned easily when I spun them by hand.

    The cluster I had been using in the meantime had a well-working odo/speedo, so I swapped the new gears and painted needle onto it and adjusted the mileage to reflect the mileage I have on my car (otherwise it would have only showed ~72k). I have only driven the car for about 1/3 tank of gas since the timing belt/5-speed swap was completed so ended up just resetting the mileage to 95,000 miles even as it's a nice round number for all my maintenance intervals. I don't plan on selling the car so the "loss" of about 100 or so miles doesn't matter to me.

    Luckily this worked, and I finally have a fully functional cluster:


    I opted for red painted needles, chrome trim rings, and a full SI/cluster refurb. As luck would have it, the late model cluster I combined with the guts from my old one is actually from a Super ETA, with a slightly higher redline than the normal ETA tach. This actually works out perfectly since I have a slightly higher redline with the Conforti chip.

    The interior is now 100% complete, if only I had some cold A/C so I could drive the car in the 95 degree "fall" weather down here in NC...

    That's a write up for another day, stay tuned

    Leave a comment:


  • Albie325
    replied
    Originally posted by Beau B
    Wow! Stumbled across this thread glad I did! Great write ups and detail! Thank you and looking forward to reading more. Just getting back into E30's mine has been in storage for the last 4ish years.
    Glad you like it, welcome back! Time to get the ol' girl running again.

    As for the new part failure, yes super frustrating. I swapped in the new thermostat (after testing) and the car is running at the appropriate temperature thankfully.

    I got to work vac'ing the A/C system over the weekend and it isn't holding vacuum. I have a dye charge canister en route and will hopefully have time this weekend to root out the source of the leak.

    Leave a comment:


  • jeenyus
    replied
    yea that's frustrating.

    Leave a comment:


  • Beau B
    replied
    Wow! Stumbled across this thread glad I did! Great write ups and detail! Thank you and looking forward to reading more. Just getting back into E30's mine has been in storage for the last 4ish years.

    Leave a comment:


  • Poorhouse
    replied
    So frustrating when new parts fail.

    Leave a comment:


  • Albie325
    replied
    Well boys and girls, I think I nailed down my overheating problem.

    I had a couple hours today so decided to get the radiator drained and old thermostat out so that when the new one arrives Thursday all I need to do is pop it in, refill and rebleed. I decided to take the old, known working one along with the new questionable one inside and do a little... experimentation...

    Click image for larger version

Name:	1*2OKX1nhsZ3-CB2CidEdhJw.png
Views:	745
Size:	232.1 KB
ID:	9865064

    New German one on the left, old Chinese working one on the right:


    New, cold and with closed valve:


    Old with closed valve:


    To test, you put the thermostats in a pot of water and bring to a boil. Around 180F (80C) the thermostat valve should open:


    Sure enough, the old valve opened:


    And the new one didn't:


    Needless to say I'll be testing the NEW new thermostat prior to installing, you'd be foolish not to (I was). It takes all of about 10 minutes to bring a pot of water to a boil to save yourself a ton of headache and a potentially overheated engine. Actually, I'm very relieved that this is all my issue likely ended up being. If the new thermostat had been good I'd have been a bit stumped.

    Leave a comment:


  • Albie325
    replied
    connorb850 I've retrofitted the system so that it's essentially compatible with both refrigerants (O-rings, parallel flow condenser, R134 expansion valve which supposedly will work fine with R12, and will be using PAO oil), but will be filling the system with R12. Don't tell the EPA. In the event that the refrigerant leaks out again and R12 is even harder to find/more expensive by that point, I'll just switch over to R134.

    Leave a comment:


  • connorb850
    replied
    Your interior came out fantastic! Lots of nice accents without being overdone.

    I may have missed it, but are you planning on keeping R12 or converting to R134 for the A/C?

    Leave a comment:


  • Albie325
    replied
    Originally posted by LateFan
    We were surprised to learn that our local chain parts store had correctly shaped AC hoses for pretty cheap. It's been blowing cold for over two years since.
    Hmm interesting, I'll have to look into that. Thanks for the suggestion.

    Poorhouse hoping that that's all it ends up being for both of us

    Leave a comment:


  • Poorhouse
    replied
    Having the same overheating issue with mine after replacing the entire cooling system.
    I think the only thing keeping mine from going into the red on a short drive is the hole I drilled in the thermostat.
    Lower rad hose and rad are not getting hot. Leading me to think its the thermostat.
    New one on order.

    Leave a comment:


  • LateFan
    replied
    We were surprised to learn that our local chain parts store had correctly shaped AC hoses for pretty cheap. It's been blowing cold for over two years since.

    Leave a comment:


  • Albie325
    replied
    Originally posted by Tzantushka
    Awesome result.
    Have been following this for a while and it's really satisfying to see it come together.
    Thanks man, very happy with how the interior turned out.

    So after a day or two of driving normally, I've run into an issue with overheating. My first few drives I saw the engine temp creep up to the 3/4 mark, then work its way back down to 1/2 and stay there. The other day when driving home from work, however, it kept going up to the red. I pulled off the road and let the car cool down immediately, then once cool limped it home. I re-bled the system with the front end of the car jacked up a bunch of times, and no dice. After some diagnostics, I've narrowed it down to either a faulty thermostat, or a clog in the new radiator. All coolant hoses including the upper radiator hoses feel hot once the car comes to temperature, however the radiator itself as well as the lower radiator hose remains cool to the touch. This leads me to believe that there is no circulation of coolant through the radiator i.e thermostat or a clog. I highly doubt the new water pump is bad, and essentially all components of the cooling system (sensors, hoses, radiator, heater core, etc) are brand new. The only thing I didn't change was the fan clutch, I had a new one lying around and swapped it in. Definitely seems like more air flow, but this just slows the overheating a bit. I've read on a few different threads about the OEM Wahler Tstats being faulty out of the box and so I've ordered a new BMW one, should be here by the end of the week. I have no reason to believe that the head gasket is the issue as it was fine prior to the manual swap, my coolant remains clean as does the oil, and I have no white smoke coming form the exhaust. The car is running great aside from the overheating.

    While dealing with the above, I decided to touch up the bumper shrouds and IS spoiler as they got a bit dinged up from all the work I did under the car. With the IS spoiler off I decided to test fit the MTech1 spoiler as a bit of a pick-me-up, looks pretty good aside from being a different color (brilliantrot or perhaps hennarot):

    Click image for larger version  Name:	48620474246_fed64b40c6_b.jpg Views:	0 Size:	49.6 KB ID:	9864424

    Click image for larger version  Name:	48620126748_bea1467a6e_b.jpg Views:	0 Size:	72.5 KB ID:	9864425

    Can't wait to have it repainted and installed along with the rest of the kit!

    Also, I had been waiting on a new A/C hose only to find out it's backordered. It'll be essentially winter by the time it's available again so I've decided to just clean out the old one and reuse it. Once I get the overheating sorted I'll get the A/C system put back together and post up the compressor rebuild I did.

    Leave a comment:


  • Tzantushka
    replied
    Awesome result.
    Have been following this for a while and it's really satisfying to see it come together.

    Leave a comment:


  • Albie325
    replied
    Click image for larger version  Name:	48579925091_7a4655b6d2_b.jpg Views:	0 Size:	70.4 KB ID:	9862985

    Tough to get a great shot of the rear deck:

    Click image for larger version  Name:	48579922351_1395243cbc_b.jpg Views:	0 Size:	64.0 KB ID:	9862986

    I'm extremely happy with how the interior came out. I was a little iffy on the red stitching/seat belts but it really makes the interior pop and looks really sharp. I was also worried that the houndstooth would be a bit busy but it works really well and will actually be correct for the MTech1 once I get it installed. Only thing I need now is the new cluster which will finish off the look.

    As for mechanicals, I still need to get the A/C working. I rebuilt my compressor last week and will post up a little DIY on how I did that. I'm waiting (actually been waiting for over a month) on one of the new replacement hoses and then I can get everything hooked back up, vac'd, and refilled. I NEED some A/C down here in the durty durty. After that, essentially everything I've wanted to overhaul from a mechanical standpoint will be complete. Then It'll be on to the cosmetics: MTech kit repair, repaint, euro bumper conversion, and a few other nice and functional euro upgrades for the car.
    Last edited by Albie325; 08-19-2019, 07:11 PM.

    Leave a comment:

Working...
X