
making good progress. What are your plans for this thing?
-

1989 325is l 1984 euro 320i l 1970 2002 Racecar
1991 318i 4dr slick top
Euro spec 320i/Alpina B6 3.5 project(the never ending saga)
Vintage race car revival (2002 content)
Mtech 2 turbo restoration
Brilliantrot slick top "build" -
Next steps is likely to get it dipped and in primer, then work on tidying up the previous collision repair work. I’m just going to build it as a tidy standard 318i sedan. I have a naturbeige vinyl interior and clean dash, 14” basketweaves already too. Thinking of going Mineral Blue instead of the original red.Originally posted by ThatOneEuroE30 View Post
 Last edited by Matt@EDC; 11-26-2020, 08:38 AM.
Comment
-
smart color choice for resale, give it a rare option so 2door biased people don't frown on it for being a sedan. just don't fall in love with it.Comment
-
Right, didn't get to update last week, so let's get on with it.
About the last parts to be removed except for the subframes were the brake & fuel hardlines and the ABS unit. All fairly simple except for the ones going to the trailing arms which I haven't got loose yet. To be revisited... Most of the hard lines are in pretty good condition, except for one. I'm pretty sure the manual doesn't say 'support vehicle on fuel line when changing tire'.

After the car was pretty well stripped down, i took the shop vac to it and gave it a good thrashing with the pressure washer. Not going for immaculate but clean enough not to get filthy everytime I touch it.

I got up inside the fenders so they were pretty clean when i pulled them later. Minimal surface rust to report.


The front panel/core support has a few wobbles to straighten out, suggesting it saw some front end action back when the rear got stoved in. The passenger front fender has also got a couple of creases in the arch lip (which explains why it didn't sit over the arch liners correctly) and a good dose of filler on the front edge. I'll see how much a front fender is before deciding if stripping and straightening it out is worth the effort.

Knock out the last few trim clips and added them to the box of fasteners...

...which went on the shelf with all the other parts. Actually sold the two M50's I've had on the sidelines for a while, which freed up some more space.

Felt like a bit of a milestone, so treated myself to a bit of cleaning. Tidied up all the side windows before putting them away for a while. It'll get final detailed & coated before installation.


And that's about where we are, I think. I now need to put together some form of body dolly so i can pull the subframes and still roll it around for dipping. And need to get the head off the M42 to see what's what.
Thanks for the support, All.Comment
-
Did I see this chassis for sale on FaceBook? :(Comment
-
I may or may not have found him another late sedan on the cheap in much better shape- minimal rust and none of the frame hackery. I’m sure you guys will get an update soon!Originally posted by mike.bmw View PostComment
-
-
‘Tis true, things they are a changing! I have a week off work coming up soon so hopefully I can sit down and get the thread caught up.Comment
-
very into an updateComment
-
Right, update o'clock! Fortunately, updates have been lacking as I've been busy on the car recently. The rest of the year has been pretty eventful, despite the plague...
Gave the 250k miles E39 a spruce up; paint correction, detail, new windshield seals, cowl panel & badges. Oh, and a fresh set of tires, inc spare!


Got the out-laws '53 MG TD back on the road after 5yrs of sitting

Replaced a broken driveshaft and worn out steering knuckle on our winter beater Accord

Went and did some desert & short course racing

And ripped out some prehistoric cedars from our front yard. Found a walnut tree growing in one of them, so need to move that in the spring now.


But enough of the boring stuff! Back to E30 things...Comment
-
So last time, we were getting ready to drop the subframes. This went pretty smoothly

I made up a dolly using 2x4s and HF castors. Worked a treat for rolling a bareshell across the shop.

The rear subframe assembly was blown apart on the floor...

...before transferring the trailing arms to the bench for disassembly.

All came apart fairly easily, save for one of axles which was utterly welded into the hub. I stood the arm on end and filled the nose of the hub with PB Blaster. By morning, the fluid had done it thing and completely passed through the splines, and the axle came out nice and easy. A bit of patience and PB goes a long way!

Turns out the Maddox ball joint press tool from HF is absolutely perfect for removing the trailing arm bushings. The threaded arbor just runs out of travel before the bushing is free, so drop a 17mm socket in on top of it to send it all the way out.


The 20 ton hydraulic press made easy work of the hubs, bearings and subframe bushings.

Right, gotta go eat my own body weight in turkey and potatoes. Will continue the catch up once I awake from the impending food coma.
Happy Thanksgiving, AllComment
-
Food and nap done, let's carry on...
Front subframe next...

...which was completely disassembled. Front struts were stood on end while the cartridge retainer nuts soaked in PB Blaster for a couple of days. In this pic, the rear hubs & wheel bearings are getting the same treatment before going under the press. It was always gonna be a messy job, so working on the big pieces of cardboard made tidying up after a breeze.

I'm aware the aforementioned cartridge retainer nuts can be a bit of a bear. I secured the nut in the bench vice, then used a pry bar across the steering knuckle (3/8" extension though one of the tapered holes to brace against) to turn the strut housing itself. A solid base, plenty of leverage and all that soaking in PB made it pretty straightforward. One of the nuts got a bit bent up in the process, but they'll be replaced anyway.

Apart from subframes, trailing arms, dustshields, swaybars and strut tubes, everything is going in the bin. Anything reused will be powder coated then rebuilt using new parts. I've spoken with a few local powdercoaters and settled on Circle City Coatings in Indy. The front subframe was cracked around the engine mount as usual, and they were kind enough to acid dip it for free so that I could get on with welding in the Garagistic plate kit. I'll then have everything blasted & coated in the new year, once the I've remodelled the master bathroom...


It was about this time that the new hotness arrived...

Comment
-
So with the red car down to an absolute bare shell, I was literally planning out my first cuts to chop out the rust when AWDBOB messages me with a lead on a better shell. After checking it out, it was in great condition! Floor pans are mint, virtually no rust in the trunk side pockets, rockers are mint with only one pinch weld slightly buckled from jacking. Needs a couple of things attending to, but didn't need a full respray or any rust repair. Done deal!
The white car is a 325i auto roller, build date 02/1990, so contemporary to the red '91 318i. The car had a small electrical fire behind the dash and was subsequently parted out, retaining a clean title. The PO had started working on it as a bit of a project but got overwhelmed with the amount of work required to build it up from a bare shell. A few of their efforts will need a degree of attention, but overall, it's a super tidy shell. They had already bolted on a bunch of new chassis parts including brakes and M3 front suspension, but the deal was just for the shell, so I need to drop the subframes and return to the PO.
So away went the poor red sedan, however I stayed true to my thread title and saved the old slick top! The roof is now with AWDBOB if anyone wants to re-skin a sedan.

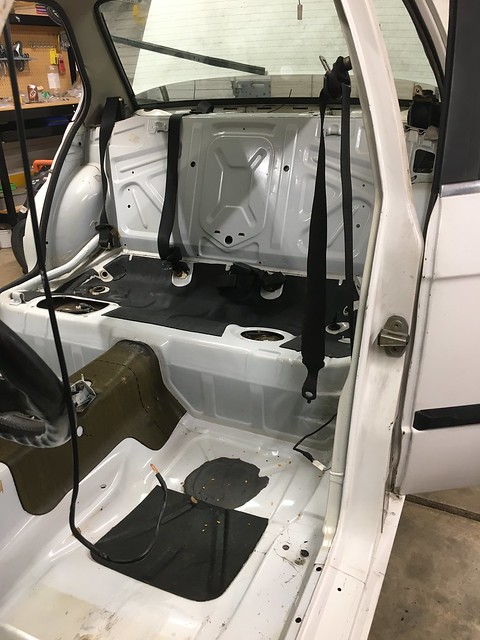
First thing the white car needed was a good wash. I set about stripping out as many remaining items as possible to get back to a bareshell again. The PO had 'welded' in 'vert strut tower gussets as part of their suspension upgrades. I was half tempted to remove them anyway, but then I leant on one while removing the ABS unit and it moved... A good yank pulled the whole thing out. Great work. The other side only needed mild persuasion with a mallet to be freed.
The original chassis loom had been cut at the driver footwell, and replacement fed through the firewall. I assume they were going to follow the old harness to lay down the new one, but it was at this point they bottled it and sold up. Anyway, both harnesses had to be removed, and the dash area was gutted back to the firewall. I then set about giving the interior a good wash with APC and brushes.


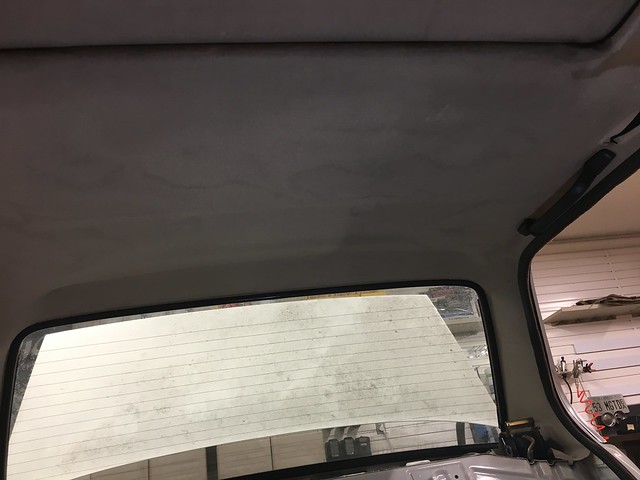
The headliner has a few stains, presumably from previous water ingress. I gave it a good scrub with APC & upholstery cleaner, which relived it of a ton of dirt. Still a little stained, but at least I know it's clean. Below shows the difference with the left 2/3's done.
The sunroof frame is MINT. I gave it a good vacuum and a wash and ensured all the drains were running free & clear. The rears need a little persuasion with some wire and compressed air, then I ran a bunch of APC through them and flushed with plenty of water.


I sealed up the firewall openings with duct tape and rolled the shell outside for a bath. The engine bay and front of chassis was addressed with Zep (orange) Citrus Degreaser. The cowl recess was gutted, vacuumed out and seen to with bottle brushes and APC.
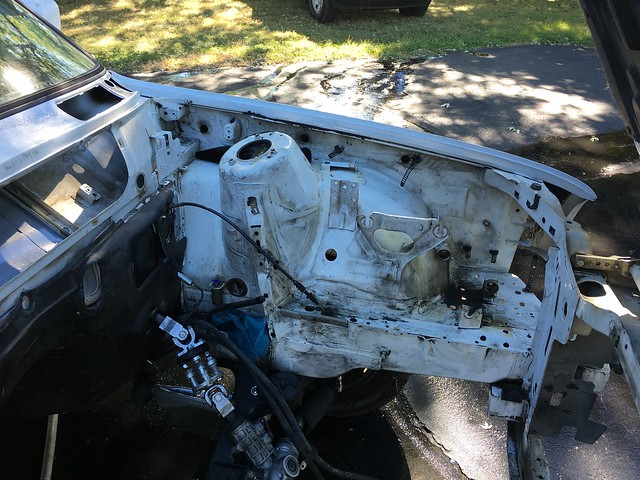

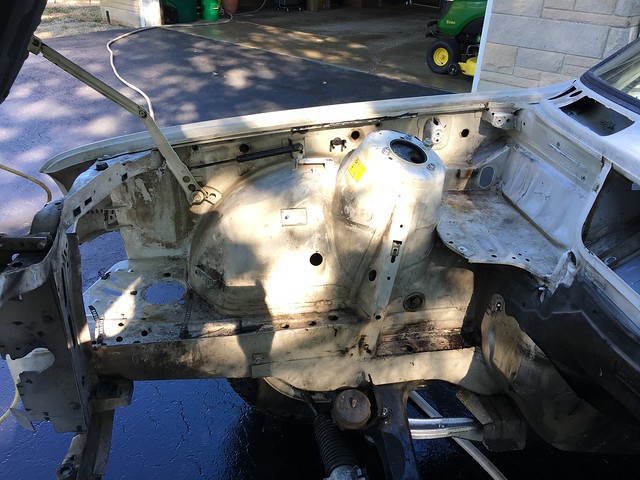

After a good thrashing with the pressure washer, I loaded up the foam cannon with Meguiars Hyper Wash and a dash of APC for some extra dirt cutting ability. The shell was kept thoroughly coated while I went round scrubbing every nook, cranny and jam with detail brushes & more APC. After a rinse, it was the usual decon wash procedure:
2 bucket wash with Dawn
Treat lower areas using Stoners Tarminator
Treat all over with CarPro Iron-X
Rinse, snow foam and rinse
2 bucket wash with Dawn
Clay bar
2 bucket wash with Meguairs Gold Class shampoo
It had obviously been stood a while but cleaned up real nice. The paint is typically dry for single stage, but it'll polish up well.


Needless to say, I super stoked with the new shell as I have been able to get moving on to restoring and rebuilding a lot sooner than expected! More progress to follow as I'm still trying to get up to date...Comment
-
Nice, the new shell looks much more promising.Comment
-
Nice, sad that you had to let go of the red chassis.. but from the start it looked quite a bit of work to get it back in good shape.
Good luck with the new shell! It looks very clean. I'm impressed by how well it cleans up. Subscribed 😉Belgian E30 Driver
/// 1990 - E30 - 318i Cabriolet Brilliantrot
/// 1988 - E30 - 320i Touring Diamantschwarz (Sold)
/// 1990 - E30 - 318IS Coupé Lazurblau
Check out my Rare BMW Music Edition Cassettes TopicComment

Comment