Announcement

Collapse
No announcement yet.

'91 325i Alpine Sedan (2.7 Stroker ground-up rebuild)

Collapse
X
 
  • Filter
  • Time
  • Show
Clear All
new posts

    '91 325i Alpine Sedan (2.7 Stroker ground-up rebuild)

    08-May-21 - Title changed as car is no longer a 318i, red or a slicktop... and now gets a 2.7L (stroker) M20

    Well, after stalking the forum for a couple of years, I figured it was about time I started making my own contributions! While I haven't necessarily been a 'BMW guy', I've now fallen into my second BMW restoration. The first being a '98 528i (E39) which I bought as a project with almost nothing working, but the body and interior were relatively straight. Fast forward 2.5yrs, almost everything has been repaired, restored or replaced and she runs down the road like a new car.

    Through that little venture, I got to know the guys at Zionsville Autosports, who I'm fortunate enough to live very close to. A couple of years ago, they started renting out part of their building, which meant clearing out a bunch of their stock. I was shocked when I called round one day, only to find the front lot completely empty of parts cars and shells! All except one...


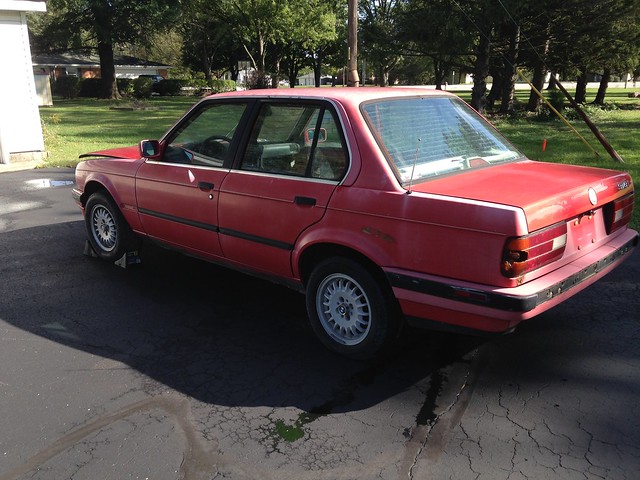
    A 1991 318i sedan. Being a late model slicktop sedan, it seemed a shame to let it go to the crusher. Like the last remaining sad little puppy at the shelter, I had to have it. I gave it a quick look over, struck a very generous deal and had it hauled off home. As soon as it landed on the driveway, I set about looking at what I'd just bought.


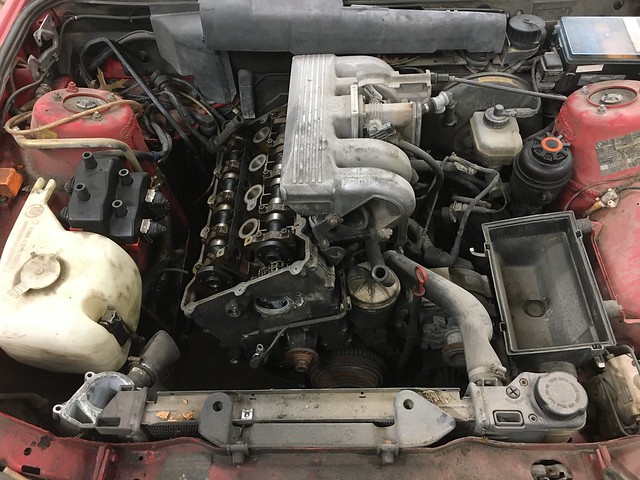
    I rolled it into the workshop and set about tearing out the sopping wet carpet to preserve the reasonably decent floors. Being an ex-parts car, this is about all that was left of the interior. Though it had retained the power window and lock mechanisms in all 4 doors.


    I wasn't necessarily ready for another project at this time and 15 months of house remodelling, plus a blown headgasket and subsequent engine rebuild on the E39 meant the sad little puppy was neglected to the corner for quite sometime. But i's now been given pride of place in the workshop for the project to commence, which is where I'll pick up in the next post.
    Last edited by Matt@EDC; 05-08-2021, 05:22 AM.

    #2
    Solid first post. I anxiously await the second. :-)

    Comment


      #3
      Waiting for chapter two to get posted as well. Good start OP.

      Comment


        #4
        With a few friends cars taken care of and the E39 back on the road, I spent a couple weeks knocking out some jobs around the workshop I'd been wanting to take care of and cleared the decks for the little E30. I'm blessed with a decent sized detached shop, but as we all know, any size shop that becomes messy leads to less workspace. Therefore I make a point of downing tools and tidying up on a regular basis and being pretty ruthless with not buying or saving stuff I don't need. I hate tripping over junk when I'm trying to work on a project.


        The car was awoken from it's slumber in the corner of the garage.


        I dropped a 14" drivers seat in so the wife could steer it out to the workshop while I propelled.


        Sent it in at an angle to allow maximum workspace for tear down.


        So first, the good bits...

        The floors are fairly solid.


        There's no rusty sunroof to worry about.


        And.... well, that's about it unfortunately. So, on to the bad and the ugly...

        I had already started stripping the trunk area which was absolutely filthy and full of dust. I wondered if it had been in a flood or river at first, but it was really isolated to the trunk and parcel shelf area. The rear bumper, lights, lock and aerial were all removed, connectors labelled along the way.


        Here, the potential source of the dust became evident; one of the air vents in the trunk had been fitted backwards. The intent of such vents is to draw air from the trunk compartment ensuring any odors or fumes are drawn away from the passenger compartment. By fitting one backwards, the air being drawn out one side sucks air (and dust, lots of dust) in from the other side.


        Nothing a little shopv-action cant clear up...


        ...revealing a typically crust battery tray...


        ...and not quite so crusty jack pocket.


        Unfortunately, this is where it started going downhill. Poking around in the trunk, the passenger side of the parcel shelf didn't look quite right...


        I needed to pull the parcel shelf and rear glass to get a better look. It would appear that if you're missing half a lock strip, just fill all the gaps with sealant


        Yep, looks equally chopped up here too.


        The C-pillar has also been cut, as I found out behind all the melted insulation, suggesting it's also been on fire at some point after it was chopped up.


        And the passenger rear sill has some dodgy welding, flaky paint and filler, as well as foil tape around the fuel filler tube, the likely source of the aforementioned fire.


        So, how far does the chopmanship go? Under the floor, the rearward frame rail sections, while a separate piece by design, have obviously been replaced at some point. MIG wire sticking out of the welds does not appear to be factory.


        In addition, the double lap weld on the drivers side of the rear panel (but not passenger side...) and tack welds around the trunk floor, suggest that they have both been replaced also. Looks like all black paint under the flaking Brilliant Red, so guessing the whole rear and rear right corner of a black car has been slapped on. It must have been long long ago when it was worth doing. Long enough for some areas to rust quite severely (despite enough seam sealer to fix the Titanic), back when the amount of work was worth doing (so why am I contemplating doing it now...? ) and before it consequently caught on fire, maybe from a poor repair in the area of the fuel tank filler.

        So to sum up, it really is that unwanted little puppy, kicked, beaten and tortured with fire. As a result, I've taken far too much pity on it and can't bring myself to put it down just yet. The original goal when I bought the car was a to build a clean driver of a restoration. Right now the plan is to tear it down to a bare shell roller and check the extent of the choppage is fully understood. Then ensure that the rest of the car is straight before tearing into the rear end and hanging some panels properly. At that point we'll decide if it's going to be a restoration, restomod, or hotrod, dependent upon the level of finish that can be achieved.

        Fingers crossed this isn't a road to nowhere, but should be plenty of fun along the way. Tear down update to follow.

        Comment


          #5
          Originally posted by mike.bmw View Post
          Solid first post. I anxiously await the second. :-)
          Originally posted by roguetoaster View Post
          Waiting for chapter two to get posted as well. Good start OP.
          ​​​​​​​Thanks guys. Hopefully part two was.... interesting.

          Comment


            #6
            Part two went in a different direction than I pictured. I've only personally seen one other E30 as hacked as that one, and it became a motorsports beater.

            Comment


              #7
              Hate to say it, but with the abundance of good sedans still left, time to put it down. You'll spend way more time and money trying to put that right, than to just buy a decent sedan in the first place and then getting on with doing what you want with it.
              My e30: OEM+ with M30B35

              Comment


                #8
                Originally posted by lukeADE335i View Post
                Hate to say it, but with the abundance of good sedans still left, time to put it down. You'll spend way more time and money trying to put that right, than to just buy a decent sedan in the first place and then getting on with doing what you want with it.
                I wouldn't say there's an abundance of sedans out there but I have to agree. Being a slicktop it has some value living on as track car or something, but I wouldn't waste any time and money repairing all that frame and body damage, yikes...
                My Feedback

                Comment


                  #9
                  Thanks All. I appreciate the comments, and you're not wrong! I do have my justifications for proceeding, though I'll keep them to myself for now and just continue to document the journey.

                  So, on with the tear down!

                  The trunk lid is in great condition, aside from a coating of soot from the blaze.


                  The hood is likely toast as the seam sealer has come away and allowed rust to take hold where the skin wraps around the frame. Has a very tidy insulation panel though.


                  The vultures have been at the engine and had the cam gears and valve cover away, as well as the AFM. All a bit of a pain to replace as I gather, though I do have a lead on a later E36 M42 which I believe to be complete from airbox to harness. That would render the missing parts and updated timing cover. The lower sump is only held on with 2 bolts too, so we'll find out later if that was removed to harvest any other parts.


                  Removing the motor meant unbolting the flex disc, which was obliterated, as standard. Most guides call for the gearbox support to be removed, but I found a 17mm wrench went up & on the nut no problem. This then rests against the bracket on the tail housing while you're heaving on the bolt. Much easier than trying to counter turn 2 hand tools.


                  I thought it odd that one of the gearbox bushing nuts was missing. Then I noticed the whole rubber bushing was missing. Except for the top metal plate and stud. So a little push will lift that side of the 'box... Oh no, wait, the other bushing has separated too. Sooooo, there's nothing holding the gearbox to the body. That'll simplify extraction Also note exhaust chopped off behind the O2 sensor, more on that shortly....


                  Also found the gearknob plastic sleeve glued to the stick. Had to crunch it up with the large Channelocks to get it off. The 'bitch clip' had been replaced with a nut and bolt, which was nice. All suggests the 'box has been out at some point.


                  Pulled the plugs and found pretty clean trans fluid and just a bit of fuzz on the drain plug. Doesn't mean all the synchro teeth weren't drained out in the past so may devise a dyno rig and/or crack the casings open for inspection if the G240 ends up staying.


                  So that exhaust. Looks like someone ground off half a nut, gave up and welded it back up again. Then chopped it off just long enough that it probably wasn't going to come out with the powertrain. So I removed all the manifold nuts (and a decent amount of knuckle skin) but it wouldn't come out the top or bottom, so it was left to drop out while the engine was lifted.


                  Radiator came out next. Externally the core is very very tidy, though it was full off green coolant, none of which would drain from the petcock, suggesting it's all sludged up in the bottom. Something I've experienced before in an old truck, but the coolant was like chocolate milk and nowhere near as clean as this. Again, doesn't mean it wasn't changed out at some point.


                  The loom was pulled through the firewall and disconnected enough that it would all come out with the engine. Busted out the large 1/2" ratchet for the engine mount nuts but someone had already loosened them for me

                  My buddy came over to drive the crane while I guided it up & over the front panel. The 2 ton HF crane legs wouldn't go under the control arms so I had to jack the front up a little until it was relieved of the weight of the engine. Must remember this on reassembly so I don't beach it on top of the crane!


                  Engine and gearbox separated with a bit of fuss. Had to take a grinder to one of the bolts after stripping the teeth off the Torx head (my bad). The head of bolt holding the debris shield on was buried under a cake of filth so it took me a minute to figure out why it wouldn't separate from the bellhousing. But, it came around to our way of thinking in the end and the motor went up on the stand with ease, where it will await an autopsy to figure out why it was parked in the first place. The clutch disc is much fresher than the pressure plate, which is likely why the gearbox was removed not too long ago.


                  After a few late nights of filthy work, I've turned my attention to blowing the doors apart. I'll let you know how that goes.

                  Comment


                    #10
                    I'm really enjoying these daily updates. Are we all caught up now?

                    Comment


                      #11
                      Originally posted by mike.bmw View Post
                      I'm really enjoying these daily updates. Are we all caught up now?
                      Thanks Mike, that makes it all the more rewarding.

                      You're almost caught up now. I've had one door apart already. I'm going to do another hour or so tonight and I'll update later this week when they're all done.

                      Stay tuned.

                      Comment


                        #12
                        Zooming right along.

                        Comment


                          #13
                          Driver side doors unceremoniously gutted and dumped out on the floor.


                          Was fairly frustrating and a bit of a fiddle. The lower window trim clips hung on like pitbulls which slowed me down quite a bit. And I've found very little info on sedan rear door glass. I had 3 or 4 tries at getting the rear sliding window out and still not sure it came out 'the right way'!

                          Hopefully the other side will go smoother now I have an idea how it all goes together and therefore (should) come apart. I'll keep looking for reference material and try to do a guide if i dont find anything in the meantime.

                          Comment


                            #14
                            Got a little time on the passenger side doors tonight. Got those all broken down to bare door shells.


                            The rears went smoother this time. Still not found any definitive guides to removing sedan rear door glass, but this time I:

                            - removed the most rearward lower window track (1 x 10mm hex bolt)
                            - lowered the sliding window to the bottom
                            - pulled the rubber/felt trim that the glass slides in
                            - remove 2 x 10mm hex bolts holding the pillar/ upper window track in place
                            - tilt the pillar forwards such the fixed piece of glass can be wiggled free and removed
                            - now remove 2 x 10mm hex bolts holding the sliding glass to the regulator and you can pull it out the top


                            Without removing the fixed glass to allow that pillar to move backwards, I couldn’t make enough space to get the sliding glass out the top. The pillar has to be dropped down into the door to be removed, and it wouldn’t come out the bottom until the sliding glass has been removed. Also note I couldn’t tilt the pillar very far without removing the lower window trims The fixed glass needs a real good wiggle to break the seals away from the door, which is difficult without getting the pillar right out of the way.

                            Started boxing up the trims and door rubbers. Trying to stay tidy...


                            I’ll get the lock and window mechanisms boxed up tomorrow too before moving onto the next task. Might tackle the fuel system and brake lines for a bit of respite before attacking the dash and wiring loom.
                            Last edited by Matt@EDC; 05-14-2020, 07:15 PM.

                            Comment


                              #15
                              Did a few more tidy up jobs tonight. Pulled the last few clips out of the doors and bagged up all the hardware.


                              Boxed up all the door locks, handles and window mechanisms. Happy with how well parts are condensing down into boxes so far!


                              Got the front door looms labelled and removed.


                              Same for the rear doors and overhead lights. All labelled and laid out on the floor pan.


                              All the trunk wiring is already pulled and labelled. So as per the previous post, next I need to disconnect all the rear brake and fuel system wiring so that I can start moving the loom forward towards the dash.

                              Comment

                              Working...
                              X