Announcement

Collapse
No announcement yet.

One down, one to go

Collapse
X
 
  • Filter
  • Time
  • Show
Clear All
new posts

    One down, one to go

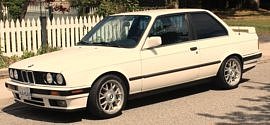
    This weekend I'm replacing the trailing arm bushings on my Spec E30 with hard (very hard) AKG busings. I have weld in camber/toe kits and am searching for a way to have the alignment last for more than a weekend. I've tried Powerflex and OE bushings to no avail. My theory is that the inner sleeve of the bushing needs to stay locked in place and the bushing rotate on the sleeve for the adjustment to hold.

    The AKG bushings have internal gooves for grease and while the sleeves aren't a sliding fit it takes very little to push the sleeve into place. So I'm hoping that the bushing will rotate on the sleeve. The grease grooves suggest that AKG expects the bushing to rotate on the sleeve.

    One side is done and I'm about to go out and attack the other side. Hopefully it won't be any worse than the one I've done.

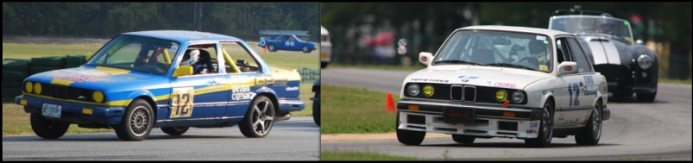
    The car is just back from a frame shop where I had the trailing arms "adjusted" for the camber I want. That whole story started just before a race weekend (four races) at Hallet when I found that the left trailing arm was bent and prevented achieving toe in. There wasn't going to be time to change the trailing arm, so the car went with right at 1/16" total toe out. Toe out in the rear is so loose it would scare god and it was a real handful during track out. After Hallet I repaced the bent trailing arm and then discovered that I could only get 2.25deg on one side and 1.3deg on the other side. With only a week between Hallet and Road Atlanta I just had to live with the wrong camber, though I did get rid of the toe out.

    Road Atlanta was not nearly as bad as it was at Hallet, but it still was pretty exciting in right hand corners (which RA has in abundance). So the car made a trip to a frame shop for adjustment. The camber adjusters were bottomed out (against the subframe) and the shop bent the arms for a camber of 3.5-4deg. When set for the desired 3deg the adjusters should about in the middle of their range. That should help with the axial alignment of the bushing and help keep the adjusters from drifting.

    For the curious, My goal is 1/16" total toe in and 3deg of camber. Tuesday morning I'll find out if I've succeeded when I have the car laser aligned. Then it will be off to Memphis for the first NASA MidSouth race weekend.
    Last edited by jlevie; 07-04-2011, 08:54 AM.
    The car makes it possible, but the driver makes it happen.
    Jim Levie, Huntsville, AL

    #2
    Jim, have you tried to drill/tap the bushings for zerk fittings? You can also drill an access hole into the unibody and lubricate the trailing arm bushings through the rear seat area periodically to ensure the bushings stay lubricated. I have done this with the last set of AKG bushings I installed since they have the internal grooves like you stated.

    NASA MidSouth TT Director / GTS2 #018
    Mods: Coastal PS Fluid, 10w40 Oil
    Future Mods: Bosch Micro-Edge Wiper Blades, Painter's Tape, Spark Plugs, Freezer for Nutty Buddys, Adam Nitti CD's

    Comment


      #3
      No I have not installed grease fittings. On a daily driver I think this would be a good idea. But a race car sees much more limited use and the grease in the bearings ought to last a couple of years or perhaps more. I figure that the bushings will have to be changed in a couple of years anyway.
      The car makes it possible, but the driver makes it happen.
      Jim Levie, Huntsville, AL

      Comment


        #4
        Other than having to drain about seven gallons of gas from the tank so I could remove the filler hose, the right side actually went easier and smoother than the left side. I'm always prepared for a struggle getting the trailing arms out of the tabs on the subframe, or back in. But this side was easy. It is all back together now and ready to be aligned.

        In my opinion the only realistic way to do this job is the drop the subframe a few inches. There isn't much to that and it only means taking the bolts out of the subframe support brackets, removing the subframe nuts and driving the bolts up and out of the bushings, and removing the diff bushing bolt. The exhaust is in the way, but if you release the donuts that hold the muffler up it will sag down and provide plenty of room to lower the subframe.To avoid excess strain on the exhaust I support the muffler with a jack stand.
        The car makes it possible, but the driver makes it happen.
        Jim Levie, Huntsville, AL

        Comment


          #5
          Good info. I have to do this this summer.

          '89 Alpine S52 with goodies

          Comment


            #6
            What bushings are you running on the subframe?
            NASA
            BMWCCA member
            PCA member 25yrs


            1991 318IS slick top
            1997 M3 sedan
            2001 325CI DD

            “whoever turns the wheel the least, wins"

            Comment


              #7
              Originally posted by e30s50dan View Post
              What bushings are you running on the subframe?
              AKG aluminum bushings.

              Got the car on the alignment rack this morning. After installing the bushings I had both the camber and toe adjusters in the middle of their range. Camber on both sides was a bit more than 3deg and toe was only about a tenth of a degree off. The final numbers were 3.0 deg of camber on both sides, .23deg of toe in on the left and .24deg of toe in on the right. Perfect!
              The car makes it possible, but the driver makes it happen.
              Jim Levie, Huntsville, AL

              Comment


                #8
                Those are great numbers. Congrads!
                NASA
                BMWCCA member
                PCA member 25yrs


                1991 318IS slick top
                1997 M3 sedan
                2001 325CI DD

                “whoever turns the wheel the least, wins"

                Comment


                  #9
                  what did you use to get the rear axel out of the hub...im curerntly replacing my left trailing arm (87 325is) cause the shock bolt snapped inside of the one on the car now. I have bushings but i think im gonna take em to the shop..im the only mechanic in my fam and dont have a lot of specialty tools to do the bushings and wheel bearing.

                  ive loosened all the six allen heads bolts from the inner cv joint but im not sure what ill have to do tomorrow morning to get the axel out the hub..any advice is greatly appreciated. and if you think i can do the bushings at my house i would read any links you have to keep the labor $$$ in my pocket
                  I have the haynes manual but it only says use a puller and has no pics
                  m20 is plenty. im simply a drifter.
                  build thread -- http://www.r3vlimited.com/board/showthread.php?t=206510

                  Comment


                    #10
                    Originally posted by ROLLingKING View Post
                    what did you use to get the rear axel out of the hub...im curerntly replacing my left trailing arm (87 325is) cause the shock bolt snapped inside of the one on the car now. I have bushings but i think im gonna take em to the shop..im the only mechanic in my fam and dont have a lot of specialty tools to do the bushings and wheel bearing.

                    ive loosened all the six allen heads bolts from the inner cv joint but im not sure what ill have to do tomorrow morning to get the axel out the hub..any advice is greatly appreciated. and if you think i can do the bushings at my house i would read any links you have to keep the labor $$$ in my pocket
                    I have the haynes manual but it only says use a puller and has no pics
                    Once you get the lock plate and axle nut removed from the hub, take the wooden handle side of a hammer and put it against the axle spindle. Now use another hammer and drive the axle out. It really shouldn't take that much force, maybe a few taps then you can pull it out by hand!!

                    I've got a press to remove and install the trailing arm bushings, but akg sells a special tool, and it isn't very expensive $35!!
                    Last edited by Moberg12; 07-06-2011, 09:08 PM.

                    Comment


                      #11
                      Ugh--the weld-ins are slipping? That's unfortunate--is this a common problem? That makes me want to get subframe spacers...

                      Comment


                        #12
                        Yes, we have had problems with the weld-in adjusters slipping, but keep in mind this is happening on race cars that see much rougher service than a street car.
                        The car makes it possible, but the driver makes it happen.
                        Jim Levie, Huntsville, AL

                        Comment


                          #13
                          Fair point, but I am not exactly easy on my car--I almost want to consider tacking the eccentrics into position after the alignment was finished. Technically if you tack the ring on the threaded side, you could still remove the bolt.

                          Comment


                            #14
                            And the rest of the news...

                            I took the car to Memphis International Raceway this past weekend for the first NASA MidSouth race event. The threads on the left side toe adjuster stripped in the first session on track. That allowed the wheel to move fore/aft as power was applied or removed. Which in turn caused the car to drive to the right under power and the left under braking. In that condition the car is un-driveable.

                            I was able to affect a repair by stealing a bolt from the trailer, but I had nothing with me to properly set toe, so I just had to eyeball it. While not right and a bit skittish, at least I could race it. I think I understand the failure. There was plenty of thread engagement and the bolts are Grade 8, but the flats for the eccentric washer reduce the thread area by about 30%. It takes a lot of torque to have the adjusters hold and that reduction in thread area was more than the bolt could take.

                            I intend to replace the eccentric bolts with home made ones that use 12-point aircraft bolts, which are a good bit stronger than Grade 8. I'm not going to use an eccentric washer, as it really isn't needed with hard bushings and I'll tack weld the eccentrics once the alignment is done. The downside of that is that I'll have to drop the subframe to cut the tacks if I want to change the alignment or swap out a trailing arm.
                            The car makes it possible, but the driver makes it happen.
                            Jim Levie, Huntsville, AL

                            Comment


                              #15
                              Well +1 to the list of eccentric failures

                              After a few autocrosses and 1 HPDE, the left adjuster on the driver's side trailing arm has let go. Note that I had it tack welded by my mechanic post-alignment. Now, there is .5-1 cm of vertical play. When I drive over a crack or medium bump, i get a large clunking sound.

                              Going to have it re-aligned and re-welded this Saturday. Here's to hoping that it just broke free, vs. stripping or something worse. Can't really see as the exhaust is in the way.

                              Honestly, the setup has been kind of a pain in the ass so far.

                              Comment

                              Working...
                              X