
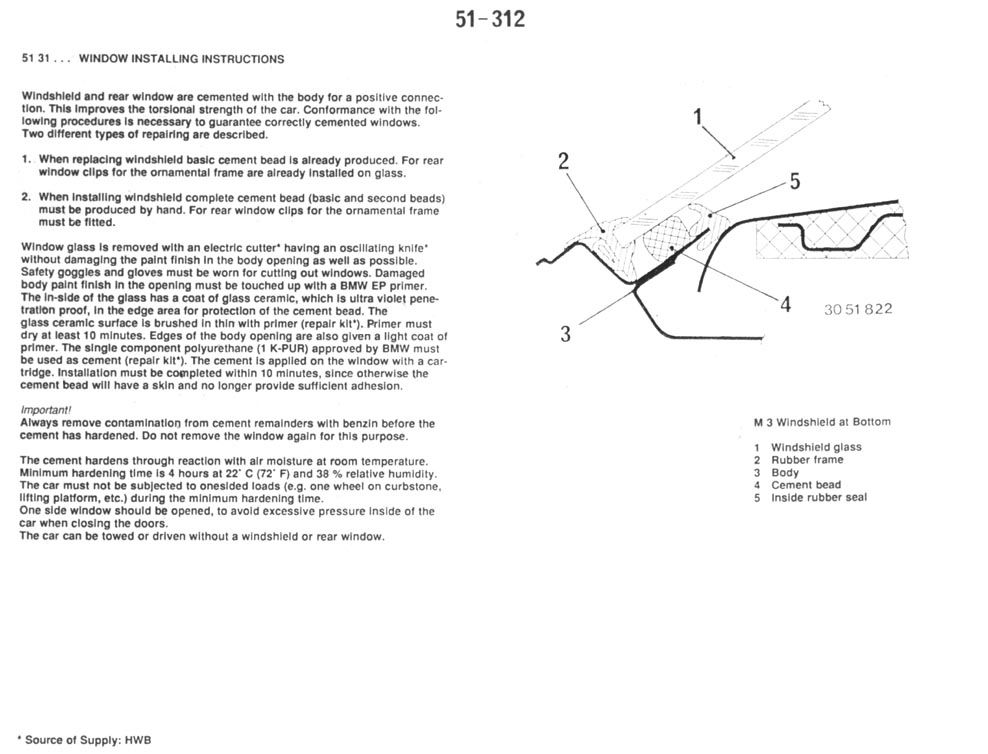
Since I bought the M3 the windshield has always bothered me when driving the car. The original windshield was pitted so I decided to replace it. I searched the internet for install threads and did not find much so I thought that I would share my experience with everyone.
Seeing that the M3 windshield is bonded onto the body it is unique to other E30’s. I was advised by many friends not to take this job on at our shop but I was concerned about the rust issues that I might find on the cowling and how a windshield installation shop would repair that.
I am lucky that my son, Brian, is a Master Tech and has installed windshields in newer BMW and that his friend Rob has been installing windshields for BMW for many years. Neither of them had ever done an M3 so we all were a little scared of the job but decided to take it on.
I purchased all the parts from BMW which included the rubber gasket that goes around the windshield, the rubber gasket that goes on the inside of the car just above the dash, the bonding material kit and the glass.
This is a picture of the old windshield before we started the project. It is hard to tell with this photograph but this windshield is very pitted.

Brian and I went to work on taking out the old windshield. Removing the old rubber seal that surrounds the glass is not too hard. There is a spot at the bottom of the windshield where the seal ends meet. We used a plastic pry tool to lift the seal until we could grab it with a pair of pliers. Once it started to come out it was very easy to remove.

The yellow tape you see in this picture is “special” tape from BMW. It is what they use at the dealership to keep from scratching the paint. It is different than the blue painters tape that I usually use and is kind of like electrical tape without the real sticky adhesive side.

The tools we used were what the dealership uses on the new BMW’s. There are two ways to remove the old windshield. This method uses two units that clamp to the inside of the windshield and a piece of wire that looped between the windshield and the inside of the car. With all the inner panels removed or loosened there was plenty of room for the wire to cut the old bonding material without damaging the interior pieces.


Once the tool is setup it works with a standard ratchet that tightens up the wire thereby cutting the bonding material.

It is necessary to move the two units on the inside of the windshield to get the proper angle to cut the bond material so a few setups are required.

I was surprised when I found that both drain holes were plugged with Butyl as I was told that this is what creates the rust in the cowling. Maybe this was not the original windshield as I had thought.

The passenger’s side had just started to get a little surface rust.

The driver’s side was still in great shape.

The rusted area on the passengers side was sanded until it was down to bare shiny metal.

Then some Eastwood Rust Encapsulator was used as primer.

This was finished off with several coats of Diamond Schwartz touch up paint. Sorry for the bad picture but it came out perfect.

The bonding adhesive around the body was removed with a razor blade. Again, my thanks to Brian for taking on that job while I fixed the surface rust. There were some nicks from the razor blade in the color coat but it did not get into the metal so the Diamond Schwartz touch up paint was used to cover the original primer.

From here on out I left things to the Master Techs, Brian and Rob. When we pulled the new BMW windshield out of the box we were surprised that there was already a bead of bonding material on the windshield. It is hard to see in the picture but there are two ridges and a valley in this material. The workshop manual said to lay a 5 mm bead of bonding material on the windshield but did not mention that there would already be bonding material on the glass. We chose to set the new rubber seal around the windshield and do a test fit before we applied anymore bonding material to the windshield. There was a +/- 3mm gap between the bonding material on the windshield and the body. We decided to go with the 5mm of new bonding material as the Factory Manual suggested.

The next step, if using BMW bonding material is to prim the metal and the glass. There were two different tubes supplied with the BMW bonding material for this task. The Blue tube is for the body.

The yellow tube is for the glass. We primed the existing sealant and the portion of the glass that the new sealant would touch. Care should be taken with this primer as it will etch the glass so be carful where it is applied.

There was an area at the bottom of the glass where the factory bond on the windshield did not touch. You can see the ridges and valley on the factor bead better in this picture. We chose to fill in that area with the new bonding material.

Here are the Masters at work with the air calking gun.

Once the bonding material was applied it was time to install the new glass.


In this picture, you can see the small pieces of blue painters tape on the body of the car. We used a grease pencil to mark the rubber seal and blue painter tape on the test fit to make sure the fitment was correct once the new bonding material was applied. The wide yellow tape makes sure that the windshield does not creep downward while the bonding material is curing.

Rob does not use the strap method at the dealership because he said that he has seen installers tighten up the strap too much and when it is released it will cause the windshield to crack. The BMW factory manual showed this method of strapping the windshield but did not note the use of the yellow tape. As you can see we chose to do both but were very carful not to tighten the ratchet strap too tight.

I left the strap on the windshield for 24 hours. Then I pulled up the corners of the rubber gasket on the outside of the car and used a squirt bottle to put some water where the bond met the body. No leaks were found. Then I waited a few days before we took the car the a BMWCCA get together. This was the final test, while on the freeway I took the car up to about 80 mph and heard no air leaks. The Masters did a great job! Here is a picture of the first outing with the new windshield. The Touring is my wife’s new car and the M5 is Brian’s car.

It is so nice to have a clear windshield. I am finding that every little smug shows up now but I can live with that…
Cheers,
Jim

Comment