Announcement

Collapse
No announcement yet.

jasper's m10 to m42 swap

Collapse
X
 
  • Filter
  • Time
  • Show
Clear All
new posts

    #16
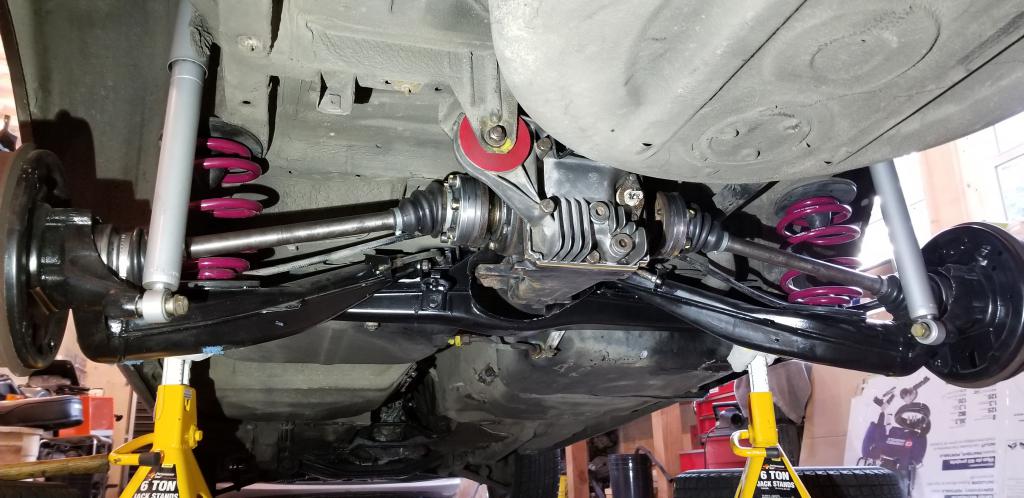
    Soyesterday I hit the upper intake with a brass wire wheel and today I installed the rear axles which I refurbished last year. I had taken the CV joint apart for inspection and they looked good - so I re-greased them and installed new boots.

    Click image for larger version

Name:	axles 1.jpg
Views:	1
Size:	93.3 KB
ID:	7200287

    Jacked up the back and threaded the wheel bolts to act as a leverage point for my prybar while I torqued the axle bolts themselves.

    I could not find a torque spec for these bolts anywhere in my Bentley or the manuals on line. Google came up with a page that said 53 ft-lbs - I took them to 60 for peace of mind.

    Click image for larger version

Name:	backjack1.jpg
Views:	1
Size:	109.3 KB
ID:	7200288

    Click image for larger version

Name:	torqueaxle1.jpg
Views:	1
Size:	96.8 KB
ID:	7200289

    All done - next up is to install a sway bar. The early 318i cars came without any sway bar at all and I am installing a 12 mm to keep things a bit supple.

    Click image for larger version

Name:	rearsub1.jpg
Views:	1
Size:	88.3 KB
ID:	7200290


    I've been reviewing some of the hard core restoration threads here and it's really brought my goal with this car into focus. I have neither the budget nor the inclination to "restore" this car and I plan to make it usable all year round.

    My goal with this car is to build it as a nice driver rather than a street racer or restored car. I want to keep the patina, and make it firm but not hard, quiet but not refined.

    Hopefully I will be able to get "collector" plates for it. Here in BC Canada the government auto insurance program will give you collector plates if the car is original and in nice condition. The benefit is that annual insurance is only a few hundred dollars instead of a thousand or more. The downside is that you can't use the car to drive to work, and you can't modify it. It will be interesting to see if they consider the m42 as a modification since the e30 did at some point get that engine as stock. They've been know to be a bit tolerant of these kinds of things.

    Comment


      #17
      Update.

      I borrowed an engine stand from a guy at work so ready to get busy cleaning up and re-sealing this engine. Plan is to replace *all* the seals and gaskets. Not planning to redo the timing gear, hoping the chain ramps etc are in good shape.

      Also hooked up with a group of local e30 guys on whatsapp. Probably some of you may be following this thread - great group - hooking me up with parts from the moment I logged on, ready to come and help out when I posted this morning (although ended up not needing help).

      First things first - I removed the clutch and flywheel. Mine is a dual mass and I heard from one of my new e30 friends that cars with A/C had dual mass flywheels and cars without A/C had single mass. I'm on the hunt for a m20 single mass flywheel - either from an m20 or a m42 without A/C. The old clutch had some meat left but the pressure plate and flywheel looked rubbed a bit raw.

      Click image for larger version

Name:	clutch 1.jpg
Views:	1
Size:	97.9 KB
ID:	7200418

      Here's the dirty engine on the stand - can totally visualize this in the car.

      Click image for larger version

Name:	engine on stand1.jpg
Views:	1
Size:	116.9 KB
ID:	7200417

      I thought removing the crank bolt would be hard but it wasn't. I threaded a couple of flywheel bolts back in to the back of the crank and wedged a prybar through the bolts up against the frame of the engine stand. Then I extended my breaker bar using the handle of my floor jack and it twisted right off. Hard to tell if I applied 240 ft-lbs to it...it's possible that the crank bolt has been off before and was not torqued to the outrageous spec.

      Click image for larger version

Name:	crank bolt 1.jpg
Views:	1
Size:	106.1 KB
ID:	7200419
      Click image for larger version

Name:	crank bolt 2.jpg
Views:	1
Size:	44.2 KB
ID:	7200420

      So that left me with this mess to clean up...much solvent and scrubbing followed....

      Click image for larger version

Name:	dirty case 1.jpg
Views:	1
Size:	61.3 KB
ID:	7200421

      Comment


        #18
        So yeah - at least four hours of spraying solvent, brushing, wiping, spraying scrubbing, brushing, wiping.....pleased enough with the results.

        Click image for larger version

Name:	cleaned up 2.jpg
Views:	1
Size:	64.6 KB
ID:	7200422
        Click image for larger version

Name:	cleaned up 3.jpg
Views:	1
Size:	57.0 KB
ID:	7200423


        I wore a respirator...would almost certainly have cancer now if I hadn't.

        Click image for larger version

Name:	cleaned up 1.jpg
Views:	1
Size:	88.7 KB
ID:	7200424


        Time to but a gasket set and start taking this thing apart. Have to do my research on how to lock the crank at TDC.

        Comment


          #19
          in4moreselfies

          curious to see how this ends up.
          1984 Delphin 318i 2 door

          Comment


            #20
            So in between some travel for work and a cold that's kicking my ass I have managed to do more cleaning. Lot's more cleaning

            This motor is a hella mess for supposedly having only 200k kilometres on it. I hope to get the valve cover off tomorrow and maybe also the timing covers - that should give a good indication of the condition this engine is really in.

            Here is the upper intake and throttle body before:

            Click image for larger version

Name:	01jan19-intake2.jpg
Views:	2
Size:	95.2 KB
ID:	7200630

            and after:

            Click image for larger version

Name:	clean intake 1.jpg
Views:	1
Size:	103.8 KB
ID:	7200628

            and this is the case before:

            Click image for larger version

Name:	engine cleaning1-01jan19.jpg
Views:	2
Size:	103.3 KB
ID:	7200631

            and after:

            Click image for larger version

Name:	clean block 1.jpg
Views:	1
Size:	120.2 KB
ID:	7200629

            Still so much to do....my target road date is June 2019

            Comment


              #21
              cleaning up nice!
              1984 Delphin 318i 2 door

              Comment


                #22
                Love the color on your car!
                What I did to clean my injectors by myself some time ago:

                Please take note this creates potential fire hazard and you should be outside and have a fire extinguisher at your side. Follow the steps at your own risk.

                1. Take a connector from a spare harness and cut the wires as long as possible.
                2. Get a can of carb cleaner and remove the nozzle.
                3. Cut a small patch (1h1 inch) of a blown inner bike tire (saw you have bikes in the background).
                4. Plug the connector you just cut to the injector and wrap the ground wire to the "-" post of a battery.
                5. Fold the rubber piece twice and cut a hole through it, so that the post for the nozzle on the carb cleaner can fits through snuggly and put the folded rubber on there.
                6. Press the injector onto the nozzle post (don't know what to call it :/) hard enough until you hear the pressure releasing into the injector. If it's a leaky injector, you'll know immediately.
                7. Touch the positive wire to the plus terminal of the battery. If the injector works correctly, a mist of carb cleaner will magically appear.

                Worked great for me, a second set of hands will make this plenty easier though.

                For the C101 - When I made my adapter, I still had some issues like intermittent "idiot light" when the key is in ON position and no cranking and flickering dash and check lights. Turned out, the rectangular connector after the fuse box was faulty. In the end, I spliced the "car side" of the C101 to the existing harness after I cut off the rectangular connector and thus eliminating it. Just sharing my experience, hope you don't have the same problem.

                Good luck with your swap !
                '85 Alpine Weiß 2-door with m20b30 ground up build

                Comment


                  #23
                  So I have been pretty damned negligent in updating this post. I've made huge progress in the last year. In teh final strokes now. Let me try to get you caught up.

                  I used JB weld to repair the corrosion holes in the coolant pipes on my head:


                  Click image for larger version

Name:	20190331_174413.jpg
Views:	444
Size:	53.0 KB
ID:	9919268

                  Click image for larger version

Name:	20190331_172347.jpg
Views:	444
Size:	59.0 KB
ID:	9919269
                  Last edited by jwetering; 04-21-2020, 12:07 AM.

                  Comment


                    #24
                    Then I fabbed up a valve spring compression tool so I could disassemble the head.

                    Click image for larger version

Name:	20190414_112514.jpg
Views:	454
Size:	83.0 KB
ID:	9919242

                    Click image for larger version

Name:	20190414_112638.jpg
Views:	446
Size:	81.1 KB
ID:	9919243

                    Comment


                      #25
                      Then I bought an awesome Tacoma for jobs around the house and winter duty.


                      Attached Files
                      Last edited by jwetering; 04-21-2020, 12:08 AM.

                      Comment


                        #26
                        Then I lapped the valves Click image for larger version

Name:	20190714_110937.jpg
Views:	443
Size:	78.5 KB
ID:	9919247

                        Comment


                          #27
                          Then I installed a four post hoist in my shop Click image for larger version

Name:	20190922_162141.jpg
Views:	450
Size:	114.7 KB
ID:	9919249

                          Comment


                            #28
                            Then I finally yanked the m10 Click image for larger version

Name:	20191223_135854.jpg
Views:	454
Size:	109.9 KB
ID:	9919251

                            Comment


                              #29
                              Then I stripped and painted the subframe and struts - that's an m10 subframe - it won't work with an m42 without modification to the spacing between the stud and locating dowel on the motor mounts - more on this later. I ended up buying a new subframe. Basically they are the same for every e30 - except the very early cars (like 84-85) .

                              Click image for larger version

Name:	20191229_153459.jpg
Views:	469
Size:	98.5 KB
ID:	9919258 Click image for larger version

Name:	20191229_153748.jpg
Views:	449
Size:	97.7 KB
ID:	9919256 Click image for larger version

Name:	20200105_203105.jpg
Views:	467
Size:	83.9 KB
ID:	9919255
                              Attached Files

                              Comment


                                #30
                                Then I modified my steering joint to fit my e46 ZHP rack. I ground off the rivet and used a bolt with a nut as spacer. I also tapped threads into the joint itself and then loctited everything.

                                Click image for larger version

Name:	20200119_144015.jpg
Views:	445
Size:	96.8 KB
ID:	9919265
                                Click image for larger version

Name:	20200119_144932.jpg
Views:	450
Size:	93.2 KB
ID:	9919264

                                Click image for larger version

Name:	20200120_175610.jpg
Views:	454
Size:	36.0 KB
ID:	9919262

                                Click image for larger version

Name:	20200120_182329.jpg
Views:	450
Size:	105.6 KB
ID:	9919263

                                Comment

                                Working...
                                X