Announcement

Collapse
No announcement yet.

Panici's '87 325is E30 - Boosted In Bronze

Collapse
X
 
  • Filter
  • Time
  • Show
Clear All
new posts

    Updated Photoshoot
    September 22nd 2018

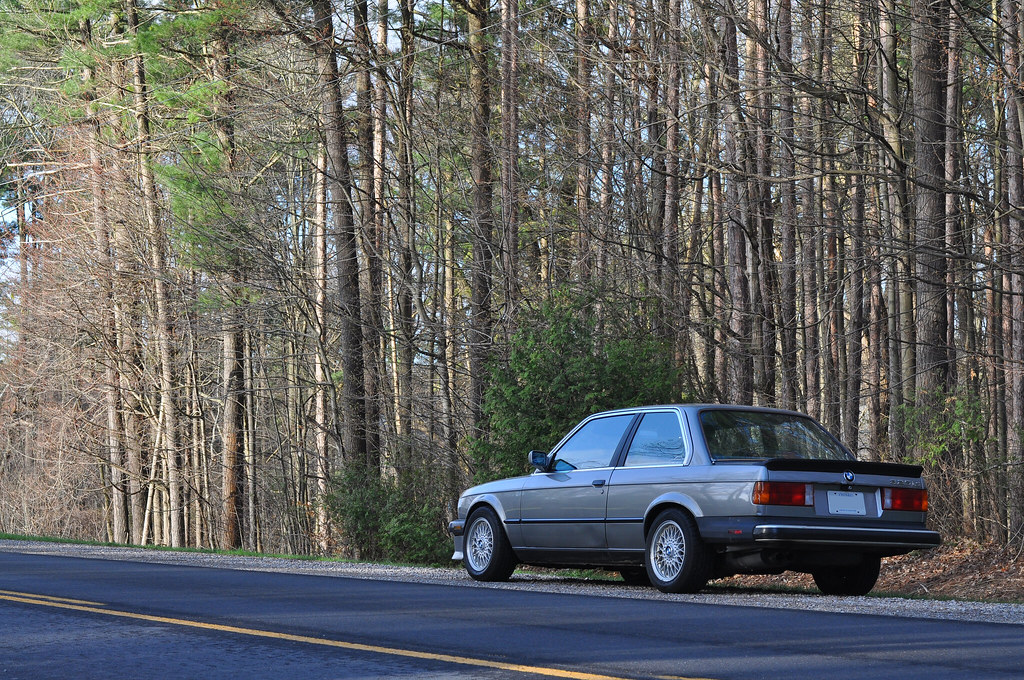
    Went for a lenghty drive on Saturday, and took some great shots of all the new additions.
    Those 15" Euroweaves really set the car off nicely!


    Comment


      The euroweaves look great, and I LOVE the houndstooth interior. Looking good!
      '86 325e Zinnoberrot /// '02 325ci Schwarz II /// '18 M4 Azurite Black Metallic ///

      Albie325 Build Thread | Albie325 COTM Jan 2021

      Comment


        Originally posted by Albie325 View Post
        The euroweaves look great, and I LOVE the houndstooth interior. Looking good!
        I think they've set the car off nicely as well. Very OEM+ IMO.

        Thank you for the kind words : )

        Comment


          Closing out 2018

          I got married to my lovely wife Emily on September 28th, 2018.
          We then took a weekend away as a honeymoon, driving the E30 up to a local ski resort.


          Stored the E30 with alternate wheels, and tucked the 15" 'weaves with the new tires in the basement. Also ran a 240v heater on low all winter to keep the garage warm. Expensive but worth it to keep the E30 cozy!


          For Christmas I bought myself a toolbox, and my Dad bought me some wall cabinets and metal signs/license plates to dress up the garage.

          The extra storage and organized tools makes a big difference!


          Last edited by Panici; 05-20-2019, 07:37 AM.

          Comment


            Congrats!
            Garage looks great, and the car is gorgeous.
            '85 Alpine Weiß 2-door with m20b30 ground up build

            Comment


              Rust Repair - Driver's side trunk pocket
              Feb 2019 - April 2019


              I finally tackled the rusty driver's side truck pocket. I repaired the lower section first, and used lessons learned to repair the side hole.
              I again used steel from my 325e parts car roof skin for the patch panels :)


              Next time I'll be sure to remove all of the undercoating from surrounding material so it doesn't burn off, and buy something smaller for cutting then a Sawzall! I could have also put more heat into the lap weld on the side repair.

              Overall it's not my best work, but it's definitely waterproof after seam sealer and multiple coats of brushed-on Rustoleum black paint.


              This repair took quite a long time, as I wasn't able to devote much time to working on the car.

              Unfortunately my father had surgery, and subsequently passed away on March 16th, 2019. :(
              There are so many things in my life that can be linked back to my Dad. He put his family first, and always gave of himself for others. I am thankful for all the things he taught me, and (most relevant to this thread) how he supported and encouraged me to embrace my hobbies and passions.
              I couldn't have asked for a better dad.


              Comment


                Adjusting wheel fitment Vol.1
                April 21st 2019


                Ordered both a set of 5mm and 10mm spacers with appropriately sized lug bolts from Ethan (8380 Labs).
                Excellent customer service from Ethan and great quality spacers.

                I put the 5mm spacers up front and 10mm in the rear.
                I'm pleased with the front fitment, but the rear still needs some tweaking.


                Also, I no longer have water issues in the trunk; I now have full trunk carpet for the first time since owning my E30!


                Comment


                  Adjusting wheel fitment Vol.2
                  May 2019


                  Hunting down some front-end noise issues, I replaced my upper strut mounts (top hats).
                  The passenger side strut threads completely stripped upon disassembly, and I ended up retapping to M12x1.5.

                  The old mounts were so crushed that I gained a noticeable amount of ride height in the front with the new mounts.
                  Kind of a letdown after just getting the front to sit nicely with the 5mm spacers.
                  I decided to drive the car for a week, to see if I could live with the added height in the front.


                  The extra height in the front bothered me enough that I tore apart both front struts again the following week.
                  I cut 1/4 coil off of both front H&R Sport springs (these were dead/inactive coils anyways).
                  While I was in there, I also removed half of the front internal bumpstops in the Bilstein Sport Dampers.

                  The driver's side damper threads stripped out this time, and I again re-tapped to M12x1.5.
                  I ended up using an open-ended lug nut as a jam nut for the driver's side, and completely replacing the nut on the passenger side with an open-ended lug nut to maximize thread engagement.

                  These will hold with loctite to assist, but next time the front struts are apart they will either need to be ground down and re-threaded to M10 or completely replaced.
                  I'll likely upgrade to Koni SA dampers all around at that point to try and improve ride comfort.


                  Sorry for no pictures of the final ride height and fitment. The car is filthy and I've been quite busy.
                  I also swapped my rear spacers from 10mm to 15mm, and I will get some pictures this week if the weather holds.


                  Oh, I threw on an eBay cone filter. Yes I know this either won't affect power or might even slightly reduce power. My E30 already feels slow with the bigger wheels. I was looking for added induction noise only.
                  I tweaked the mount a bit after this picture, to reduce stress on the intake boot.


                  I cut up my spare carpet and made some floor mats for the front seats. I repeated the process on the driver's side.
                  Helped with NVH a little bit.


                  Last edited by Panici; 07-05-2019, 11:00 AM.

                  Comment


                    Rear End Cosmetic Refresh Part 1
                    June 2019


                    The rear end cosmetics on my E30 needed some attention.

                    I took off the rear bumper, hoping to polish it up and repaint the trim. Unfortunately I found some structural damage on the left mount, and needed to source a replacement bumper.

                    It took some time to find a replacement part, so I drove around for a while bumperless!
                    I had my own yard party while washing up the E30. (I wanted to clean behind the rear bumper & trim before everything went back together.)
                    My neighbors must love the look of my project/parts cars parked all over the lawn.


                    The replacement bumper I bought was heavily pitted, I didn't take any pictures of the "before" state.

                    While I was down in the USA for work, I bought a Harbor Freight buffer/sander. I hit the bumper with a few 7" 240 grit sanding disks to get through the clear and down to raw aluminum.
                    Unfortunately I didn't have any finer sanding disks, and there are still some visible scratches in the aluminum.

                    I did polish the bumper up with some HF black polishing compound, but this wasn't enough to remove all the scratches. I may go back with some finer paper in the future to finish the bumper up properly.

                    All that said, it still looks heaps better then the old bumper, and most importantly is structurally sound.

                    I hit the trim with some Duplicolor Bumper Coat while it was all apart.


                    Comment


                      Congrats on the wedding!

                      and...

                      I love houndstooth seats.


                      Keep up the good work.

                      Comment


                        Originally posted by LateFan View Post
                        Congrats on the wedding!
                        and...
                        I love houndstooth seats.
                        Keep up the good work.
                        Thank you!
                        Hard to believe I'm coming up on my one-year anniversary already!

                        Comment


                          DIY Startec Replicas
                          June 2019


                          I wasn't willing to pay the $800+ for a used set of Startec lights, so I set about making my own replicas!
                          I've detailed the process below, so you can attempt your own set.


                          ---


                          Parts used:

                          Lenses ($110usd + shipping):


                          Sealant ($57cad):
                          RetroRubber OEM Grade Butyl


                          Bulb paint ($10cad):
                          Pebeo Vitrail Crimson


                          Two taillight housings (preferably cracked/damaged lenses).

                          VHT Niteshades ($22cad)


                          ---


                          Directions:
                          1. Paint inside of new lenses with VHT Niteshades.
                            • This was my first time using Niteshades. Be aware it goes on quickly.
                            • I achieved the pictured darkness on my first coat while only seeking to apply an even layer.

                          2. Heat taillight assemblies in oven @ 230f for 10 minutes.
                            • I removed all of the metal studs, and placed lights on a block of wood on the bottom rack.

                          3. Smash out existing lenses with a hammer. Wear eye protection.
                          4. Remove bits of leftover lens from edges while lights are still warm.
                          5. Heat RetroRubber sealant in oven for a few minutes to soften.
                          6. Stretch sealant thin and apply to all edges on taillight housing. You only need a little bit to make a seal.
                            • I used too much on my driver's side (first attempt) and the finished product doesn't look as good up close.

                          7. Place lens on top of sealant & housing.
                          8. Place in oven on top of wood. I used additional wood on top of lens to weigh down.
                            • I followed Morimoto directions and went for 7min @ 270f. This melted/distored my lenses in a few spots.
                            • I'd recommend starting at 230f and adding heat/time to melt the sealant if needed.

                          9. Paint bulbs red as needed to achieve startec colour reflective effect.
                          10. I used wiring from a spare bulb tray to wire my rear fogs in parallel with the brake lights.


                          ---

                          Additional notes and areas for improvement:

                          My taillight housings only had a reflective (chrome coated) surface on some of the internals.
                          Adding a reflective surface to the rear fog areas would help to improve the lens colour effect.
                          I'm not sure the best way to achieve this, as I've used chrome spraypaint before and it sprays out more like silver paint.

                          I am also converting my lamps to LED for added brightness. So far I've used the same glass/bulb paint on the LEDs with success.


                          (no bulbs)


                          Comment


                            Unbelievable work on those lights
                            Simon
                            Current Cars:
                            -1999 996.1 911 4/98 3.8L 6-Speed, 21st Century Beetle

                            Make R3V Great Again -2020

                            Comment


                              Originally posted by 2man View Post
                              unbelievable work on those lights
                              +1
                              Before this thread, I didn't know you could purchase lenses separately from the housings.
                              I thought it was always one piece.
                              Last edited by Stanley Rockafella; 07-21-2019, 10:48 PM.
                              If it's got tits or tires, it's gonna cost ya!

                              Comment


                                More pictures from June & July 2019.

                                We bought an R53 Mini Cooper S for my wife, and took it up north the next day to a rented cottage!

                                -


                                Last edited by Panici; 10-07-2023, 09:35 AM.

                                Comment

                                Working...
                                X