
UPDATE - More pics added July 1st!
Couldn't fir them on to this thread! ;)
I have been way too lazy - or...busy - to get pictures up of my progress.
I got home from college on May 14th, and I had my engine out (and exhaust and everything off) by May 18th. Had the engine dismantled by the 19th, and everything to the engine shop that day.
Even though I had all the parts standing by, ready to go, and had everything ready at the machine shop, I ended up doing more research.
To make a long story short, I came back to my original idea 2 weeks later, I finally decided I couldn't afford all the fancy stuff, and to just rebuild my 2.7.
So, I've been on a roll the past couple weeks, even though I've been working full time, and doing most of my progress after work and a little on the weekends. I've gotten a bunch of stuff powdercoated by a local friend of mine, and it will look awesome when it's done!
I got my engine and all internals back from the shop last Friday. They look awesome!
Here are the specs of the engine I'm building:
Rebuilt 2.7i bottom end (stock rings, stock bearings)
- SuperEta 130mm rods
- SuperEta pistons
- Eta 81mm Crankshaft
- Crankshaft polished
- Assembly balanced (he actually had to remove material from the pistons to even it out!)
- Block painted gray (not dark gray like I hoped! lol)
- IE Crank scraper/oil baffle (hoping this will come to use on the many track days I intend to attand!)
- Honing
- Decked .015"
Stock 325i Head
- Valve seats redone
- New valve stem seals
- Cleaned/checked
- Resurfaced
- Stock head gasket
S50 Injectors
Stock I intake manifold
Stock I throttle body
325i ECU (Alpina B7 chip coming!)
M30 AFM
IE Spark Plug Wires (when I get more money - stock for now)
Lightened Metric Mechanic Flywheel
Stock Sach's OEM Clutch
That's all that's coming to mind right now. Nothing spectacular by any means, but I've learned a great deal...and if you compare the amount of time I've done all this to the year it took me to change my interior and do my clutch - I think I'm doing quite good. Estimated date for the car rolling by it's own power is July 1st!
I'll add more as it comes to me...for now, I'll show some pictures.
All my pictures are available here: http://photos.e30driven.com/v/supere...enginerebuild/
Here's a couple that I chose:

The day after I got home from college, unloading the car, and gettin ready to pull it apart!

My cracked subframe. Not sure how it happened, but damn glad I saw it. It's gettin fixed as I type this. ;) (replacement subframe)

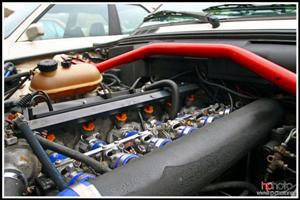
Not my SuperEta engine, but my 325is engine - taking it apart as practice - actually very easy! :D

Exhaust and drivetrain out by this point, emptying out engine bay

Right before it's yanked

Yankage - helps to have a helper - hard to do alone... (ask me how I know) - My dad is a lazy bum.

It's actually not very dirty! :) Course...I just cleaned my tranny not too long ago.

I hate cosmoline (hard to see in this pic)

Before I tore it down to the block (took me 2 hours to get down to the bare block!) (this was taken at about 1...am. lol)


Mmmmm...bare block. Soo dirty. lol

Blurry, but you get the idea. ;)

Tore down the bottom end the next morning - supereta pistons and rods seen here

Time to pull out the crank!


Glad my parents don't mind! :)

Off to the shop. Brought both blocks to see which one they reccomended using. Why not, I have em? heh

Engine bay before cleaning and removing AC and windshield washer fluid resovoir. Can see the wonderful cosmoline tint on the pass. shock tower and battery tray (course...mine's in back) But yea.

My 2.7 turn lock-to-lock steering rack - 30,000 miles on it, from a 2003 BMW Z3 3.0i (my testing shows thats it 2.7 turns - so hopefully!) Got it all cleaned up with some brakecleen. Got it for $200! :)


Front plasitc bumper - my next project after I get my car rolling again - along with a redone valance and rear bumper :)

Back on the ground, rolling it out to clean the empty engine bay.


Got it out there, THEN found that our powerwasher wasn't working. Oh joy. Oh well, gave it a quick rinse - still not as clean as I'd like. Lets just say, I want to be able to eat off my engine bay. Why not? I got the time, and the engine is out - might as well!


Prepping to pull out my rack. Funny - looks like it's been JB Welded, doesn't it? I snapped that peice off hitting a come-along on the interstate - glad it only hit my steering rack and exhaust - had I hit it with my tire or my oil pan - wouldn't have been pretty! I woulda gone around the damn thing, but I was stuck in the lane - so I braced for the worst! :D Perfect time to upgrade! lol

Prepping to pull off my subframe.

Too bad my rear diff cover could never stay silver like the day I painted it. lol

Word of advice - be sure to remove ALL bolts before dropping subframe! We tried for a good 20 mins to pull the badboy down - come to realize that my rear diff mount was still attached...yanked that out and down it plopped. lol

Closeup of the cracked subframe. Quite a shock, indeed. Makes you wonder how long it was like that? I went to a driving school in April! :-o
Back from the shop

It looks baby blue with a flash, but it's really just a normal gray - should match my car's color quite well, actually!

Polished 81mm crank


Couple more shots without flash

SuperEta pistons, cleaned and balanced

Inside the block. :)

New Z3 rack installed, modified linkage on my own - no binding - gotta love angle grinders! :) CANNOT WAIT to drive with this! AHH - my car will be like a whole new car when everything's done! lol

Keepin her clean! Just waiting for the internals to go in!

Most recent engine bay shot. We just got the pressure washer back, so when I get my rear subframe back in, I'll pull her out and get the bay cleaned out better.
And, that...so far, is a rundown of everything. I need some time to work on it tonight, so hopefully that'll work out. ;)
I'll get pics of the block's current state tomorrow. :) I'll add more as it comes to me!
Couldn't fir them on to this thread! ;)
I have been way too lazy - or...busy - to get pictures up of my progress.
I got home from college on May 14th, and I had my engine out (and exhaust and everything off) by May 18th. Had the engine dismantled by the 19th, and everything to the engine shop that day.
Even though I had all the parts standing by, ready to go, and had everything ready at the machine shop, I ended up doing more research.
To make a long story short, I came back to my original idea 2 weeks later, I finally decided I couldn't afford all the fancy stuff, and to just rebuild my 2.7.
So, I've been on a roll the past couple weeks, even though I've been working full time, and doing most of my progress after work and a little on the weekends. I've gotten a bunch of stuff powdercoated by a local friend of mine, and it will look awesome when it's done!
I got my engine and all internals back from the shop last Friday. They look awesome!
Here are the specs of the engine I'm building:
Rebuilt 2.7i bottom end (stock rings, stock bearings)
- SuperEta 130mm rods
- SuperEta pistons
- Eta 81mm Crankshaft
- Crankshaft polished
- Assembly balanced (he actually had to remove material from the pistons to even it out!)
- Block painted gray (not dark gray like I hoped! lol)
- IE Crank scraper/oil baffle (hoping this will come to use on the many track days I intend to attand!)
- Honing
- Decked .015"
Stock 325i Head
- Valve seats redone
- New valve stem seals
- Cleaned/checked
- Resurfaced
- Stock head gasket
S50 Injectors
Stock I intake manifold
Stock I throttle body
325i ECU (Alpina B7 chip coming!)
M30 AFM
IE Spark Plug Wires (when I get more money - stock for now)
Lightened Metric Mechanic Flywheel
Stock Sach's OEM Clutch
That's all that's coming to mind right now. Nothing spectacular by any means, but I've learned a great deal...and if you compare the amount of time I've done all this to the year it took me to change my interior and do my clutch - I think I'm doing quite good. Estimated date for the car rolling by it's own power is July 1st!
I'll add more as it comes to me...for now, I'll show some pictures.
All my pictures are available here: http://photos.e30driven.com/v/supere...enginerebuild/
Here's a couple that I chose:
The day after I got home from college, unloading the car, and gettin ready to pull it apart!
My cracked subframe. Not sure how it happened, but damn glad I saw it. It's gettin fixed as I type this. ;) (replacement subframe)
Not my SuperEta engine, but my 325is engine - taking it apart as practice - actually very easy! :D
Exhaust and drivetrain out by this point, emptying out engine bay
Right before it's yanked
Yankage - helps to have a helper - hard to do alone... (ask me how I know) - My dad is a lazy bum.
It's actually not very dirty! :) Course...I just cleaned my tranny not too long ago.
I hate cosmoline (hard to see in this pic)
Before I tore it down to the block (took me 2 hours to get down to the bare block!) (this was taken at about 1...am. lol)
Mmmmm...bare block. Soo dirty. lol
Blurry, but you get the idea. ;)
Tore down the bottom end the next morning - supereta pistons and rods seen here
Time to pull out the crank!
Glad my parents don't mind! :)
Off to the shop. Brought both blocks to see which one they reccomended using. Why not, I have em? heh
Engine bay before cleaning and removing AC and windshield washer fluid resovoir. Can see the wonderful cosmoline tint on the pass. shock tower and battery tray (course...mine's in back) But yea.
My 2.7 turn lock-to-lock steering rack - 30,000 miles on it, from a 2003 BMW Z3 3.0i (my testing shows thats it 2.7 turns - so hopefully!) Got it all cleaned up with some brakecleen. Got it for $200! :)
Front plasitc bumper - my next project after I get my car rolling again - along with a redone valance and rear bumper :)
Back on the ground, rolling it out to clean the empty engine bay.
Got it out there, THEN found that our powerwasher wasn't working. Oh joy. Oh well, gave it a quick rinse - still not as clean as I'd like. Lets just say, I want to be able to eat off my engine bay. Why not? I got the time, and the engine is out - might as well!
Prepping to pull out my rack. Funny - looks like it's been JB Welded, doesn't it? I snapped that peice off hitting a come-along on the interstate - glad it only hit my steering rack and exhaust - had I hit it with my tire or my oil pan - wouldn't have been pretty! I woulda gone around the damn thing, but I was stuck in the lane - so I braced for the worst! :D Perfect time to upgrade! lol
Prepping to pull off my subframe.
Too bad my rear diff cover could never stay silver like the day I painted it. lol
Word of advice - be sure to remove ALL bolts before dropping subframe! We tried for a good 20 mins to pull the badboy down - come to realize that my rear diff mount was still attached...yanked that out and down it plopped. lol
Closeup of the cracked subframe. Quite a shock, indeed. Makes you wonder how long it was like that? I went to a driving school in April! :-o
Back from the shop
It looks baby blue with a flash, but it's really just a normal gray - should match my car's color quite well, actually!
Polished 81mm crank
Couple more shots without flash
SuperEta pistons, cleaned and balanced
Inside the block. :)
New Z3 rack installed, modified linkage on my own - no binding - gotta love angle grinders! :) CANNOT WAIT to drive with this! AHH - my car will be like a whole new car when everything's done! lol
Keepin her clean! Just waiting for the internals to go in!
Most recent engine bay shot. We just got the pressure washer back, so when I get my rear subframe back in, I'll pull her out and get the bay cleaned out better.
And, that...so far, is a rundown of everything. I need some time to work on it tonight, so hopefully that'll work out. ;)
I'll get pics of the block's current state tomorrow. :) I'll add more as it comes to me!


Comment