Announcement

Collapse
No announcement yet.

California Dreamin': E30 Vert Build Inspired by Katy Perry

Collapse
X
 
  • Filter
  • Time
  • Show
Clear All
new posts

    #31
    I spy your car at my work!


    Sent from my iPhone using Tapatalk


    1992 M tech 2 Convertible - S50 Swap
    1992 e34 Touring- S50 Swap
    1992 325i-S50 Swap (SOLD)

    1995 e36 M3 Mugello Red - S50 (SOLD)
    1991 325i Convertible Laguna Green (SOLD)
    1987 325i (SOLD);1992 M tech 2 Convertible (SOLD)
    1988 325i Convertible Alpine White (SOLD)
    1991
    Brilliantrot Convertible 80k Miles (SOLD)
    1992 325i Convertible Schwarz (SOLD)
    1992 318i Convertible Project-Finished (SOLD)

    Comment


      #32
      Originally posted by KIRIEIW View Post
      I spy your car at my work!


      Sent from my iPhone using Tapatalk
      HELL YEA! I stopped by to see if you guys had any 1 series rubber mats available. Thanks for the pic. Let's grab coffee or milk tea sometime. I just got a job in San Mateo so I'll be in your hood often.

      Comment


        #33
        FRONT STRUT FELL OUT OF TOP HAT

        COST
        My own tears and blood

        Decided to getaway for Christmas weekend and drove the car to Palm Springs, CA. Mind you, the car was just on a road trip a week prior to San Diego and back which is about 490+ miles away. Since nothing went wrong on that trip, it gave me the confidence to take it out again which was about 420+ miles (lol). Car never gave any overheating issues, aside from needing to top off the oil, it was smooth sailing. As soon as we had two miles left before getting to our destination, I noticed that my suspension "clunk" up front turned into a "thud" and it felt like the front was not absorbing bumps at all. I pulled over and quickly diagnosed the issue and THANK GOD I keep my tool box in the back of my car.

        Being far from home, late Saturday night, and no shops open on Sunday I knew I had no option but to fix this. Towing it back home or leaving to get fixed at a shop after Christmas was a no go for me! After checking in and a quick bite, I got to wrenching in the parking lot and I was fortunate to be accompanied by good warm weather.

        I'm guessing the nut at top backed out after years of wear. I had to remove the wheel, hammed and chisel the perch into place so the strut could slide through, and remove my strut bar to access the top nut.

        Biggest issue I ran into:
        The strut rotates freely and requires you to hold it with a vice grip, an allen key and a series of sockets. I was not that fortunate because the top was pancaked and the allen key wouldn't fit. I did what I can to barely lock the nut into place. The suspension was clicking crazy, but I was just happy that it was back in the right place.

        PRO TIP
        You can use an ELECTRIC impact gun and give the nut a couple short blips till it's secure. I rented one from Home Depot for $11

        Here's the issue. You can see the damage it has caused to the perch. Also, a local member noticed that the washer is in the wrong place.


        As you can see, the top of the strut where you'd stick the allen key has been destroyed.


        OTHER PRO TIP
        Shouts to Eric Berger for this, he told me that the gun and socket have to be pushed up against the strut tower hole so that the shaft wouldn't spin. HIS TRICK WORKED! Be sure no to tighten it more than 47ft. lbs.


        Here's the asshole tightened up. No more click-clacking.


        Happy days! I treated myself to a shower, good coffee and breakfast, and top down cruising around Palm Springs. The car seemed to be at home in this desert oasis with 70 degree weather at the end of December.


        TILL NEXT TIME EVERYBODY!
        Last edited by LorenzeTorres; 12-27-2017, 04:36 PM.

        Comment


          #34
          Good thing you keep your tools in your car! My car gave me shit a few days before Christmas, so like you, I didn't have a few days after Christmas to just chill and not HAVE to wrench lol.

          Does anyone know what torque specs the struts need? Your thread makes me wanna double check my strut tower nuts

          Comment


            #35
            Originally posted by Levy3Poop View Post
            Good thing you keep your tools in your car! My car gave me shit a few days before Christmas, so like you, I didn't have a few days after Christmas to just chill and not HAVE to wrench lol.

            Does anyone know what torque specs the struts need? Your thread makes me wanna double check my strut tower nuts
            I feel you, owning an E30 is earned not given lol. And honestly, I wouldn't have it any other way. Wrenching on my car in these tight situations gives me confidence and helps me build a little more trust driving it long distance.

            Hope this helps! As soon as I tightened the nut, left strut never made sounds on the way back.

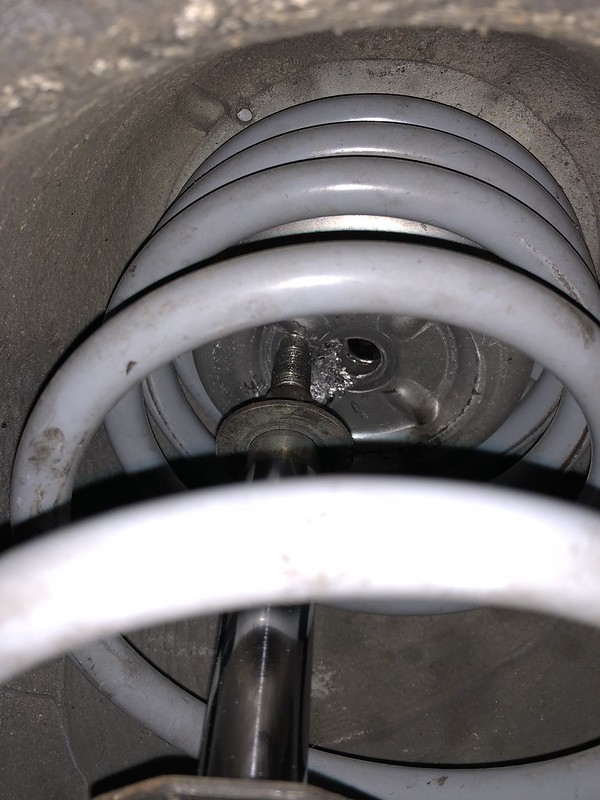
            25734448_10155381735449403_3404802460871567304_o by lorenze torres, on Flickr

            Comment


              #36
              Dude THANK YOU! I have a running note file on my phone including all sorts of various things for my car, including a big list of torque specs, and you just helped me make it a little more comprehensive. You da' maaan!
              Last edited by Levy3Poop; 12-27-2017, 06:49 PM.

              Comment


                #37
                Originally posted by Levy3Poop View Post
                Dude THANK YOU! I have a running note file on my phone including all sorts of various things for my car, including a big list of torque specs, and you just helped me make it a little more comprehensive. You da' maaan!
                No worries man! This pic was given to me courtesy of Eric Berger (Bay Area E30 guy). I feel you on that list!

                When I bought the car, my list started out small and as I started to put more miles on it, the list got larger and more expensive

                Also, these torque specs are no joke. I've snapped my top hat bolt and that was a pain to replace. Good luck with your build. Please post some pics on this thread!

                Comment


                  #38
                  Originally posted by LorenzeTorres View Post
                  Please post some pics on this thread!
                  As you wish!


                  Sent from my SM-N910V using Tapatalk

                  Comment


                    #39
                    Oh boy das hawt. I remember stumbling upon your build thread and saving a couple pages for things that might be useful in the future for me

                    Comment


                      #40
                      HEADUNIT SWAP
                      ** I have another iDA305 for sale for $65**

                      COST:
                      Alpine iDA-X305 (2009): $80
                      Harness for Headunit: $35

                      Links:
                      Alpine: Bought in person
                      Harness: Bought in person

                      This shortly after removing my newer Pioneer with bluetooth and mic, and throwing in my favorite deck of all time, the Alpine iDA-X305. I love the big knob, colored screen, and really good DAC. Though I gave up some modern goodies, I prefer the old school look and crisp sound that the unit produces, the bonus is that you can change the accent lights to red to match the interior BMW lightning.

                      The one in the picture is the one received from eBay, the new in box unit came from a local audio shop with a time travel machine.
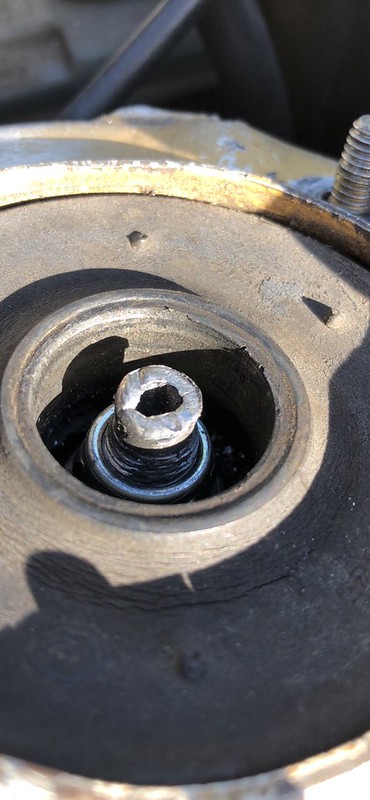
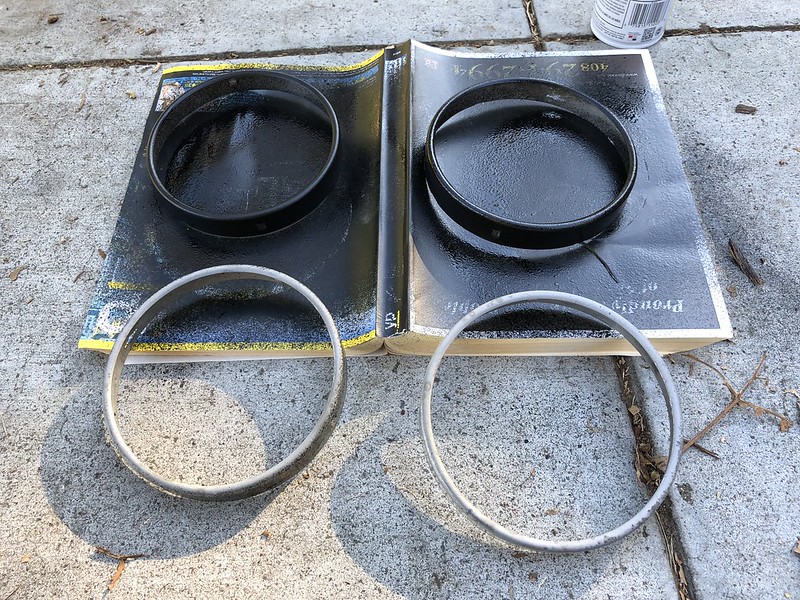
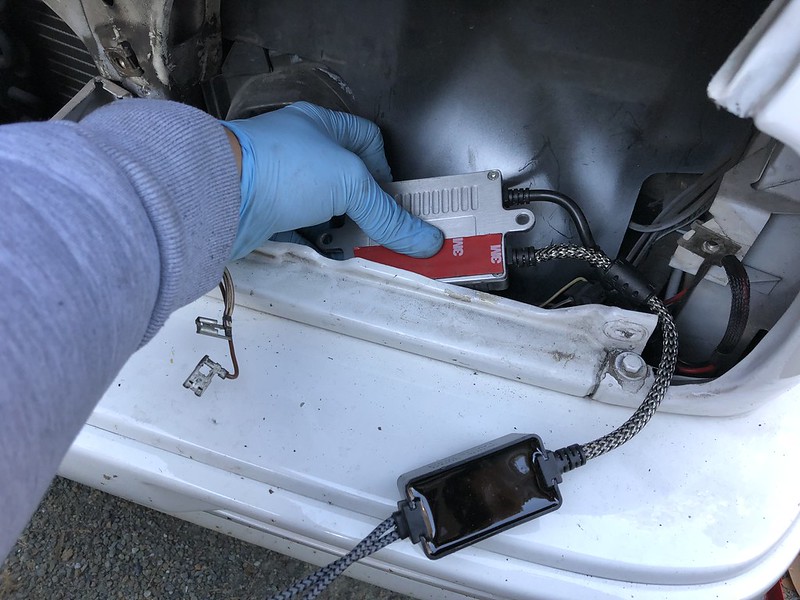
                      IMG_3657 by lorenze torres, on Flickr

                      I ran to another audio shop to have them wire up the Alpine harness to the Pioneer wires. They did a fantastic job for $35, however the wires were all cluttered.
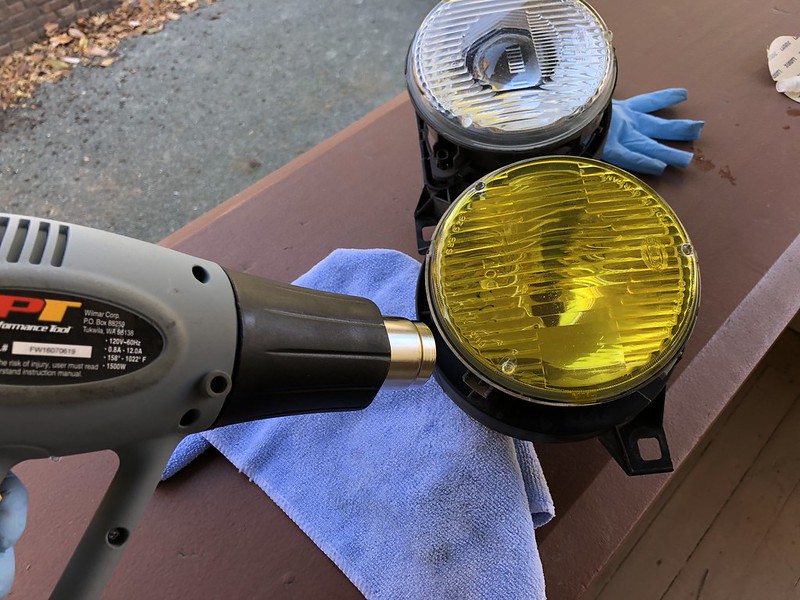
                      IMG_3658 by lorenze torres, on Flickr

                      Thank goodness the audio shop had all the things I need like this vintage aux cable adapter. You can plug in a usb cable and the unit doesn't recognize the device. Something to do with the firmware on the unit is so old that the latest iOS and iPhone don't place nice. That's not too big of a deal, and I save battery life by NOT streaming through bluetooth.
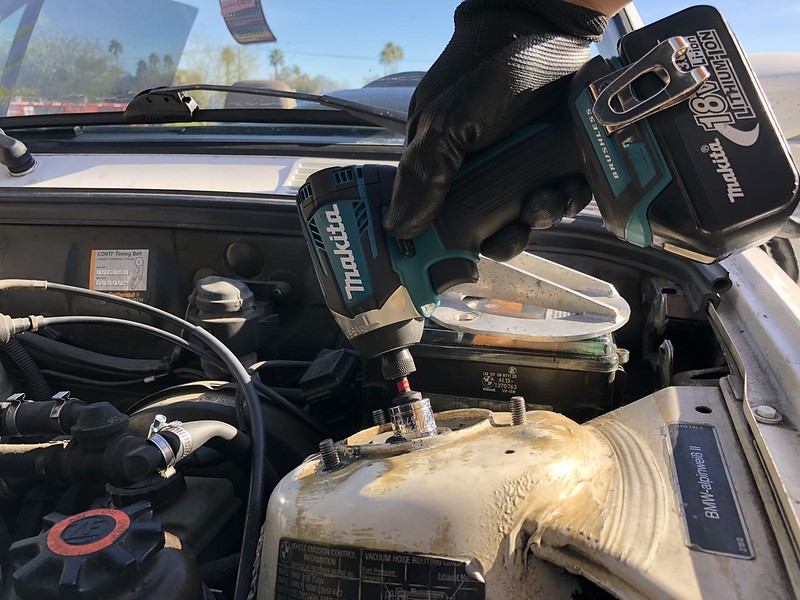
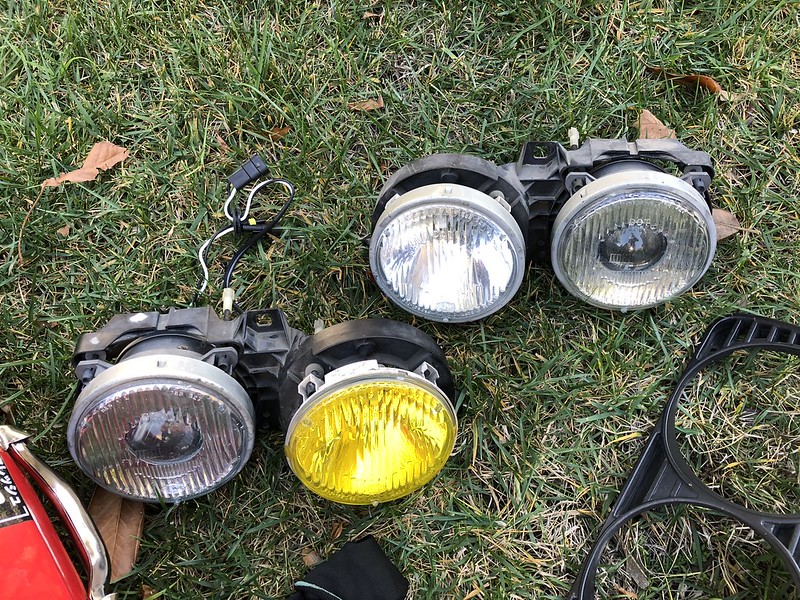
                      IMG_3651 by lorenze torres, on Flickr

                      A little house keeping goes a long way. I hate tangled wires and cables.
                      IMG_3659 by lorenze torres, on Flickr

                      If you want my spare, I'm selling it for $60 + shipping. Please shoot me an email at lorenzetorres@gmail.com if you're interested!
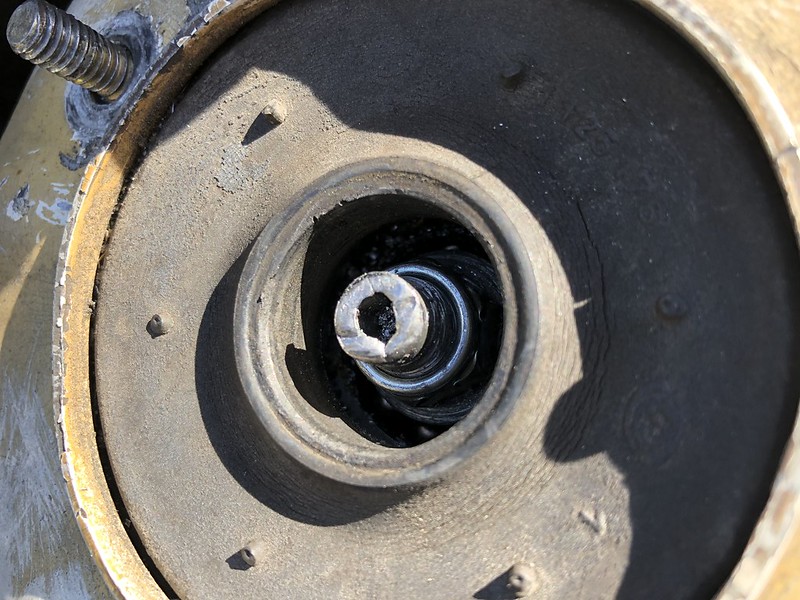
                      IMG_3649 by lorenze torres, on Flickr
                      Last edited by LorenzeTorres; 12-28-2017, 03:41 PM.

                      Comment


                        #41
                        DME/ Main and Fuel Pump Relay SWAP
                        Nothing too crazy to see here. Just like the batteries found on the back of the remote for your tv, it's good to refresh electronic components.

                        Additionally, there was a lot of cross referencing and a little bit of guessing to get the right relays. Apparently they differ through the years and models. I couldn't find an article that said this is EXACTLY what you need. The part numbers often didn't match what the retailers had. Side note, color DOESN'T matter.

                        The links below for the relays are for a 1992 325i Convertible Auto

                        COST:
                        DME/ Main Relay: $18.50
                        Fuel Pump Relay: $11.50

                        Links:
                        DME/ Main Relay: https://www.pelicanparts.com/cgi-bin...6-1-729-004-M9
                        Fuel Pump Relay: https://www.pelicanparts.com/cgi-bin...-1-378-238-M14

                        IMG_3656 by lorenze torres, on Flickr

                        IMG_3655 by lorenze torres, on Flickr
                        Last edited by LorenzeTorres; 01-09-2018, 12:04 PM.

                        Comment


                          #42
                          OEM Ellipsoid Install + HID Refresh
                          Hello again, it's been awhile everybody and I'm happy to bring you the first post of the new year! Ever since I owned the car, I couldn't see shit at night. Between the bouncing headlights and the stupid ricer blue HID's pointed way down, I couldn't take it anymore.

                          I must admit, the Depo smoked smileys with the crosshairs were cool, here are my complaints:
                          1) The beam was scattered. It didn't have a nice cutoff.
                          2) Headlight adjustment gears felt fragile
                          3) You can adjust the headlight so much before they pop of their sockets and they just bounce freely while driving.

                          Aside from all that, for the price they're not bad. You truly get what you pay for.

                          Prices are what primarily drove my decision to get USDM Ellipsoids, followed by their availability. I wouldn't mind running OEM Smiley's but I didn't want to pay a premium and wait for them to pop up online.

                          All in all, I'm really pleased with how this "upgrade" turned out. For $200 I can't complain! It was easy, enjoyable, and very rewarding to see the road better.

                          **The headlights had and adapter/ wires that converted OEM pigtails to plug and play with the HID kit. No splicing was needed.**

                          COST:
                          Used USDM Ellipsoids: $100
                          Yellow Lamin-x Film: $17
                          DDM 35W/9006 Bulb/ 4500K HID Kit: $61

                          Links:
                          Used USDM Ellipsoids: Local member in the Bay Area
                          Yellow Lamin-x Film: https://www.ecstuning.com/b-lamin_x-...ellow/b006u-y/
                          DDM 35W/9006 Bulb/ 4500K HID Kit: http://www.ddmtuning.com/Products/DDMPlusHIDKit

                          Here's a before and after
                          Left is Depo, Right is OEM Ellips

                          You'll need a philips and some sockets to remove the headlights.
                          Open the hood, but don't prop it up. This will allow you remove the grills to get access to the bolts holding the headlights. After that, it's really straight forward, there's about three bolts and out they go.


                          I had some left over plasti-dip and put it to use on the bezels. I wanted a clean and seamless look. I didn't bother to scuff them up, but I did wipe them down with alcohol to clean any gunk off.


                          Added a little flair with the yellow high-beams lens film. It's a nice contrast to the white. I also like the story behind "Frenching headlights" and how in GT racing the color of headlights would signify what class you're running to other competitors on the track. So EURO.


                          To successfully put these on:
                          1) Before peeling the film off the backing SPRAY the lens with water
                          This will allow you to make any needed adjustments without ripping the film or ruining them
                          2) Spray your fingers with water
                          The oils from your fingers will ruin the adhesive quickly
                          3) There's only one way to put these on right. The triangle cutouts will not line-up with the little nubs on the lens if they are on put on properly.
                          4) Heat gun is not necessary, but it helps ALOT with the film become malleable and easier to apply.
                          The edges are a PITA, and will need some patience. What I did is heat it, placed my finger over the piece I was trying to apply, let it cool, and it stuck!
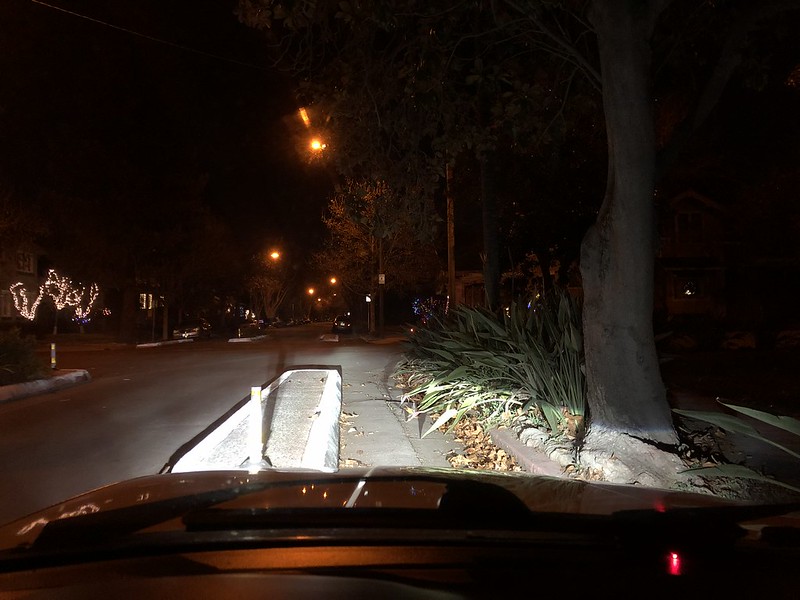
                          IMG_3722 by lorenze torres, on Flickr
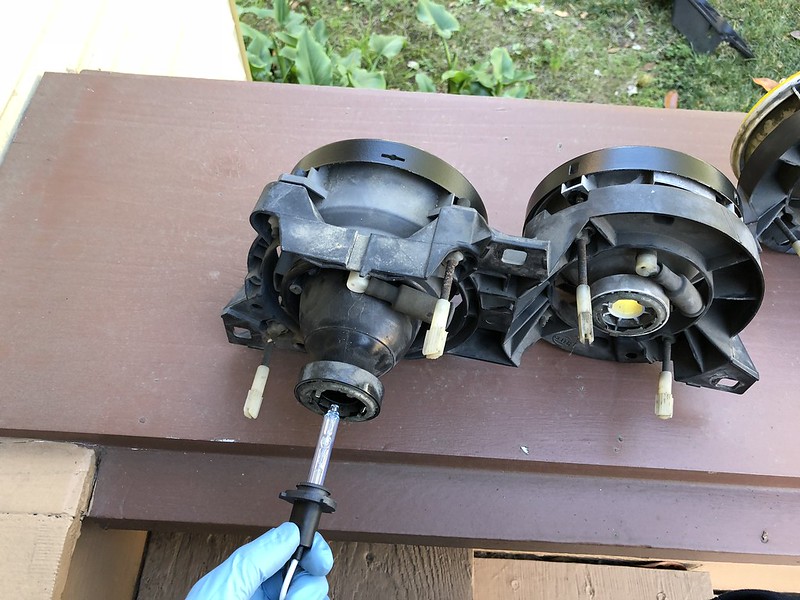
                          Time for assembly! I let the film sit for 10-15 minutes and then put the bezels back on. Be careful because if you remove the bezel, it might rip the film off.


                          Really impressed with the quality of the ballasts. They didn't feel cheap and are made of metal. Not bad for $61.
                          I used double-sided tape, mounted, and tucked them under the bumper. Noticed the PO had the old ballasts floating around.
                          *Be sure to wipe the mounting areas well to create a good bond.


                          Here's the finish product. I still have purchase the bulbs and wire up the high-beams later on.


                          Super pleased with the color, visibility, and cutoff.


                          QUESTION:Can somebody please send me a link on how to adjust these lights. I need to aim them a little higher. Thank in advance!
                          Last edited by LorenzeTorres; 01-10-2018, 01:57 AM.

                          Comment


                            #43
                            Work looks good, I've avoided the Depot lights due to what I believed would be poor light output. I may retrofit a new set of projectors into the stock ellipsoids...but your work looks clean.
                            BMWCCA #389756

                            Comment


                              #44
                              Originally posted by oekundar View Post
                              Work looks good, I've avoided the Depot lights due to what I believed would be poor light output. I may retrofit a new set of projectors into the stock ellipsoids...but your work looks clean.

                              You are very correct regarding the Depo's. Looks really cool, but didn't do the job well.

                              Thank you for the very kind words! I figured, I might as well do everything right the first time so I don't have to keep going back in. It was pretty close to being a set it and forget it job.

                              If you ever get around to that retrofit, please link in this build thread. Would love to see and share how that goes. Good luck with everything!

                              Comment


                                #45
                                There are some thumbscrews on the backside of the headlight retainers, should be two per light for vertical / horizontal adjustments.

                                Here is some info on how they should properly be adjusted:


                                Comment

                                Working...
                                X