
Originally posted by alistairolsen
View Post
-
No if i had to guess I'd wager the holes are probably there. There are a ton of unused holes in mine - including provisions for RHD vehicles -
Great thread, thanks for all the detail. I will be taking the drill to my bumper soon to fit the Sport Evo splitter and your information is invaluable.Comment
-
Congrats on the new arrival. Great to see another update on this build and proving very helpful for someone trying to do the same but some way behind you.Comment
-
Thanks. I have a fair amount of parts inbound now - new fuel lines, pumps, filters, etc, some brake stuff, all my subframe stuff is at the powder coater, bought another dash (the first one cracked), got a crack free passenger tail light, steering rack is back from rack doctor, etc. Will put more updates together soon.Comment
-
First off - Love the thread and your attention to detail.Originally posted by CurrusDei View Post
I'm going to be mounting the EVO3 undertray and splitter to my US bumper and am wondering what size holes you drilled for mounting the splitter? I can't seem to find a post that indicates the size of the holes that need to be drilled.
Also, I'm curious how the splitter stays mounted to the bumper...does the rubber plug expand in the hole when mounting bolt screwed in?
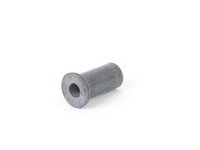
This plug:
Thanks!
Comment
-
I got a set of metric drill bits and then used the one that was the closet fit to that rubber plug (i forget what size it was, but i just used my caliper). When you put the screw into that rubber plug, it threads into the metal threads at the far end. Then when you continue tightening, it squishes the whole thing down, so you end up with the rubber flange on one side, and kindof a rubber donut on the other.Comment
-
Like this...

Sent from my iPhone using TapatalkComment
-
^Oh, I see. Awesome. Thank you for that pic. I never would have thought that rubber piece would compress like that.Comment
-
Well, the odometer on the restoration is rolling over the 4 year mark this month. My garage is packed with nice shiny parts instead of old greasy ones. Update coming shortly...Comment
-
Alright, update time.
My subframe stuff is all back from the powder coater. Very, very pleased. Huge difference.
Glad to see this guy go
Now for some quality time with the ground…
Adhesive padding around this wire to keep it from being pinched between the body and the tank (the factory did this, but it had deteriorated, so new padding it is)
Center bolt in the driveshaft tunnel
So much room in here all of a sudden. A few pieces left (transfer tube on the tank and hose from the tank to the filler pipe)
Found a good passenger tail light
Got my plastic rivets for the bumper
Did some more zincing. ABS rings were fun…
These too…
Clutch slave cylinder
Got a new slave cyldiner and grommet, but man it’s a pain to put in with the pedals and brake servo already in, so no pics of that process…
New line to brake booster is black
Cleaned up hardline, new rubber line from master cylinder to slave cylinder
Radiator to coolant overflow tank line.
New elbow
Clamps on the straight rubber line are being cleaned up, reinstalled this weekend. Thinking I’ll zinc them.
Oh yeah, remember the nasty steering rack? RackDr said I’m lucky it didn’t kill me. It was missing internal components, stuff was in backwards, etc… consistent with that zip tie on the right
Anyways they cleaned it up, rebuilt it from the inside out, pressure tested it, and its working perfectly now. Looks a lot better too. I wish they could’ve kept the original zinc finish, but apparently they have to put it in some clamps to get it to come apart and the cast paint looks a lot better. Pretty cool having the original rack as so many of these go over to Z3 or E36 parts.
Ashtray back in – got new little bulbs for all the gauges and the cig lighter
New install hardware too
Anthracite E30 Floormats from Germany. OEM. I think NLA?
And now time for some bushings and bearings.
oooOOooo shiny and satiny
Teflon grease for rubber bushings
Wheel bearings in too (other arm shown)
For this weekend, ball joints, subframe bushings, shock inserts, more zinc.
Comment
-
I love seeing updates on this, you're doing a fantastic job on the restoration!Comment
-
Good to see another update of quality work. I especially like your zinc plating work. I bought a small kit for my restoration, while the zinc comes out looking good, the colour passivate has proven impossible to master for some reason.Comment
-
love this threadComment
-
4 Years in... Rebuilding an E30 M3. I finished college faster...
Originally posted by BMG View Post
What kit are you using? If you get the zinc right the yellow chromate should be automatic. With the yellow chromate that comes with the Caswell kit it needs to be 80 degrees F, and only dip it for 30 sec, then dip slowly a few times in the rinse tank. Make sure you’re using distilled water, not tap. Then I use a shop towel to collect the drops of water left on the piece. Dont rub with the towel, I just touch the edge of the shop towel to areas where water has collected and let the capillary action of the water draw it into the towel.
Try the caswell kit and if you have trouble give them a call. I spoke with one of their engineers when I first started and it was helpful. Whoever my yellow zinc starts to look off it’s usually because I need to add brightener to the plating tank or clean the zinc plates. Also if I leave parts in the degreaser too long they get dark and cloudy, then I put them in a 3% muriatic acid/distilled water solution and use a brush to get them bright again, then rinse and do the water break test before plating (spray with distilled water, if it doesn’t bead, you’re good)
Sent from my iPhone using TapatalkLast edited by CurrusDei; 03-11-2018, 06:37 AM.Comment
-
Thanks for the reply. I started out avoiding doing the plating myself and sent most of it out in a couple of batches, along with stacks on new nuts and bolts from BMW.
With lots of the parts now done, I found it was often one tiny part needing plating to finish the item I was working on being completed.
It isn't practical of cost effective to take one of two tiny parts for professional plating, so purchased a kit from eBay here in the UK with the aim of just doing the odd small part myself now the major stuff is done.
I thought the zinc stage would be the hard bit, but that all seems OK , its just the yellow chromate doesn't seem to adhere. I can plate it and dip in the chromate and get it looking OK, but it will scratch off easily and doesn't get that almost gloss-like finish to it.
Given the vastly differing price between the two kits, I can't help think its a ' get what you pay for' thing, but that's probably unfair to say when its early experiences of something new.
I think maybe the best bet is to mix a new batch and revisit.Comment


Comment