Announcement

Collapse
No announcement yet.

m60b44 build... I think I already ruined my block...

Collapse
X
 
  • Filter
  • Time
  • Show
Clear All
new posts

    m60b44 build... I think I already ruined my block...

    So I picked up a 97 540i/6 drivetrain. I already have an m60b40/5spd in my e30, but I wanted to throw my m60 heads/timing stuff on the m62 block, aka m60b44, and then throw on the 6 speed as well. I did a compression test, all cylinders were 220-230, except one 210 and one 240. Seemed good enough for my use, as my current m60 is 195-230 all around and that thing runs great.

    So I began tearing down the m62 engine. This is my first time messing with engine internals.

    I started cleaning it after some googling that turned up zero relevant results. I first used a new razor blade very carefully to removed the thick head gasket crap that was left on the block. I also taped off the oil/water holes around each cylinder and scraped off the carbon from the pistons. Then used a maroon scuff pad and lacquer thinner to clean the pistons. I shop-vac'd the crap off as I went, trying not to let anything fall between the piston and bore. The pistons stick above the block surface so I didn't mar the top of the bores at all with the scuff pad. I used a rag and some lacquer thinner to wipe the top of the bores since they had carbon crap all over them, which came off pretty easy. I used my finger to wipe oil around all of the bores as I went from piston to piston to keep things lubricated. I then started wiping the block deck surface with the maroon scuff pad and lacquer thinner to get all of the remaining gasket stuff off, at which point I stopped because I realized I'm going pretty far with some pretty harsh tools, with no idea WTF I'm doing. I don't even know if a maroon scuff pad is acceptable to use to prep an aluminum block surface?

    Then I began looking at the bores. I found one cylinder with two scratches that I can catch my fingernail on, and another cylinder with 1 scratch that I can feel as well. I can't imagine this is good. They almost look fresh, as if I did this during my cleaning. All of the cylinders had some slight scratches before I started, but these seem more severe. I only cleaned 4 cylinders. The other 4 that I haven't cleaned do not have any scratches that I can feel, just visible ones, like I usually see in pics.

    So, what did I do? Trash the block?


    Uncleaned side:


    Scratched cylinder:


    Cleaned piston:


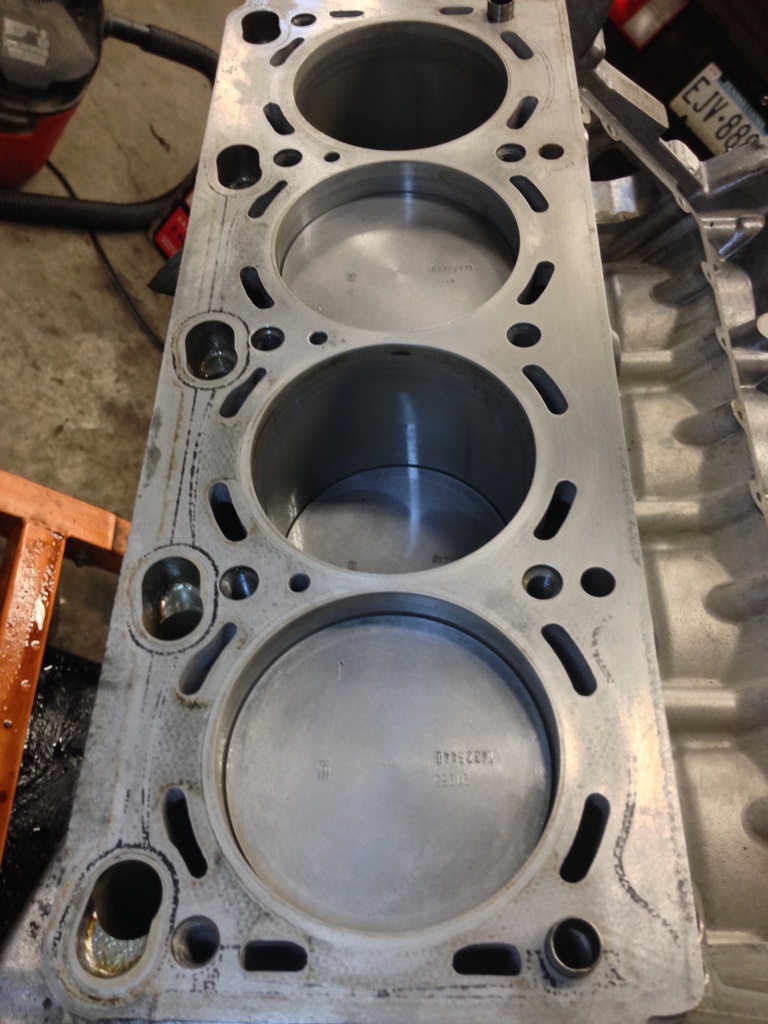
    Cleaned side, halfway done scuffing block deck surface:


    85 325e m60b44 6 speed / 89 535i
    e30 restoration and V8 swap
    24 Hours of Lemons e30 build

    #2
    By maroon scuff pad, are you talking about the one of these?


    If so, you're fine dude. Those pads are much softer than the aluminum, you're not gonna tear the block surface or bores up with them. As for the lacquer thinner.. well, that's not gonna fuck your shit up, but spray9 works amazing without that nasty smell.

    As far as the bore scratch goes - it really doesn't look like you did that, especially if all you were using was the lacquer thinner and scotch pad. Technically that scratch might let a little bit of gas & oil by, but I bet that was the cylinder that compression tested the lowest.

    IMO stop using the razor blade, might nick the surface of the block. You'd probably be fine, but I would just make sweet, sweet love to that surface with spray9 and the scotch pads.

    Just out of curiosity, how come you didn't just pull the pistons out? That scratch would come out with a hone job (are you even supposed to hone those coated walls?) and I would want to replace the rings & bearings anyway since you've gotten it to that point anyway.
    Last edited by jalopi; 02-15-2014, 04:46 PM.

    Comment


      #3
      Can't be honed as normal cylinders are. Needs to be etched to leave the silicon content raised above the aluminum, as that's what the rings ride on.

      This was supposed to be a $0 budget build. Basically just new gaskets and go. So if I need new bearings, rings, machine work, etc, this block is going in the scrap pile and I'll keep running my m60. It's not worth the maybe 40whp.
      85 325e m60b44 6 speed / 89 535i
      e30 restoration and V8 swap
      24 Hours of Lemons e30 build

      Comment


        #4
        sigpic

        Comment


          #5
          Well, this makes me feel a bit better:

          928 Forum - 1987 928 Block w/scatch - I have a 1987 928 S4 block which a small scratch in one cylinder.. if the block is Alusil ( which I am not sure of ) would it be less expensive to fix it with that process or go with Nickasil which has to strip all the Alusil off...This car is for normal driving...so I would like...


          He apparently had scratches in his alusil bores which he could feel with his fingers, put the engine back together anyway, and it runs fine with no major compression/oil loss issues.


          Originally posted by e30_302 View Post

          I assume you are trying to tell me to use one of those to clean the deck of the block?
          85 325e m60b44 6 speed / 89 535i
          e30 restoration and V8 swap
          24 Hours of Lemons e30 build

          Comment


            #6
            That's the quick way, but you still have to be careful imo. They go on air powered angle grinders. I've only seen the green ones (coworkers had em for cleaning hg's off of aluminum blocks) and the older guys that had them warned me not to stay on the same spot for too long. Maybe it was so that the "disc" didn't wear out too fast?? Idk, it's still softer than the aluminum. I will say they do one hell of a job of ripping the old hg material off the block in a very short period of time.

            In any case, scrub away man, you'll be fine.

            Comment


              #7
              DO NOT use scotch brite (your maroon scuff pads) on power tools.

              Other than that, you're ok.

              Pistons and rings are perfectly fine to reuse. Bearings are also, if clearances are in spec and they don't look worn.

              Get some carb cleaner... the good stuff that comes in a bucket, not the spray on stuff. You may have to go to a CarQuest or similar store that supplies professional shops to find it. Get a couple of cheap disposable METAL paint trays from Home Depot Racing. The carb cleaner attacks plastic.

              Pull your pistons and separate the rings and rods. Keep each cylinder's components together with 1 gallon ziploc bags. Pour some of the carb cleaner into the paint trays and put your pistons and rings into it. Put the pistons in crown down and let everything soak for a couple of days. The carbon should just wipe off after that.

              DO NOT try to scrape the insides of the rings grooves. Use a stiff toothbrush or at the most a brass bristle detailing brush.

              If your wife is ok with it, you can run pistons and aluminum components through the dishwasher. You can also run steel components through the dishwasher as long as you get to them WD-40 IMMEDIATELY after the cycle stops to prevent flash rust. Do not wait for the heated dry, if your washer has it. I put my entire Caddy Northstar block in the dishwasher. It came out beautiful.

              There are enough How-To's on the internet for building and assembling engines that it's not productive for me to type out the whole thing here.

              The important shortcut you're taking is that you have an engine that you knew was running before you tore it down. So you know that ring gaps and bearing clearances are good already. Just make sure that all the pistons, rings and rods go back in the cylinders they came out of and all the bearings go back in their original locations and you'll be fine with tearing the engine down, cleaning it up and reassembling.

              As far as the scratches in the bores go, when the pistons are out, scotch brite them just enough that you can't catch a fingernail in them.
              Last edited by The Dark Side of Will; 02-16-2014, 08:48 AM.

              Comment


                #8
                I had no intentions of pulling the bottom end apart. It took 10 minutes to clean those 4 pistons. The carbon literally wiped right off with lacquer thinner. Or are you saying that due to my cleaning method, I should now pull it all apart and clean everything?

                I just want to put my perfectly good heads on the perfectly good block. Both engines ran great. Neither engine had compression issues, so I figured I could just slap them together like everyone else does and call it a day. But the carbon on the pistons was loose and flaky, and the head gasket is burnt to the block. So I just wanted to properly get rid of that crap so as not to cause additional problems.
                Last edited by JGood; 02-16-2014, 09:03 AM.
                85 325e m60b44 6 speed / 89 535i
                e30 restoration and V8 swap
                24 Hours of Lemons e30 build

                Comment


                  #9
                  Your cleaning method is fine man, as long as you don't mind the smell of lacquer thinner that is. Just continue with your "I could eat off this" work and you'll be set.


                  FYI - some of those marks on the block from the head gasket are gonna be a bitch to get off by hand. The older guys I know told me that as long as you can't feel any hg material with your finger nail it's clean enough (pertaining to the "stains")

                  Comment


                    #10
                    Originally posted by JGood View Post
                    I had no intentions of pulling the bottom end apart. It took 10 minutes to clean those 4 pistons. The carbon literally wiped right off with lacquer thinner. Or are you saying that due to my cleaning method, I should now pull it all apart and clean everything?
                    If you roll the engine over and the rings don't leave a line of debris on the bore where they stopped at TDC, you should be fine.

                    I recommended disassembly to be sure that there's no grit between the piston and the bore in the two cylinders that have scratches (or any other cylinders). I'm something of an overkillist.

                    There will be some carbon on the rings that you won't get without pulling the pistons, but the engine ran fine with it there before you took the heads off.

                    If it's going back together with MLS head gaskets, then you need to get the block and heads pretty darn clean. If it's going to use fiber/organic/composition gaskets, then go by what Jalopi said above.

                    You have to pull all the timing covers to set up the timing drive, right?
                    Are you planning to pull the oil pan? If so, then pulling the pistons incurs no additional monetary expense.

                    If you're keeping the M62 timing chain, then you'll want to replace the U-guide. I'd recommend swapping over to the M60 timing drive with the idler sprocket instead of the U-guide.

                    Comment


                      #11
                      Timing covers and oil pan are off, the entire timing chain/guide setup is off. I'm switching to m60 heads which requires m60 timing gear.

                      I thought I'd need to replace all of the rod bolts if I removed them. I don't mind taking them out at all if not.
                      85 325e m60b44 6 speed / 89 535i
                      e30 restoration and V8 swap
                      24 Hours of Lemons e30 build

                      Comment


                        #12
                        What are the torque specs for the rod bolts? If it doesn't call for an angle figure after the torque figure, they're probably not tty. I'd still double check that they aren't tty first though.

                        Comment


                          #13
                          TTY and torque + angle are two different things. Just because the spec is Torque + Angle doesn't mean it's TTY.

                          Does "the book" call for replacing the rod bolts if they are loosened?

                          Comment


                            #14
                            I believe you've got that backwards - just because it's not torque + angle doesn't mean it's not a tty bolt. Pretty sure the only purpose those angle gauges serve is to accurately torque tty bolts.
                            Last edited by jalopi; 02-16-2014, 05:04 PM.

                            Comment


                              #15
                              The TIS says to replace, wash, and oil bolts, then torque them to 5nm, 20nm, then 80*. For all other BMW engines other then the m60/2, it 5nm, 20nm, 70*.
                              85 325e m60b44 6 speed / 89 535i
                              e30 restoration and V8 swap
                              24 Hours of Lemons e30 build

                              Comment

                              Working...
                              X