Announcement

Collapse
No announcement yet.

Body work on Hood.

Collapse
X
 
  • Filter
  • Time
  • Show
Clear All
new posts

    Body work on Hood.

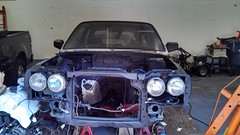
    I got this hood out of a Junk yard. It was a BIG improvement from my previous one. The downside of this one, is the hit on the left side. Also it seems to be slightly warped on the right side.However, I'm not entirely sure. As you can see from the picture the right-side fender has some damage. I'm left with two conclusions regarding the hood: 1). The hood is warped. 2) The right side fender is damaged, thus making the hood look warped.

    If the hood is warped I might consider replacing it. If it's only damaged on the left side, I would love to tackle on the job of fixing the hood.
    Attached Files
    Last edited by NorthridgeE30; 08-21-2014, 05:10 PM. Reason: Grammar
    It's the small details that count.

    #2
    Additional pictures

    I also can't seem to post multiple pictures through my iPhone, so I'll have add them individually.
    Attached Files
    It's the small details that count.

    Comment


      #3
      Posting again

      I'm left wondering how I would repair the hood, if it's repairable. Old schools hammer and block kit?
      Attached Files
      It's the small details that count.

      Comment


        #4
        it looks like it just needs to be aligned but to be honest it's hard to tell from photos.

        try this: https://www.youtube.com/watch?v=PiVU0fR8vlA
        and this: http://www.rtsauto.com/how-to-align-...l-by-yourself/

        from the looks of your situation you're going to need to try both methods since the video only aligns front to back/up and down.
        sigpic

        Comment


          #5
          Originally posted by glnr13 View Post
          it looks like it just needs to be aligned but to be honest it's hard to tell from photos.

          try this: https://www.youtube.com/watch?v=PiVU0fR8vlA
          and this: http://www.rtsauto.com/how-to-align-...l-by-yourself/

          from the looks of your situation you're going to need to try both methods since the video only aligns front to back/up and down.

          That's what it blthough at first, but it's actually the left-front corner near the headlights. It seems it took a hit and the corner rolled in a bit. I'll post a video and higher quality pictures soon.
          Last edited by NorthridgeE30; 08-21-2014, 08:34 PM.
          It's the small details that count.

          Comment


            #6
            Here are the corners from the both endsClick image for larger version

Name:	image.jpg
Views:	1
Size:	82.1 KB
ID:	7169096
            It's the small details that count.

            Comment


              #7
              Right front side.

              Notice how the left side is a tad more curved than the right side.
              Attached Files
              It's the small details that count.

              Comment


                #8
                may not be oem.. and yes you could use a hammer and dolly, but its gonna need paint once you take to it with a hammer and dolly so be forewarned. Also don't buy a bondo brand set or harbor freight one, it will create more work. Matco and snap on hammers are really nice but they are made by martin so you may be able to save some money by getting a martin set or hammer. Here is what I would advise you to get http://www.ebay.com/itm/snapon-body-...item19f22fd0f8 or something similar

                Comment

                Working...
                X