
Sorry if I didn't catch this while reading, but can you remove the TB heater plate completely and bolt the TB directly to the manifold? What a rubbish idea; I've had plenty of cars in New England winters and never had a throttle plate ice over...
-
1987 Toyota MR2: 20v blacktop screamer
sigpic
2013 Subaru BRZ: the new hotness
1991 318is Alpine White: sold
1989 325i Alpine White: sold -
Correct, as part of the whole deletion process. If you can make out the color difference in the diagram that's a good reference.Originally posted by MazterDizazter View PostComment
-
Just completed this. This write-up was very helpful, and it was very simple! All of the hoses in good shape were ones that were to be kept and all the ones that were cracked to hell were deleted, so that worked out conveniently. Here's hoping for no more vacuum leaks!1987 Toyota MR2: 20v blacktop screamer
sigpic
2013 Subaru BRZ: the new hotness
1991 318is Alpine White: sold
1989 325i Alpine White: soldComment
-
Ok, so I went to attempt to tackle this today because I was going to do a black wrinkle finish on the manifold anyway and I figure while I was in there I decided to drop in the 19# 4 pintle injectors I got a while back (That's a whole other story, I had to make a thread about it.
Once I got the upper off, I soon realized that someone has already tackled this, at least I think so. The TB heater plate was already deleted and the ICV hose was already routed the way it is in the diagram in the OP.
Took a couple of pics for some confirmation:
Before I touched anything

The hose I'm pointing to goes from the intake tube to the ICV
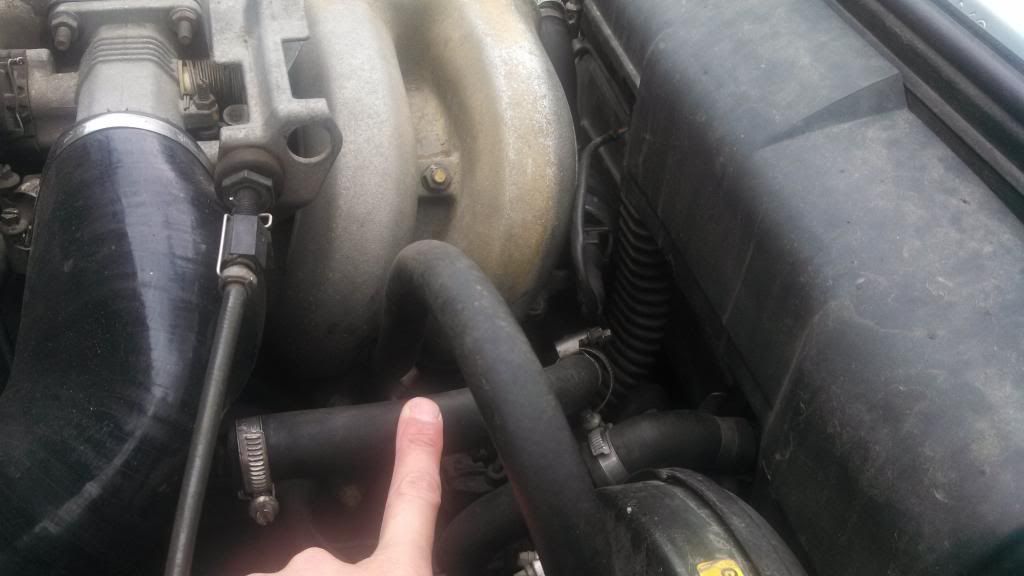
This one goes from the valve cover down under the manifold
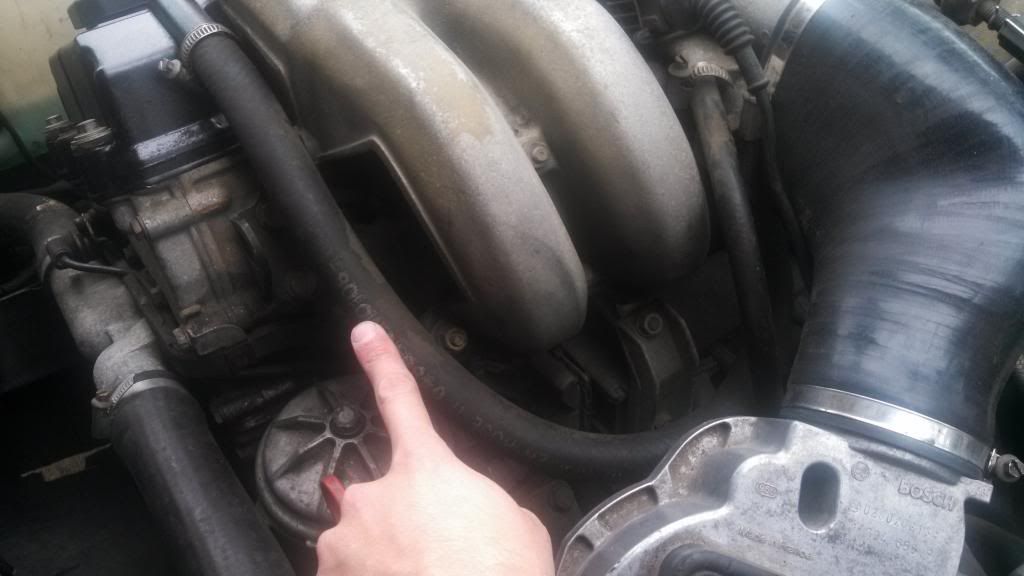
This is with the manifold off, still haven't removed any hoses or re-routed anything yet.
Am I seeing things or is this the finished product??1991 318is - Daily/weekend track car.
An on-ramp is a terrible thing to waste...Comment
-
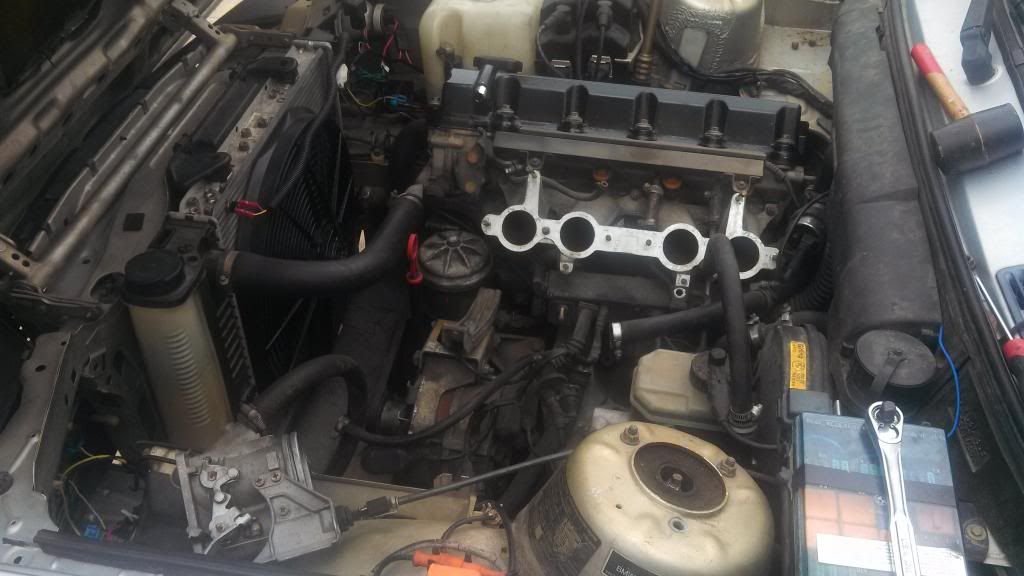
I cannot see under the lower manifold, so I am not sure what was done with the coolant lines or if the water pipe is newish, but the vac lines are routed correctly. Two things I do note, one is that your FPR line looks really past it and two, that line from the lower manifold to the brake booster is really awkward and would make me worry for some reason.Comment
-
The fuel line is still soft and easy to move, its not dry rotted or anything.
The one on the booster was routed awkwardly...I fixed that.
The coolant lines like like the diagram and look fairly new, I think it was done at some point in its life. Wish I had some records on this car!1991 318is - Daily/weekend track car.
An on-ramp is a terrible thing to waste...Comment
-
can't believe how much irrelevant hoses there are under there lol you'd think these cars were made to drive in the North Pole with all those coolant lines
Comment
-
just want to make sure everyone doing this knows that the bmw black pipe that is only a few dollars more than the aftermarket one, is worth the extra 7 bucks.
I went the cheap route a while back. aftermarket pipe and o-ring, cleaned the mating surface of the block, new o ring. within less that a few k it was leaking at that point. Not enough to easily see, but I could smell antifreeze and was loosing fluid. Finally it got bad enough to start becoming visible pooling on the block
At the same time I did the delete I tried those block off caps, the rubber ones you can buy at a store. within that same few k miles one was forming cracks, so off they came and back to a hose
one person posted here that the 5/8 heater hose is too big for the head and he put in a pvc sleeve. well for me that's where those stupid block off caps worked. they are so thin, I cut the top off of one so it was just a small tube, pushed it on the head, then slid the heater hose over it and then the clamp, made the hose a much tighter fitLast edited by isamemon; 05-30-2013, 02:18 PM.Comment
-
I finally did this! But I haven't gotten to the hvac lines figuring that one out nowComment
-
Originally posted by AustinK425 View Post
About time!Parts Collector and Former Houndstooth interior junkie.Comment
-
Bump, so I did the same thing as simon with the water pipe to head hose... Unfortunately after 25 miles of dialing the car in I saw a small plumes of smoke and the bend had torn. Went to my local auto parts store to find a workable molded piece but nothing I could work with... Anyone happen to know the exact diameter I need for that? Need something to work with until in order my silicone hose kit or find a decent alternative.Comment
-
Hey Simon,
How is the little factory bent hose you carry a spare for holding up? I routed my original one the same way and it blew out pretty fast right where i bent it the opposite way from the mold. Granted, it had 173K on it so it could have gone just as easily in its original configuration. I am now going to replace everything. Are you still on the first replacement? Looks like its been a few years.
Thanks
ThanksComment
-
Update:
I had mistakenly purchased an aftermarket “coolant pipe” that started leaking after ~5K miles. Very disappointing. So after going a whole summer putting small amounts of coolant in every other morning, I finally got around to removing intake system to access the pipe last Sunday.
The fuckin pipe was fine. Cleaned up like a new part. No cracks or breaks. When comparing it to a new OE replacement pipe, I could barely tell the difference – but where I did see differences were in the fit and finish of the coupling area that inserts into the block. OE part had a chamfered edge and much nicer general finish in that specific area. The aftermarket pipe had failed due to poor fit at the block apparently.
As far as the “twisted/OE coolant hose” – it was totally fine. Heat cycles on the new hose apparently had effect of taking the “twist” out. I could have reinstalled it, but I cut and twisted a fresh new one on “while I was in there”. Nice to have a sealed system again – and the first hose is now kept in the trunk as an emergency back up.Comment
-
So I did this a while ago and I've had a crap idle since and the coolant temp was reading
-69 deg I'm guessing I've gotten the connectors around the wrong way, could anyone tell me what color wires/connectors go to the temp sensor, temp Guage and oil pressure switch? Thanks for the helpComment
-
Light grey/blue is the forward one on the head. Then there is a black connector aft of that on the head which may be a one pin connector. The oil pressure connector is also black.
That aside, the wire lengths, bends/twists in the wire from age generally show which one should go where. So, with that and knowing one of the plugs/sensors on the head is a one pin connector you should be able to sort it.Comment
Comment