-
These guys - the upper left side. Yeah...pintle caps. NOW knowing they pop on and off feeling even more like a jackass for not replacing entirely. I didn't bother taking them off figuring they were part of the injector body. Which is also stupid. There are WHOLE KITS for this sort of thing. Who knew??? Dumb domo move. But learning.
Will gladly redo this one at some point, but only if necessary. P-car buddy mentioned it may be a good idea to just source a replacement rail, just to have it...

Sent from my iPhone using TapatalkLast edited by majdomo; 10-18-2018, 10:16 PM.Leave a comment:
-
Wait, by "fin things" do you mean pintle caps? They just pop on and off. You did put them back on before you reassembled, right?
These:

Leave a comment:
-
Now that I know there’s no issue with having a couple of those tiny fins busted I would have done all 4. It bugs a bit to know it’s not “finished.” But...yes, it works for now. Next time (hopefully there isn’t one) it’ll take far less time to tear down. Much learned.
Sent from my iPhone using TapatalkLeave a comment:
-
Good to hear, but not replacing some of the o rings was probably not a great idea. However, if it works, it works.Leave a comment:
-
Update - gas smell is gone and fortunately no gas leak from the rail. Sweet.
Sent from my iPhone using TapatalkLeave a comment:
-
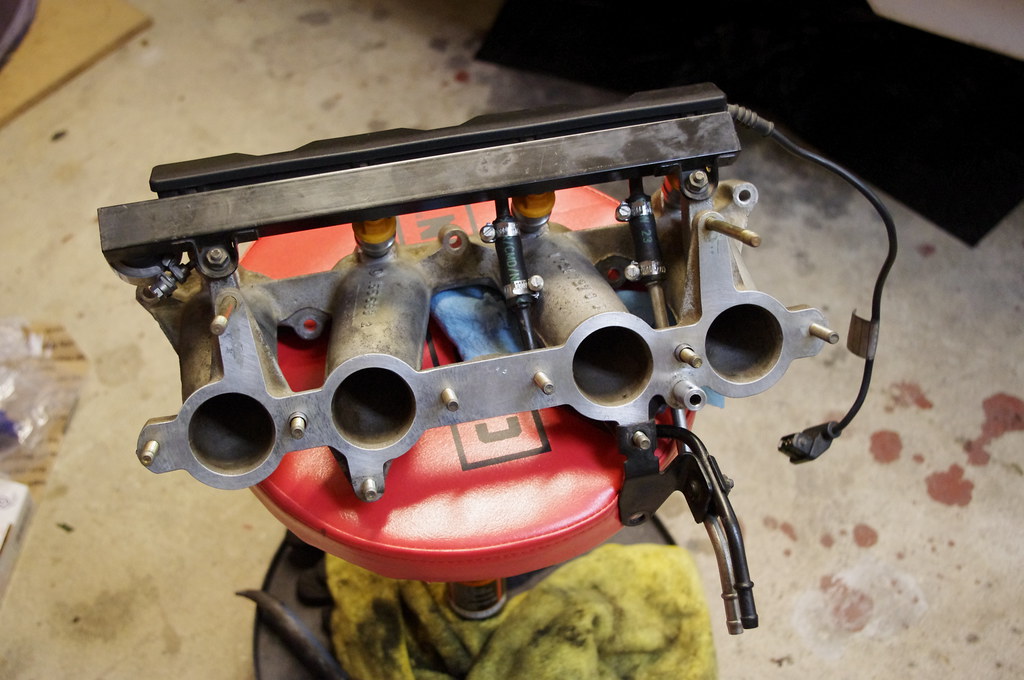
Alrighty - so this is done! Took significantly longer than 2 hours unfortunately, mostly because I’m a total noob going slow, but also partly because it was kind of a windy disaster up here today and getting parts on short notice was a pain in the ass and took me down to BMA twice. At least they had everything.
Ended up needing to pull both manifolds, which added some time. I f’ed around with the rail for almost 2 hours before deciding to yank the lower half of the manifold. Much nervousness. But got the new rail-side O-rings installed, just as you said with a bit of lube. Also replaced those little rubber hoses with new bits and clamps, and replaced the fuel filter for good measure (been on the list for a while). New upper and lower gaskets of course.
Did 2 of the 4 intake-side rings but the plastic was extremely brittle and ended up snapping one of the little fins on the end so quit while I was ahead. Oh, also cleaned out a shit-ton of carbon buildup but was still a little gross when I put it back. Oh well.
Test driving was fine, after turning over a bunch and getting everything re-pressurized. No gas smell at all, yet, not even after shoving my nose right on the edge of the valve cover near the electrical rail, where I saw it leaking yesterday. No visible leaks after checking a few times. Real test will be tomorrow, after having it sit at work for the day.
Thanks for your input, without R3V I’d be spending a ton of $ with my mechanic!!
Sent from my iPhone using TapatalkLeave a comment:
-
Fortunately removing the intake on an M42 is simple, so you'll be done with the whole project in less than two hours, especially considering that you can leave the lower half of the manifold in place. Just don't break the injector caps, cut the old o rings off of the injectors, lube the new ones before installing, and be certain that they are seated top/bottom.Leave a comment:
-
Hello!
Just because those rubber lines look good on the outside doesn't mean they are still good. I refreshed my entire "mess under the intake" a couple years ago and my rubber fuel lines were in terrible shape. There were internal cracks letting fuel vapor seep out. This was not noticeable from the outside. I highly doubt there is anything wrong with the hard lines or fuel rail. It's likely the short rubber fuel lines or injector o-rings.
Leave a comment:
-
Thinking on this further...it's probably an injector o-ring leaking and then running to the hard line. To your point I haven't driven over the fuel rail and there is pretty much zero reason for a crack in a metal line. Could happen but most likely explanation is a shot piece of ancient rubber.
Buying parts tomorrow to give 'er a go. Can always throw money at the mechanic if it all goes Pete Tong.
Leave a comment:
-
I probably could DIY but this is my daily and need it in service and won't have time to get to it for a while...unfortunate because I'd enjoy monkeying around with it.
The leak looks like it's coming from above the rubber hoses, and unless the hard lines coming from the rail are two pieces, that most likely means a crack in the hard line off the rail or in the joint to the rail, or the rail itself is shot. Wild-ass guess but will find out soon enough.Leave a comment:
-
Cant do it yourself?
Unless you drive over a fuel rail i cant see any reason why the fuel rail would ever need to be replaced.Leave a comment:
-
Alright, found it. Good news is - it's a gas leak! Bad news is - it's a gas leak! Coming from the rearmost hard line up to the fuel rail, above the rubber tube. I don't know if that means the rail is shot or if there's an o-ring that can be replaced on the hard line. RealOEM suggests the entire rail needs replacement, so off to the mechanic she goes next week. Just don't have time to learn and DIY.
Sucks but what can you do...Leave a comment:
-
Haven’t taken the intake apart yet, no o-ring replacement just yet. Am hoping it’s not that but if it is, will prob take to the mechanic and throw my wallet at the problem. FPR vac line has not been replaced, but sounds and looks easy enough. And it’s coming from that area too. Will order one up and swap it out. Thank you!!
Also - oil cap didn’t fix it. Didn’t expect it to but worth a shot.
Sent from my iPhone using TapatalkLeave a comment:
-
Did you replace all of the injector o rings, how about the vac line to the FPR?Leave a comment:


Leave a comment: