
I had intermittent issues with my automatic transmission neutral safety switch.
Some days it would work fine.
Other days the car wouldn’t start which involved lots of wiggling and moving the trans selector lever through the gears to start the car.
Time for a replacement, so it wouldn’t leave us stranded and end-up in divorce…
I have a 320i with cruise fitted, so Real OEM was listing P/N 25161216713 (Switch Gearbox) for my car (#8).
The OE part is not cheap…
Lots of other similar parts with different part numbers at a lower price, but couldn’t tell the difference.
The switch is expensive and not readily serviceable because it’s riveted together.


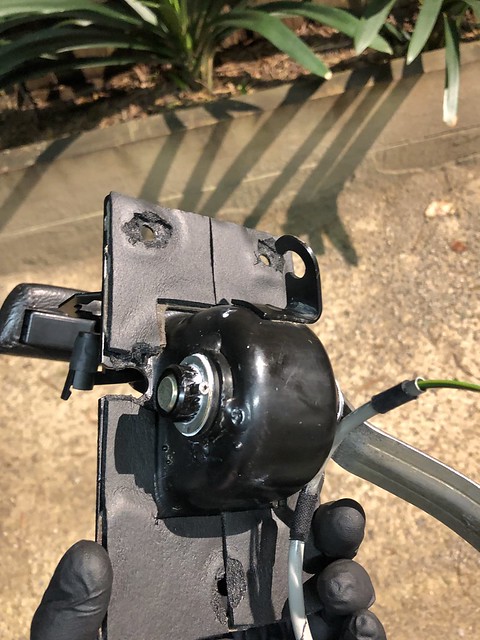
Breaking it open, it’s a simple switch, but can get gummed up.


Before going through all this & replacing, you may want to try spraying some electronic cleaner into the working surfaces to see if that helps.
It’s not a quick job, as I had to remove the entire selector assembly to replace the switch.
I could find limited information on-line - the Bentley manual instructions mention removing the exhaust & heat shielding under the car.
If you have nimble hands, you can avoid this, here are a few pointers I found along the way.
If you don’t have a hoist or pit, you’ll need to jack-up the LHS side the car & put on jack stands.
REMOVAL STEPS

DISASSEMBLY STEPS
REASSEMBLY STEPS
INSTALLATION STEPS
HANDY TIPS
If your gasket is stuffed, some self-adhesive closed cell foam works well.
(I used the leftovers from my A/C retrofit)
The plastic shift light indicator bulb housing is usually brittle and can crumble away – mine was split.
Used some heat shrink tubing to fit in between the plastic, apply some gentle heat & then drill a small hole to illuminate the gear indicator markings

Some days it would work fine.
Other days the car wouldn’t start which involved lots of wiggling and moving the trans selector lever through the gears to start the car.
Time for a replacement, so it wouldn’t leave us stranded and end-up in divorce…
I have a 320i with cruise fitted, so Real OEM was listing P/N 25161216713 (Switch Gearbox) for my car (#8).
The OE part is not cheap…
Lots of other similar parts with different part numbers at a lower price, but couldn’t tell the difference.
The switch is expensive and not readily serviceable because it’s riveted together.
Breaking it open, it’s a simple switch, but can get gummed up.
Before going through all this & replacing, you may want to try spraying some electronic cleaner into the working surfaces to see if that helps.
It’s not a quick job, as I had to remove the entire selector assembly to replace the switch.
I could find limited information on-line - the Bentley manual instructions mention removing the exhaust & heat shielding under the car.
If you have nimble hands, you can avoid this, here are a few pointers I found along the way.
If you don’t have a hoist or pit, you’ll need to jack-up the LHS side the car & put on jack stands.
REMOVAL STEPS
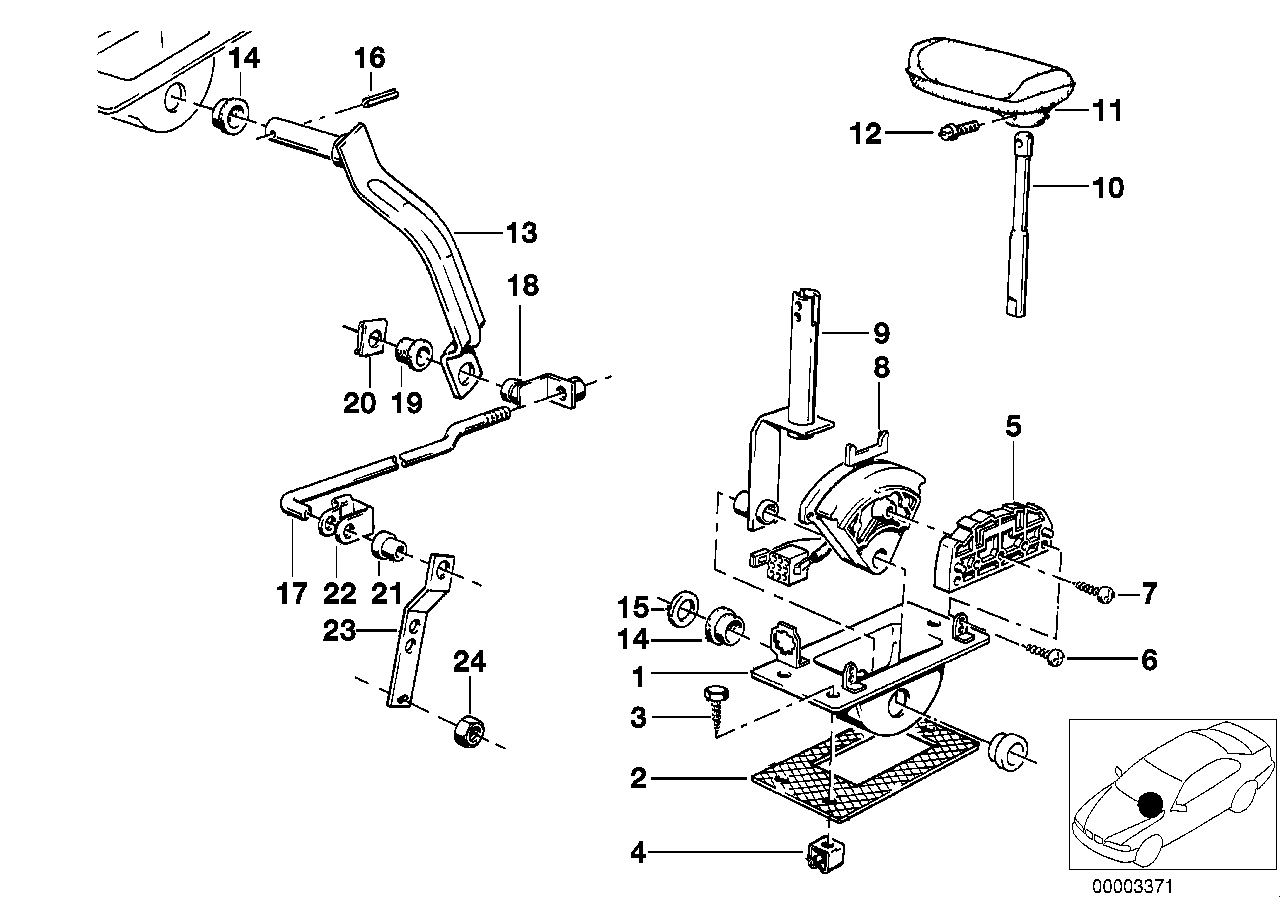
- Remove the handbrake console & centre console & insulating foam around the selector assembly
- Move the gear selector shaft (#9) to first gear– this makes access to the upper selector arm & retaining clip easier under the car (between the trans mount bracket & heat shield)
- Under the car, on the LHS of the auto trans, remove the upper selector arm retaining clip (#20)
- A sturdy pair of needle nose pliers or flat screw driver helps lever the retaining tab up and off the shaft - don’t lose it – if it flings off and lands on top of the exhaust heat shield, you can reach down & grab it once you remove the selector assembly
- Push the selector rod (#17) away
- Back in the passenger’s seat, unclip the neutral safety switch connector & selector indicator light wiring
- Unscrew 2x hex head screws (#3) with a 10mm socket
- Don’t lose the plastic spacer from the rear mounting stud (you removed the black 10mm plastic nut as part of the centre console)
- Lift up the selector assembly – but you’ll need to unclip the wiring from the 2x grommet holders on the side & under the selector assembly – then you can manoeuvre out of the car
DISASSEMBLY STEPS
- To prevent damage to the selector grip handle (#11) best to remove it
- Using an allen / hex key, undo the selector grip handle grub screw (#12)
- Pull the handle straight up & off the shaft – the white plastic rod (#10) will come off with the grip handle
- Give the selector assembly a good clean (throttle body cleaner)to remove accumulated grease – most likely the foam from the gasket (#2) will flake off
- Make a note of the position of the washer (#15) and bushings (#14)
- Using a pin punch drive out the retaining pin (#16) and remove the selector arm & bushings
- Undo the 3x Phillips head self tapping screws (#7 x1 and #6 x2)
- Push the shift gate (#5) away from the locating lugs – may need to jiggle and move past the selector shaft – remove the switch & shift gate from the selector assembly (release tabs on the switch connector to remove from the plug bracket)
REASSEMBLY STEPS
- Install the switch (#8), shift gate (#5) together and then fit the selector shaft (#9) into the selector assembly housing – lubricate working surfaces with a thin smear of lithium grease or similar
- Ensure the switch lever is engaged into the selector shaft
- Relocate the shift gate into the locating lugs and tighten the 3x Phillips head screws
- Replace the gasket (#2) –or – see repair tip below
- Reinstall the bushes (#14 & #15), selector lever (#13 can only go one way), washer (#15) and drive the retaining pin (#16) into the selector arm shaft
- Clip the switch plug housing back into the locating bracket
- Refit the selector grip handle (#11) & white rod (#10) into the selector lever shaft (#9)
- Apply some Loctite to the grub screw & tighten – it’s only a M4 thread so don’t over tighten
- Re-connect the shift indicator light wiring back into the bulb holder – see repair tip below
INSTALLATION STEPS
- Manoeuvre the selector assembly into the trans tunnel hole & re-attach the reverse light wiring to the 2x grommet holders on the selector assembly
- Ensure the selector assembly is correctly seated & the selector shaft can move freely
- Loosely install the 2x hex head screws (#3)
- Move the selector shaft lever to first gear
- Under the car, reattach the selector rod (#17) to the selector arm (#13) & install the retaining clip (#20) - ensure the clip is seated – needle nose pliers or large flat screwdriver helps
- Back in the car tighten the 2x hex head screws (#3)
- Check the sector lever operates freely
- Reconnect the neutral safety switch wiring connector & any additional connectors
- Check things work & reinstall centre console & handbrake console
HANDY TIPS
If your gasket is stuffed, some self-adhesive closed cell foam works well.
(I used the leftovers from my A/C retrofit)
The plastic shift light indicator bulb housing is usually brittle and can crumble away – mine was split.
Used some heat shrink tubing to fit in between the plastic, apply some gentle heat & then drill a small hole to illuminate the gear indicator markings