
I was just going to post this to my ''Members rides page'' but when I did it I couldn't find a single guide that talked me through the auto to manual swap on a RHD car so thought I would do a thread in the hope it may help someone doing a similar project as there are some differences.
So when I bought the E30 I was focussed on the condition, no rust, nice interior and lowish milage not so much whether it was auto or manual because I knew it was possible to swap them over. What I hadn't quite appreciated was how many parts that would take to do and the task of pulling them all together!
I found a nice clean low milage Getrag 240 5 speed overdrive box with warranty at Quarry Motors in Sheffield and got it pallet shipped and then sourced a mint flywheel, manual prop shaft (they are a different length to the auto) and transmission support crossmember through an E30 Facebook group and drove to Northampton to collect them.
However in addition to that, I also had to pull together:
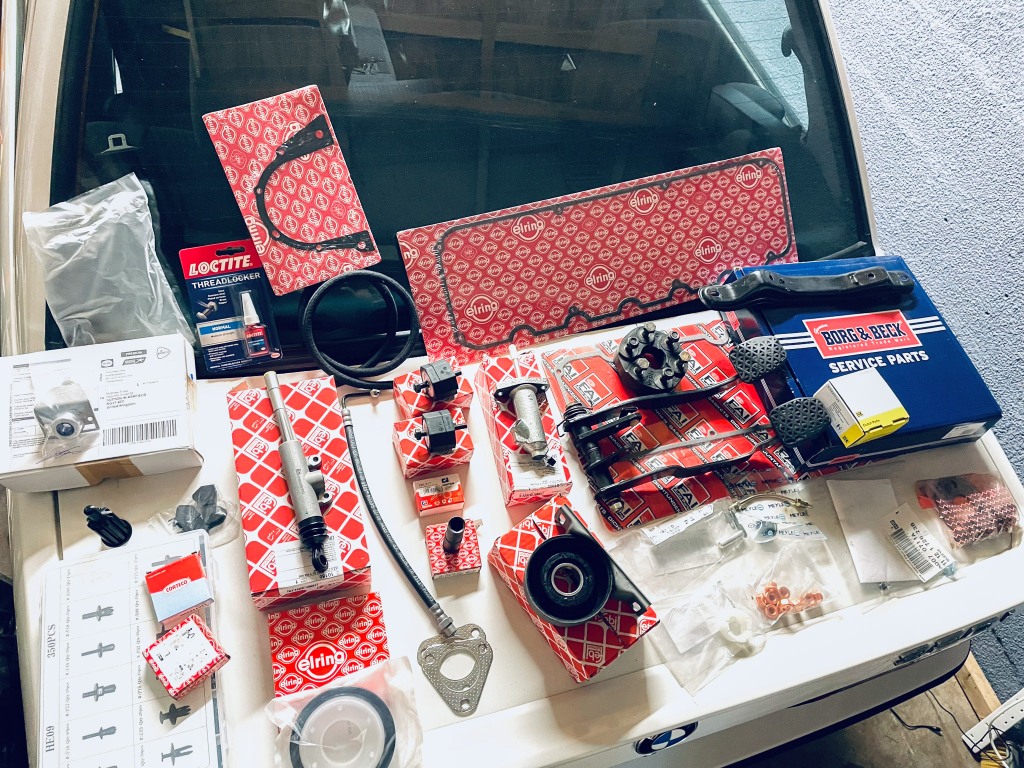
Reconditioned manual pedal set and new Febi rubber pedal covers
New Febi Master and slave clutch cylinders, pipe for slave from BMW and pipe to fluid reservoir
New Febi prop centre support bearing
New rear Elring main seal and gasket
New three piece Borg & Beck clutch set with throw out bearing and alignment tool
New exhaust support brackets from BMW, copper nuts and Elring metal gasket
New Febi gearbox rubber mounts
New BMW prop to gearbox guibo
Gearbox to car brake light cable
New BMW gearbox reverse lights switch
Front, rear and selector Elring seals for the gearbox
Gear selector stick, shifter carrier and selector bar plus all new bushings for each
Delrin Rear Shifter Arm Bracket Assembly
Then, it was off to BMW in Chesterfield to order a ton of new gearbox to engine mounting torx bolts, new flywheel bolts, dowels, washers, clips!

So first tip if you are tackling this yourself on a RHD car is be aware that every guide I could find online is based on a LHD car so you are going to need to do some things differently.
Removing the auto wiring harness and over riding the neutral start inhibitor requires some different wiring to be done as you don't touch anything under the steering column on a UK car and also you will need one of these 1.2mtr long clutch master to slave pipes which runs across the firewall which is not needed on a LHD car.

A few other things, the starter is a nightmare to remove and re-install due to bolt access being almost impossible tied with a spinning nut on the other side in the engine bay. The pedals are also a pain in the arse due to access... Im 6ft3, yes they absolutely are... fiddly, awkward, worse bit for me of the whole project.
So, lets get started!
Get the car up on jack stands as high as you can. The higher you get it the less times you will bang your head lol!

Disconnect the battery
Remove the entire exhaust system in one piece
Remove the heat shields
Remove the automatic prop shaft and centre support bearing

Into the car, remove all the centre console trim, disconnect the electric window switches, breaker switch, put the car into neutral and remove the auto shifter (there is a 13mm nut holding the selector to the gearbox under the car)
Disconnect the auto harness (37) and brake light cable (C301). 34 years of biscuit crumbs and crisps that had gone through the trims haha!!!

Put a jack under the transmission and remove the three nuts holding the centre support crossmember in place, then the two bolts under the rubber mounts and remove it all.
Remove the oil drain in the gearbox and leave to empty. Remove the two oil coolant pipes which run from the gear box to the radiator, get ready for a little spill as they come out of the housings at each end. Once disconnected they pull through easiest from the gearbox side.
Then start with the easy bell housing bolts at the bottom, removing these and four bolts on the piece under the oil pan will allow you remove the access panel which will give you a view to the torque convertor bolts. There are three to remove and using a 22mm spanner on the front crank you can rotate the engine to access them all.

Next up, lower the gearbox on the jack and you will get a feel for the nightmare that lies ahead haha! Yes, you are going to have to remove those torx bolts that sit barely visible right at the top of the gearbox bell housing across about three foot of automatic gearbox with a few winches of access and the there on the left are dreaded starter bolts!
I decided to use four impact extensions giving me about three foot length with a wobble socket on the end and a 1/2in breaker bar and then used some electrical tape to just position the wobble socket at the right angle to guide it in. It worked (eventually after a lot of swearing).
For the starter bolts, the lower one I wedged the ratchet on the torx under the car then removed the nut in the engine bay (its awkward but doable) for the one thats barely visible attached the torx bar under the car, jacked the transmission up to give visibility of the nut in the engine bay, wedged in a tyre leaver and then removed the torx bolt. It was a struggle but it came out. At this point you can pull the engine and gearbox apart.re you do, back into the bonnet, remove the kickdown cable from the throttle body with a 10mm spanner and feed it down to the floor.
Flying visit from the boss
I pulled the gearbox away, this is great fun when your on you own with no one to help as it weighs an absolute ton! The torque convertor stayed behind. Lowered the gearbox and dragged it out. I then pried the torque convertor away leaving just the flywheel and clutch behind.


Look how clean that tunnel is!

Remove the flywheel bolts ( I used an impact gun to stop the wheel rotating) and remove the flywheel and clutch.
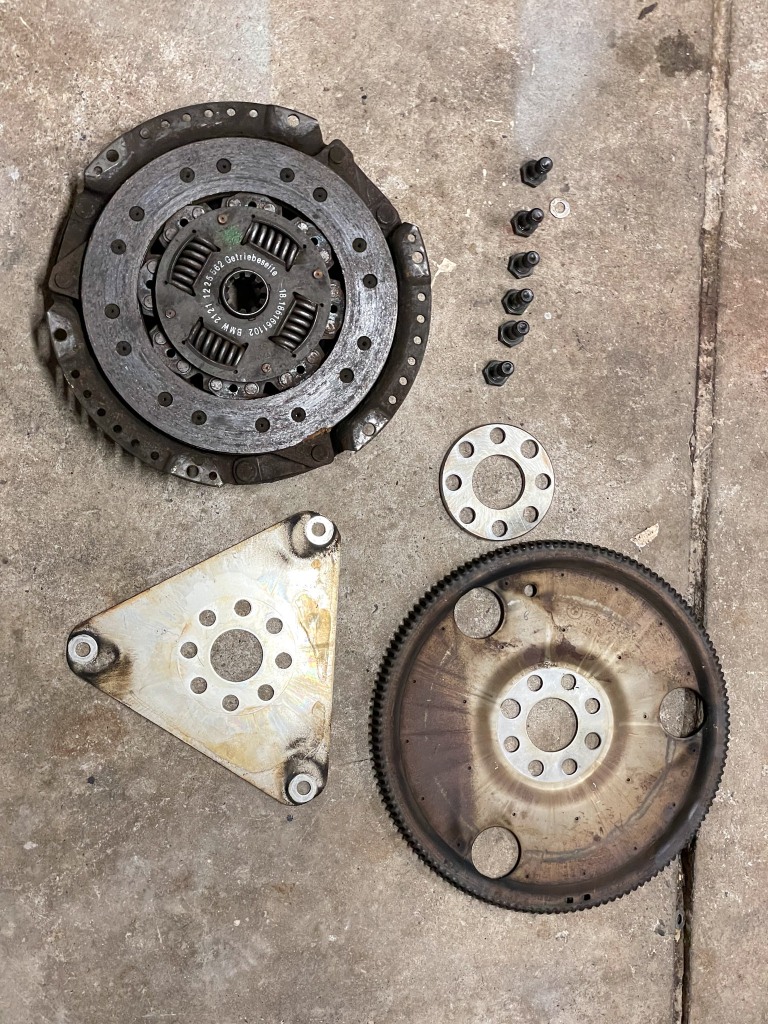
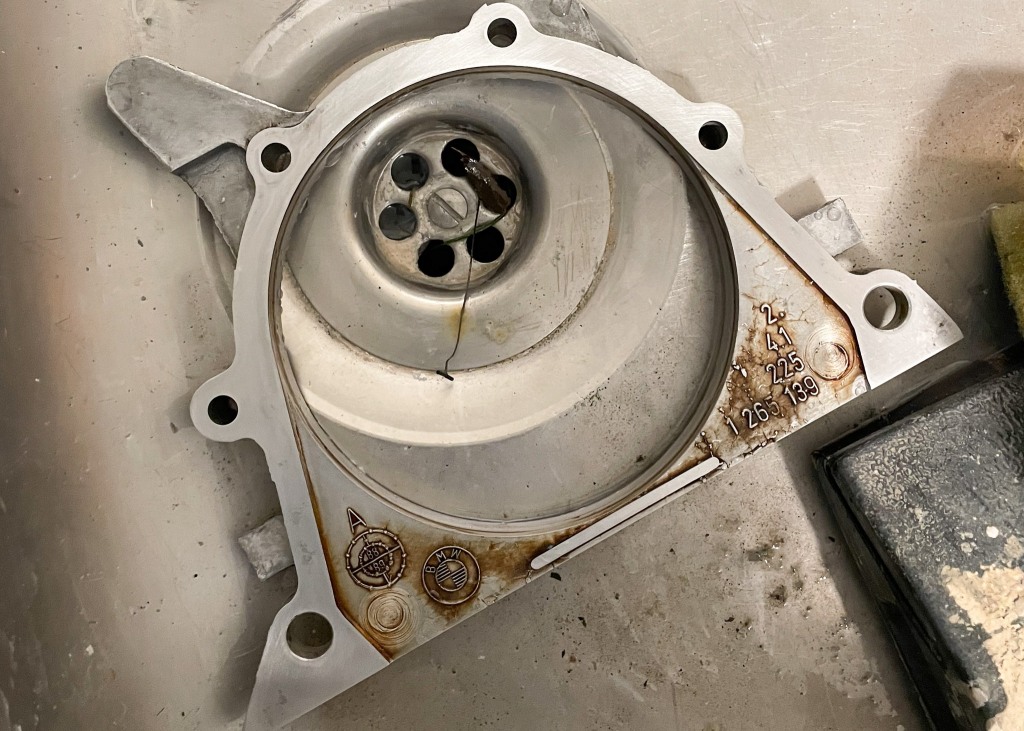
This will leave you looking at the rear main seal of the block. Its absolutely worth doing this seal whilst you are in there, remove and clean up the mounting bracket, insert the new seal, add the gasket and some RTV between the bottom of the bracket and the oil pan and replace.


I then spent an hour replacing the input shaft, output shaft and selector seals on the new manual gearbox.
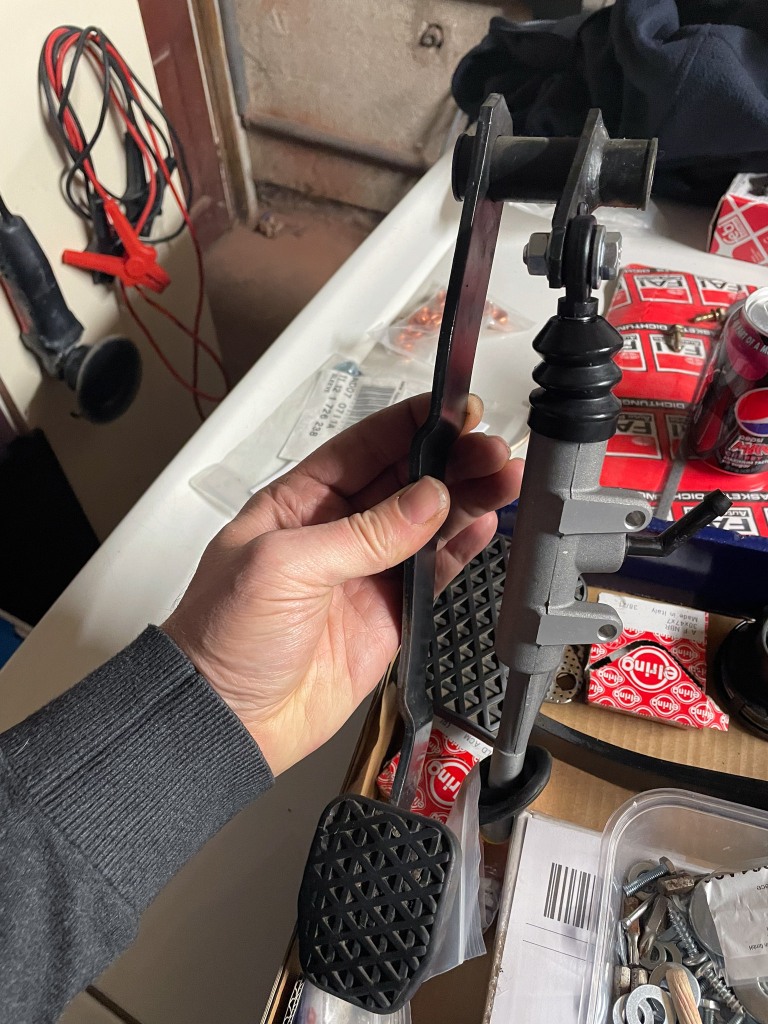
At this point I moved onto the pedals. I managed to source a full pedal set in great condition from a 1992 318i. The pedal box is different but the brake, clutch and mounting bolt were identical and thats the only parts I need.
The auto and manual pedal boxes are the same so I will be leaving it in, using the same brake switch and just swapping out the pedals.


Remove the drivers seat so you have decent access, its only four bolts. Remove the main carrier bolt of the auto pedals and slide it out.
Disconnect the brake booster bracket and remove the auto brake pedal, install new longer carrier bolt through frame, new brake pedal and clutch pedal and bolt in. At this point you will also want to reset you brake light switch. Push the pedal all the way down, reach behind and pull the black switch top all the way out and then allow the brake pedal t slowly rise to meet the switch.
On the bulkhead you will see the car is already set up for manual install, a rubber grommet for the fluid feeder pipe to go through and a push out metal square to feed the bottom of the master cylinder through. Attach the feeder pipe to the clutch master before installing it as there no access to it afterwards.
Install the master cylinder to the clutch pedal and then the frame of the pedal box (two very awkward 10mm bolts, helps to prop the accelerator pedal down to move the cable out of the way) then attach the long hydraulic feed pipe from the base of the clutch master and feed it across the bulkhead to the passenger side and down towards the floor ready to connect the slave.


Next up build your shifter. The big crossmember I bought from BMW (£90 inc VAT) new bushings, new washers, new plastic seat. The rear carrier I had to get from Tims Classic Car Parts in Holland (£70 inc shipping), its a Delrin Rear Shifter Arm Bracket Assembly.

Once built up attach to the gearbox, I did this before installing the box as the is a clip that holds the carrier to the gearbox which would be impossible once installed (affectionately know as the bitch clip).
Install the slave cylinder to the gearbox and attach the flexible hose which will meet the metal pipe you installed from the master earlier.
At this point also install the reverse switch on the opposite side of the gearbox and the cable which runs from it and up into the cabin.

Install your shiny new manual flywheel and shim. Then install the pilot bearing, the automatic doesn't have one so make sure you don't miss this step. I used a 22mm socket to tap it in and it needs to sit about half an inch recessed to allow the manual gearbox input shaft to slot in.

Install your shiny new clutch and pressure plate, six torx bolts to hold it in place.

Its time to re-install the gearbox, and speaking from experience this is like wrestling a dolphin when you're doing it on your own. I had the gearbox balanced on a trolly jack, slowly raised it to where it was aligned and then slowly manoeuvred the jack forward to slot the input shaft into the clutch an pilot bearing. At this point you are trying to keep the gearbox balanced on the jack, guide the shifter through the hole and wobble the box to get the input shaft to align with the clutch... lets just say it took a lot of attempts and the neighbours all closed their windows haha!
Once its in and snug up to the engine its time to reinstall all those almost inaccessible top bolts, the starter and the lower access panel. I let the gearbox hang unsupported and gently jacked up the engine from the oil pan until it was just touching the firewall to give me maximum access to the upper bolts.
Once its all bolted up install your new rubber mountings, new guibo, manual support crossmember, manual driveshaft with new centre support bearing and you are then left with this! Hurrah, its in! This is a VERY nice feeling haha!

Looking up you can see the shifter and rear carrier installed

Connect the master and slave cylinder pipes down by the gearbox, then in the engine bay snip the end off the capped of output from the brake reservoir and attach your master feeder pipe. Top up the reservoir and then bleed the clutch by opening and closing the bleed nipple on the slave system until you have a nice firm pedal. Keep an eye on the reservoir level as you do this to ensure it doesn't drop below the feeder pipe level and introduce air to the system.

Back into the car for the wiring and I couldn't resist a quick gear change check, all five gears and reverse were there thankfully lol!

Forget everything you have seen online about the wiring if you are working on a UK car. Its simple and there is no cutting of wires or faffing under the steering column.
Firdstly connect the male plug on the cable that runs from the reverse switch on your gearbox to the old auto female reverse switch plug (C301).

Next, drop the glovebox and remove the trim covering the harness. Under here you will find two plugs after some searching. One is a yellow black came to yellow black cable. The other is a yellow black cable to black cable. Unplug these and connect the yellow/black to the yellow/black which had been connected to the black.


Thats it, neutral start inhibitor is over ridden and you can remove the entire auto harness shown below with the number 37 sticker. It runs under the carpet so is a bit of a faff, but once completed you have the wiring exactly as a manual would have come from the factory.

Fill the gearbox with some quality gear oil (took around 1.3 ltrs)

Its then time to rebuild all the centre console, attach the wires to the starter, put the drivers seat back in and reinstall the heat shields and exhaust system with a new carrier bracket (again this is great fun on your own haha!) Ohh and I added some shiny new Febi pedal rubbers.

Thats it, its key turn time.. everything crossed!
Everything was spot on, started perfectly, drove out of the garage and a spin up the bypass she was cruising along at 70mp like it had never been anything other than manual!
How long did it take me? Well, I was lucky, everything came apart nicely as there is no rust anywhere on the car, no snapped bolts or sheered nuts. I did a couple of hours a night over a week or so, I'd guess around 12-15hrs all in. You could reduce this by a few hours if you have an assistant to help lift and align the manual box in, help with the starter bolts and clutch bleeding and generally hold all the awkward bolts in place whilst you work on them. Also I renewed every seal, gasket and o-ring, if you're not doing that probably another couple of hours knocked off.
Hope this helps my fellow UK E30 owners!


So when I bought the E30 I was focussed on the condition, no rust, nice interior and lowish milage not so much whether it was auto or manual because I knew it was possible to swap them over. What I hadn't quite appreciated was how many parts that would take to do and the task of pulling them all together!
I found a nice clean low milage Getrag 240 5 speed overdrive box with warranty at Quarry Motors in Sheffield and got it pallet shipped and then sourced a mint flywheel, manual prop shaft (they are a different length to the auto) and transmission support crossmember through an E30 Facebook group and drove to Northampton to collect them.
However in addition to that, I also had to pull together:
Reconditioned manual pedal set and new Febi rubber pedal covers
New Febi Master and slave clutch cylinders, pipe for slave from BMW and pipe to fluid reservoir
New Febi prop centre support bearing
New rear Elring main seal and gasket
New three piece Borg & Beck clutch set with throw out bearing and alignment tool
New exhaust support brackets from BMW, copper nuts and Elring metal gasket
New Febi gearbox rubber mounts
New BMW prop to gearbox guibo
Gearbox to car brake light cable
New BMW gearbox reverse lights switch
Front, rear and selector Elring seals for the gearbox
Gear selector stick, shifter carrier and selector bar plus all new bushings for each
Delrin Rear Shifter Arm Bracket Assembly
Then, it was off to BMW in Chesterfield to order a ton of new gearbox to engine mounting torx bolts, new flywheel bolts, dowels, washers, clips!
So first tip if you are tackling this yourself on a RHD car is be aware that every guide I could find online is based on a LHD car so you are going to need to do some things differently.
Removing the auto wiring harness and over riding the neutral start inhibitor requires some different wiring to be done as you don't touch anything under the steering column on a UK car and also you will need one of these 1.2mtr long clutch master to slave pipes which runs across the firewall which is not needed on a LHD car.
A few other things, the starter is a nightmare to remove and re-install due to bolt access being almost impossible tied with a spinning nut on the other side in the engine bay. The pedals are also a pain in the arse due to access... Im 6ft3, yes they absolutely are... fiddly, awkward, worse bit for me of the whole project.
So, lets get started!
Get the car up on jack stands as high as you can. The higher you get it the less times you will bang your head lol!
Disconnect the battery
Remove the entire exhaust system in one piece
Remove the heat shields
Remove the automatic prop shaft and centre support bearing
Into the car, remove all the centre console trim, disconnect the electric window switches, breaker switch, put the car into neutral and remove the auto shifter (there is a 13mm nut holding the selector to the gearbox under the car)
Disconnect the auto harness (37) and brake light cable (C301). 34 years of biscuit crumbs and crisps that had gone through the trims haha!!!
Put a jack under the transmission and remove the three nuts holding the centre support crossmember in place, then the two bolts under the rubber mounts and remove it all.
Remove the oil drain in the gearbox and leave to empty. Remove the two oil coolant pipes which run from the gear box to the radiator, get ready for a little spill as they come out of the housings at each end. Once disconnected they pull through easiest from the gearbox side.
Then start with the easy bell housing bolts at the bottom, removing these and four bolts on the piece under the oil pan will allow you remove the access panel which will give you a view to the torque convertor bolts. There are three to remove and using a 22mm spanner on the front crank you can rotate the engine to access them all.
Next up, lower the gearbox on the jack and you will get a feel for the nightmare that lies ahead haha! Yes, you are going to have to remove those torx bolts that sit barely visible right at the top of the gearbox bell housing across about three foot of automatic gearbox with a few winches of access and the there on the left are dreaded starter bolts!
I decided to use four impact extensions giving me about three foot length with a wobble socket on the end and a 1/2in breaker bar and then used some electrical tape to just position the wobble socket at the right angle to guide it in. It worked (eventually after a lot of swearing).
For the starter bolts, the lower one I wedged the ratchet on the torx under the car then removed the nut in the engine bay (its awkward but doable) for the one thats barely visible attached the torx bar under the car, jacked the transmission up to give visibility of the nut in the engine bay, wedged in a tyre leaver and then removed the torx bolt. It was a struggle but it came out. At this point you can pull the engine and gearbox apart.re you do, back into the bonnet, remove the kickdown cable from the throttle body with a 10mm spanner and feed it down to the floor.
Flying visit from the boss
I pulled the gearbox away, this is great fun when your on you own with no one to help as it weighs an absolute ton! The torque convertor stayed behind. Lowered the gearbox and dragged it out. I then pried the torque convertor away leaving just the flywheel and clutch behind.
Look how clean that tunnel is!
Remove the flywheel bolts ( I used an impact gun to stop the wheel rotating) and remove the flywheel and clutch.
This will leave you looking at the rear main seal of the block. Its absolutely worth doing this seal whilst you are in there, remove and clean up the mounting bracket, insert the new seal, add the gasket and some RTV between the bottom of the bracket and the oil pan and replace.
I then spent an hour replacing the input shaft, output shaft and selector seals on the new manual gearbox.
At this point I moved onto the pedals. I managed to source a full pedal set in great condition from a 1992 318i. The pedal box is different but the brake, clutch and mounting bolt were identical and thats the only parts I need.
The auto and manual pedal boxes are the same so I will be leaving it in, using the same brake switch and just swapping out the pedals.
Remove the drivers seat so you have decent access, its only four bolts. Remove the main carrier bolt of the auto pedals and slide it out.
Disconnect the brake booster bracket and remove the auto brake pedal, install new longer carrier bolt through frame, new brake pedal and clutch pedal and bolt in. At this point you will also want to reset you brake light switch. Push the pedal all the way down, reach behind and pull the black switch top all the way out and then allow the brake pedal t slowly rise to meet the switch.
On the bulkhead you will see the car is already set up for manual install, a rubber grommet for the fluid feeder pipe to go through and a push out metal square to feed the bottom of the master cylinder through. Attach the feeder pipe to the clutch master before installing it as there no access to it afterwards.
Install the master cylinder to the clutch pedal and then the frame of the pedal box (two very awkward 10mm bolts, helps to prop the accelerator pedal down to move the cable out of the way) then attach the long hydraulic feed pipe from the base of the clutch master and feed it across the bulkhead to the passenger side and down towards the floor ready to connect the slave.
Next up build your shifter. The big crossmember I bought from BMW (£90 inc VAT) new bushings, new washers, new plastic seat. The rear carrier I had to get from Tims Classic Car Parts in Holland (£70 inc shipping), its a Delrin Rear Shifter Arm Bracket Assembly.
Once built up attach to the gearbox, I did this before installing the box as the is a clip that holds the carrier to the gearbox which would be impossible once installed (affectionately know as the bitch clip).
Install the slave cylinder to the gearbox and attach the flexible hose which will meet the metal pipe you installed from the master earlier.
At this point also install the reverse switch on the opposite side of the gearbox and the cable which runs from it and up into the cabin.
Install your shiny new manual flywheel and shim. Then install the pilot bearing, the automatic doesn't have one so make sure you don't miss this step. I used a 22mm socket to tap it in and it needs to sit about half an inch recessed to allow the manual gearbox input shaft to slot in.
Install your shiny new clutch and pressure plate, six torx bolts to hold it in place.
Its time to re-install the gearbox, and speaking from experience this is like wrestling a dolphin when you're doing it on your own. I had the gearbox balanced on a trolly jack, slowly raised it to where it was aligned and then slowly manoeuvred the jack forward to slot the input shaft into the clutch an pilot bearing. At this point you are trying to keep the gearbox balanced on the jack, guide the shifter through the hole and wobble the box to get the input shaft to align with the clutch... lets just say it took a lot of attempts and the neighbours all closed their windows haha!
Once its in and snug up to the engine its time to reinstall all those almost inaccessible top bolts, the starter and the lower access panel. I let the gearbox hang unsupported and gently jacked up the engine from the oil pan until it was just touching the firewall to give me maximum access to the upper bolts.
Once its all bolted up install your new rubber mountings, new guibo, manual support crossmember, manual driveshaft with new centre support bearing and you are then left with this! Hurrah, its in! This is a VERY nice feeling haha!
Looking up you can see the shifter and rear carrier installed
Connect the master and slave cylinder pipes down by the gearbox, then in the engine bay snip the end off the capped of output from the brake reservoir and attach your master feeder pipe. Top up the reservoir and then bleed the clutch by opening and closing the bleed nipple on the slave system until you have a nice firm pedal. Keep an eye on the reservoir level as you do this to ensure it doesn't drop below the feeder pipe level and introduce air to the system.
Back into the car for the wiring and I couldn't resist a quick gear change check, all five gears and reverse were there thankfully lol!
Forget everything you have seen online about the wiring if you are working on a UK car. Its simple and there is no cutting of wires or faffing under the steering column.
Firdstly connect the male plug on the cable that runs from the reverse switch on your gearbox to the old auto female reverse switch plug (C301).
Next, drop the glovebox and remove the trim covering the harness. Under here you will find two plugs after some searching. One is a yellow black came to yellow black cable. The other is a yellow black cable to black cable. Unplug these and connect the yellow/black to the yellow/black which had been connected to the black.
Thats it, neutral start inhibitor is over ridden and you can remove the entire auto harness shown below with the number 37 sticker. It runs under the carpet so is a bit of a faff, but once completed you have the wiring exactly as a manual would have come from the factory.
Fill the gearbox with some quality gear oil (took around 1.3 ltrs)
Its then time to rebuild all the centre console, attach the wires to the starter, put the drivers seat back in and reinstall the heat shields and exhaust system with a new carrier bracket (again this is great fun on your own haha!) Ohh and I added some shiny new Febi pedal rubbers.
Thats it, its key turn time.. everything crossed!
Everything was spot on, started perfectly, drove out of the garage and a spin up the bypass she was cruising along at 70mp like it had never been anything other than manual!
How long did it take me? Well, I was lucky, everything came apart nicely as there is no rust anywhere on the car, no snapped bolts or sheered nuts. I did a couple of hours a night over a week or so, I'd guess around 12-15hrs all in. You could reduce this by a few hours if you have an assistant to help lift and align the manual box in, help with the starter bolts and clutch bleeding and generally hold all the awkward bolts in place whilst you work on them. Also I renewed every seal, gasket and o-ring, if you're not doing that probably another couple of hours knocked off.
Hope this helps my fellow UK E30 owners!


Comment