Announcement

Collapse
No announcement yet.

smoking tailights.....?

Collapse
X
 
  • Filter
  • Time
  • Show
Clear All
new posts

    smoking tailights.....?

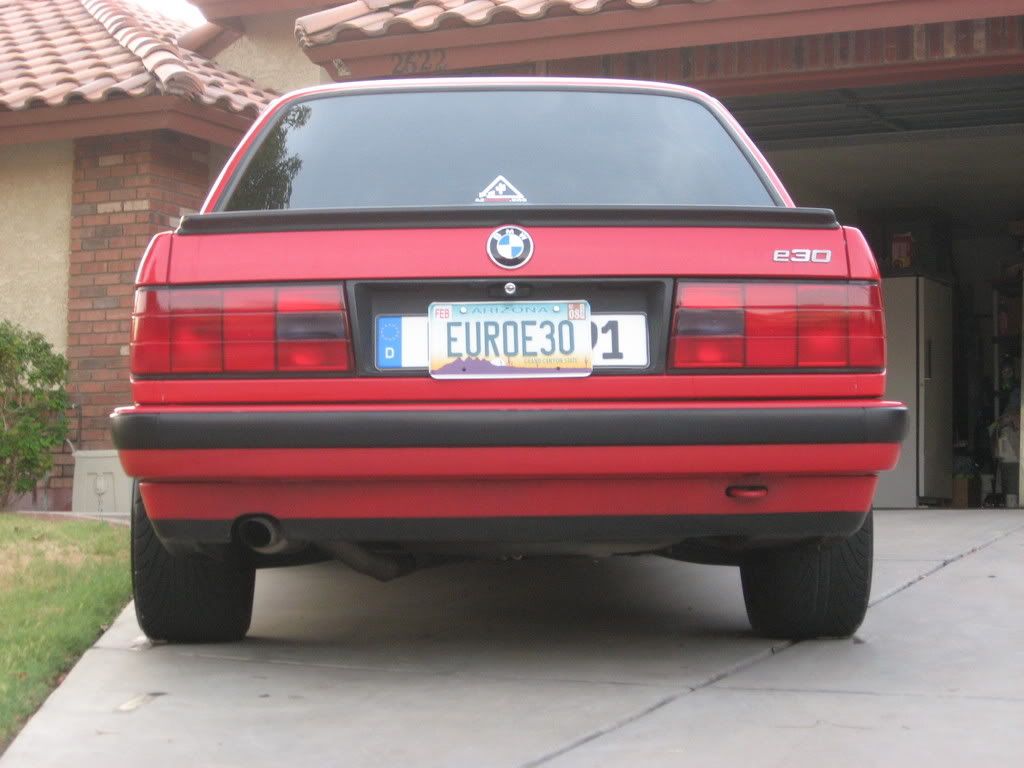
    Well, I just bought a new lense for the car and I'm gonna rebuild the gaskets for my tail's and I figured while I have them apart why not smoke them slightly? Has anybody had any experience with this idea on the tails?

    And on a side note, I was confused today, I did a straight line burnout and had 2 lines but I only have an 86 325....? Did somebody swap an LSD in or am I just confused?

    #2
    i think sometimes if its in a straight line it will still leave two stripes
    Your signature picture has been removed since it contained the Photobucket "upgrade your account" image.

    Comment


      #3
      i wanted to smoke mine too, i was going to use lamin-x but it would be too hard with the grooves, the other best way i would say to use special tint spray. i didnt use that eather though since i kinda suck at spraying so i just saved and got some MHWs. i love them

      Comment


        #4
        i used lamex i just used a stick to push it into the grooves and it looks good

        www.gutenparts.com
        One stop shopping for NEW, USED and EURO PARTS!

        Comment


          #5
          laminex to the outside of the lense ? i have a spare set of tail lights i can experiment with.

          Comment


            #6
            Originally posted by fcsteve View Post
            laminex to the outside of the lense ? i have a spare set of tail lights i can experiment with.
            Just to clarify, you always apply anything you are doing to the outside of the lens. I know it is commonly mistaken that you might be able to tint the inside but this is not true. If you're going to spray paint it, use the VHT Nightshades tint in a rattle can. You can tint to your specifications, but always remember to put an automotive grade clear coat on as a finishing touch or you will be left with cracking paint. I learned this from personal experience.

            Comment


              #7
              Yeah, I'm leaning towards the rattle can. And the VHT can be found at walmart/auto store?

              Comment


                #8
                DO NOT Lamin-x your tails unless you are comfortable being called a douche bag continuously. VHT is the better way. Remember not to overdo it though. A little goes a LONG way. Just be sure to do them OFF your car, and spray past the light in a back and forth motion. 2 light coats should be more than sufficient. Any more and your light output will be greatly hindered.
                sigpic

                Comment


                  #9
                  Thanks. Picking up the VHT this afternoon and they should be reinstalled sunday afternoon. I'll update you guys with pics and whatnot.

                  Comment


                    #10
                    Where did you guys get the VHT?
                    "We praise or find fault, depending on which of the two provides more opportunity for our powers of judgement to shine."

                    Comment


                      #11
                      Almost all larger chain parts stores carry it. Schucks, AutoZone etc.

                      But you will need to use some automotive grade clearcoat over it to avoid the sandpaper look.
                      sigpic

                      Comment


                        #12
                        Originally posted by E30 Groupie View Post
                        But you will need to use some automotive grade clearcoat over it to avoid the sandpaper look.
                        Let me reiterate, e30pwr please please do not do the tint the lights without a clearcoat. You will regret it later, but yes do post up results!

                        Comment


                          #13
                          Did you guys wet sand before with 1000 grit or something to clean up the surface prior to paint? How about a 1500 wet sand afterwards?

                          Comment


                            #14
                            Originally posted by sumyungguy View Post
                            Did you guys wet sand before with 1000 grit or something to clean up the surface prior to paint? How about a 1500 wet sand afterwards?
                            Well let me do a quick run down on the painting I've done on my taillights since I've done all reds as well as smoked. First, when I was in my ricer staged I decided tinted would look the coolest so I proceeded to do that. But I went a little dark on it(since I was a noob) and it basically blacked them out. I thought it looked cool for a while, but I didn't put an "automotive" grade clearcoat on them so within about three months they were flaking and peeling off. I don't think I did any prep or anything after when I did these. Just a good cleaning.

                            So this is what I had the first time around. Ignore big ricey sticker.


                            Moving rapidly along, after so many months my lights looked like ass so I decided it was once again time to repaint. But this time I decided I wanted all reds with a smoked reverse light, because I had seen this on another members car and it looked great. However, I was going to do it right this time. So I first used I think 1000 grit to remove all the paint that hadn't already come off, and then used a 1500 grit to bring everything back to the same smoothness. Remember though, this sanding is all done by wetsanding. Because I had screwed with my lights enough(there was some fading and discoloration) I just decided to repaint the entire thing with a Testor's candy apple red IIRC.

                            Next I let the red dry for a good hour or so, enough that it wasn't tacky to the touch. Removed the reverse light section I had previously taped off, then taped off so the reverse light was exposed but everything else was covered. I had some of my previous endeavors' tint paint let over so I lightly smoked my reverse lights.

                            Following this, I let everything dry for roughly another hour, and then laid down about three coats of automotive clear. The clear gave them an amazing shine and they look factory. The color matching was damn near perfect too. This was the last step as they looked great afterwards and didn't appear to need any buffing or wetsanding. They still weren't perfect but they were pretty damn close.

                            So this is what I have now, and they've been this way for over two years and have held up amazingly.


                            Any questions, comments, or concerns...just let me know.

                            Comment


                              #15
                              thanks!

                              Comment

                              Working...
                              X