Announcement

Collapse
No announcement yet.

Steering rack seal replacement?

Collapse
X
 
  • Filter
  • Time
  • Show
Clear All
new posts

    Steering rack seal replacement?

    I found a couple of threads about steering rack rebuilding, but not much useful info in them. My rack is starting to leak from the seal at the pass side tie rod. Has anyone replaced this seal? Can you access it from the end, or does it require a complete disassembly?

    Thanks for any help!
    1973 Bavaria

    #2
    complete disassemble and from my experience, just buy a good used rack.
    im the type that thinks he can fix it all and it turned out to be a headache the first time around.
    i'd do it again if i needed to but the easiest way around this fix is to drop 150 on a used rack

    Comment


      #3
      Originally posted by xLibelle View Post
      complete disassemble and from my experience, just buy a good used rack.
      Yeah, that's what I was thinking. It's a daily driver, I don't have the time to play around trying to rebuild it.

      Thanks for the answer!
      1973 Bavaria

      Comment


        #4
        If you are doing the rebuild yourself it may be tricky. There are quite a few seals however if you can take the rack out and can find some direction I would say go with the rebuild. I am actually doing this at this very minute. The repair/seal kit cost me $29! In relation to $150 for a "good" used rack.... what's a good used rack anyways? One that is nowhere to be known how close it is to shitn a seal or two or few? It's easy for me to say cause I do have an auto tech helping me with the seal action but like I said with some guidance.......... Good luck either way

        PS: also doing the same with my P/S Pump.

        EDIT: I will try to take pics of the whole way through..... (as far as replacing all the seals, the kit comes with around 25 or so)
        Last edited by Maluco; 12-08-2006, 07:03 PM.

        Comment


          #5
          Well, I'm just about this >ll< far from ordering a rebuilt rack, but I'd be interested to see what's involved with doing a teardown. Pics would be greatly appreciated!!
          1973 Bavaria

          Comment


            #6
            Here you go bro.


            Disassembly

            Remove clamps securing rack boots, and pull back boots to expose tie rod joint.
            1. Bend up tabs on tie rod lock plates, position rack as needed to secure rack with suitable spanner, then remove tie rods.
            2. Disconnect and remove fluid lines.
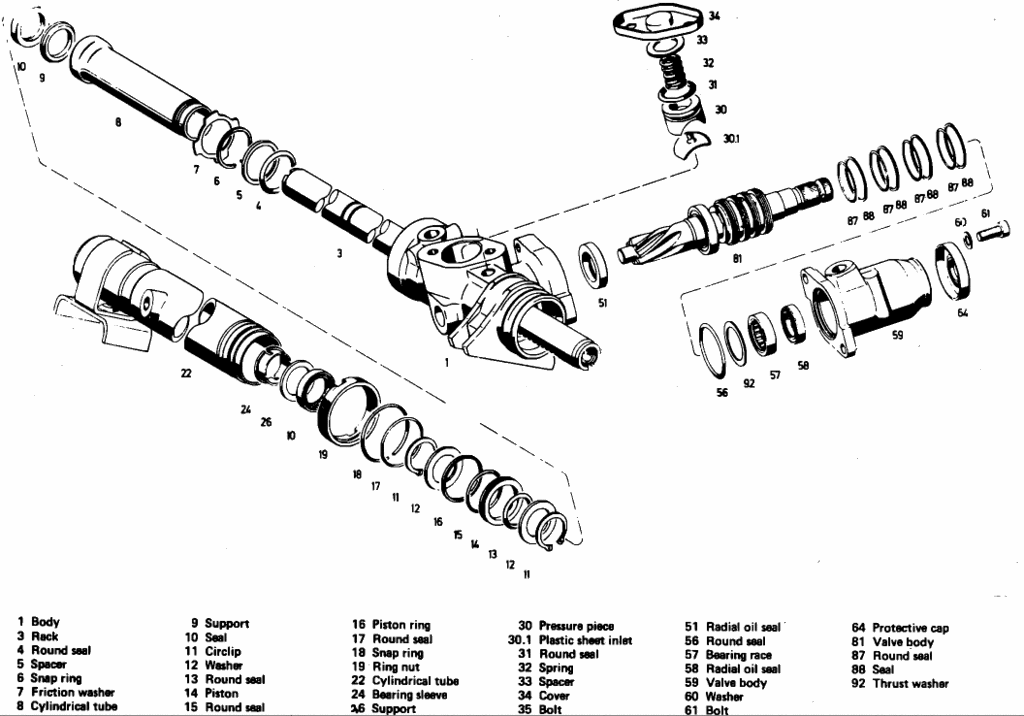
            3. Remove cap spring and spacer from rack adjuster pressure piece, Fig. 1.
            4. Thread self-tapping screw into pressure piece, then remove pressure piece along with seal and plastic insulator.
            5. Pull off cap protecting pinion steering spindle, then ensure rack is centered.
            6. Mark position of steering spindle, valve body housing and gear housing in relation to each other.
            7. Remove valve housing bolts, the housing and pinion assembly, and the housing O-ring.
            8. Remove pinion and thrust washer from valve housing, then the seal and bearing, noting installation position.
            9. Mark position of cylindrical tube (22), Fig. 1, in relation to gear housing, then loosen ring nut and remove tube.
            10. Withdraw rack assembly from gear housing, then remove piston assembly (11-14) and cylindrical tube (8), Fig. 1, from rack, noting installation position for assembly.
            11. Remove seal, spacer, snap ring and friction washer (4-7) from tube (8), Fig. 1, then drive seal and support ring out of opposite end of tube.
            12. Insert screwdriver through slot in bearing retainer in tube (22), Fig. 1, and drive remove seal and support ring.
            13. Remove seal (1) and snap ring (18) from end of tube (22), Fig. 1.
            14. Remove seal and piston ring from piston.
            15. Inspect components and replace any that are damaged, deformed or excessively worn.
            Assembly


            Replace seals and O-rings, and coat seal and friction surfaces with hydraulic fluid during assembly.
            1. Replace pinion shaft seal in gear housing, as needed, ensure seal is fully seated, then pack seal lip with grease.
            2. Install support ring into tube (8), Fig. 1, with chamfer facing inside of tube, then press seal into tube with open end facing out.
            3. Cover cuts in rack with cellophane tape to prevent seal damage, then slide tube (8) over rack and remove tape.
            4. Install friction washer, snap ring, spacer and O-ring on end of tube (8), Fig. 1.
            5. Install piston, washers, O-ring and circlips (11-14) on rack, Fig. 1, in position noted during disassembly.
            6. Install O-ring and piston ring on rack piston, then coat assembly with hydraulic fluid.
            7. Install support ring and seal (10) into tube (22), Fig. 1, ensuring seal is fully seated and that open end faces up.
            8. Measure and record thickness of snap ring (18), then install snap ring and new O-ring over end of tube (22).
            9. Insert rack into tube assembly (22), slightly compressing piston ring to prevent damage, and ensure tube is flush with friction washer (7), Fig. 1.
            10. Lubricate rack teeth with grease, then insert rack assembly into gear housing and tighten ring nut.
            11. Ensure rack teeth are properly positioned and that mounting flanges on tube and housing are aligned horizontally, then torque ring nut. Ring nut torque is dependent upon thickness of snap ring (18), Fig. 1, recorded in step 8. If snap ring is .098 inch thick, torque ring nut to 87 ft. lbs. If snap ring is .138 inch thick, torque ring nut to 108 ft. lbs.
            12. Install seals (88) and round seals (87) onto pinion valve body, ensuring round seals are positioned on top, then coat assembly with hydraulic fluid.
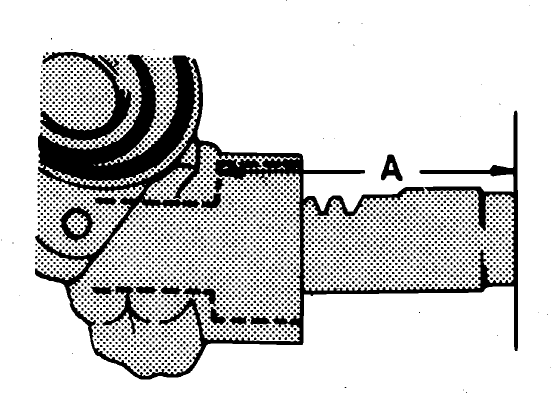
            13. Center rack in gear housing, ensuring distance between ends of rack and cylinder stops (A), Fig. 2, is 2.835 inches on both sides.
            14. Coat pinion splines with grease, then insert pinion into gear housing, ensuring marks made during disassembly are aligned.
            15. Install new oil seal in valve body housing with open end facing in, then install the bearing, ensuring both bearing and seal are fully seated.
            16. Position valve body seal on gear housing, install valve body housing ensuring matching marks are aligned. Tighten to specifications.
            17. Pack spindle cap with grease, then install cap, aligning tab on cap with slot in housing.
            18. Install new seal and plastic insulator on rack adjuster pressure piece, then insert assembly into gear housing.
            19. Install adjuster spring, spacer and cap. Tighten cap bolts to specifications.
            20. Install fluid lines, using new seals on union bolts. Tighten union bolts to specifications.
            21. Install rack boots, tie rod lock plates and tie rods, secure rack with suitable spanner. Tighten tie rods to specifications.
            22. Secure rack boots with clamps, install steering gear and check operation.
            Last edited by Maluco; 12-14-2006, 07:56 PM.

            Comment


              #7
              Thanks for posting that! I just rebuilt the th350 for my truck this weekend, I can't look at a exploded view without feeling a little sick!!

              Have you started on yours yet?
              1973 Bavaria

              Comment


                #8
                maluco, edit your post and select "disable smilies in text" please

                i found the instructions and blowup diag. rather useless once acutally diving into it. granted, there are a couple steps to be taken in order, but an idiot will figure it out w/o the chances of breaking anything.
                the hardest part is removal and installation of the seals w/o damaging sensitive parts. one of them (24, 26, 10 i believe) are impossible to remove without special tools. also, i recall that that seal is crucial to have if you have a leak on that side of the rack.
                one key to all this is to NOT dissassemble, put away for a month or so, and attempt to re-assemble. that was the hard bit for me. heheh

                item 30 is a tricky one, you have to find a wood or sheet-rock screw to fit in the hole and pull it out.

                FYI on making into a manual rack:
                -items 4, 5, and 6 are what are removed from area 3.
                -replacing any of the seals is a complete waste of time.
                -dont bother with steering fluid, just pack it with HD grease.

                Comment


                  #9
                  Originally posted by Q-ship View Post
                  Thanks for posting that! I just rebuilt the th350 for my truck this weekend, I can't look at a exploded view without feeling a little sick!!


                  Have you started on yours yet?

                  I wish I could say that I was done, or even started but, as I stated earlier, I am getting help from a tech, my cousin, who just opened a huge shop and therefore has work (that pays, pays more*) ahead of me. I will follow up for sure once we get through this though with any other info I can add.

                  Anyone else here done this?

                  Cheers,
                  Carlos
                  Last edited by Maluco; 12-15-2006, 06:11 AM.

                  Comment


                    #10
                    Just finished the rebuild, took me most of today to do it. #1, pay attention to placement/direction while you remove all the old seals etc.. other than that all it takes is patience and a couple of tools. A table vice is nice as well...

                    NOTE: almost all my seals were were dead....

                    PS Pump rebuild was very easy and quick.

                    Comment


                      #11
                      just a guess, but you didnt get the right side rack seal out.

                      Comment


                        #12
                        Originally posted by xLibelle View Post
                        just a guess, but you didnt get the right side rack seal out.
                        I removed/replaced every single seal/washer/spacer etc. on the rack without any real difficulty. Only the normal work it takes to remove them. A few love taps here and there, a flathead, bushing kit and that thin 90 degree hook tool is all the rebuild really called for. The seal on the inside/middle point of the rack was tricky though....

                        Comment

                        Working...
                        X