
I'm currently filming a "video build" for my e30, which consists of filming every step of every process that I perform on my 318is.
I figured it'd be helpful to others if I made a separate video on the strut housing shortening process as well as installing the Ground Control coilover kit for the front.
This is basically a general outline specific to my setup, but it should be helpful to some extent no matter what coilover kit you are running.
My setup is as follows:
- Ground Control kit - spring rates: 440f/650r
- Bilstein HD front strut inserts for a 325ix model e30
- 82-02 Camaro KYB Gas-A-Just rear shock (not mentioned in video)
Watch in 1080p and full screen for best quality. CLICK HERE TO VIEW VIDEO>> http://www.youtube.com/watch?v=8Q7xU...ature=youtu.be
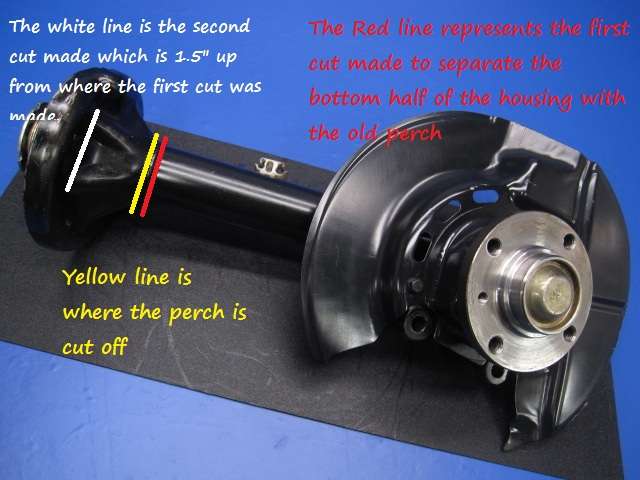
EDIT: Also, here is pretty helpful picture which someone sent to me in a private message to help them figure out where to make the cuts in the strut housing for the shortening process. In his case, he wanted to shorten the housings by 1.5".
In case you can't read the text well or are still confused, do the steps in this order:
1) Yellow line - represents where the original spring perch is cut off. Just above the weld
2) Red line - the first cut made to separate the housing. Just under the weld of the original spring perch
3) White line - the second cut made to determine how much you are sectioning out of the housing. This is up to you, just don't cut more than 2".
MORE IMPORTANT INFORMATION!
TO ANYONE WHO PLANS ON USING 325IX BILSTEIN HD's FOR THE FRONT: You should cut the inner bump stop in half before assembling everything. When viewing the shock insert, there is a metal "cap" on the very bottom. This can be separated from the yellow shock housing which reveals the internal bump stop. Use an exacto knife to carefully cut this rubber bump stop in half (so it is half it's original length). This will help prevent you from bottoming out. Mark from Ground Control made a video showing his way of popping them apart. Simply hold the strut tube, flip it upside down so the cap is facing up and the threaded shock shaft is facing the ground and give it a firm tap on carpeted ground to push the cap out. Here is the video to help visualize what needs to be done:
http://s1207.beta.photobucket.com/us...tml?sort=3&o=0
In my case, I didn't really feel comfortable hitting my new shock against the ground so I separated the metal cap from the shock housing with a small flathead screwdriver (or you can use a chisel or something similar) and that worked fine. Just took a little bit of effort and off it came. Once the bump stop is cut in half, just pound the cap back onto the strut body and you're good to go!
I figured it'd be helpful to others if I made a separate video on the strut housing shortening process as well as installing the Ground Control coilover kit for the front.
This is basically a general outline specific to my setup, but it should be helpful to some extent no matter what coilover kit you are running.
My setup is as follows:
- Ground Control kit - spring rates: 440f/650r
- Bilstein HD front strut inserts for a 325ix model e30
- 82-02 Camaro KYB Gas-A-Just rear shock (not mentioned in video)
Watch in 1080p and full screen for best quality. CLICK HERE TO VIEW VIDEO>> http://www.youtube.com/watch?v=8Q7xU...ature=youtu.be
EDIT: Also, here is pretty helpful picture which someone sent to me in a private message to help them figure out where to make the cuts in the strut housing for the shortening process. In his case, he wanted to shorten the housings by 1.5".
In case you can't read the text well or are still confused, do the steps in this order:
1) Yellow line - represents where the original spring perch is cut off. Just above the weld
2) Red line - the first cut made to separate the housing. Just under the weld of the original spring perch
3) White line - the second cut made to determine how much you are sectioning out of the housing. This is up to you, just don't cut more than 2".

MORE IMPORTANT INFORMATION!
TO ANYONE WHO PLANS ON USING 325IX BILSTEIN HD's FOR THE FRONT: You should cut the inner bump stop in half before assembling everything. When viewing the shock insert, there is a metal "cap" on the very bottom. This can be separated from the yellow shock housing which reveals the internal bump stop. Use an exacto knife to carefully cut this rubber bump stop in half (so it is half it's original length). This will help prevent you from bottoming out. Mark from Ground Control made a video showing his way of popping them apart. Simply hold the strut tube, flip it upside down so the cap is facing up and the threaded shock shaft is facing the ground and give it a firm tap on carpeted ground to push the cap out. Here is the video to help visualize what needs to be done:
http://s1207.beta.photobucket.com/us...tml?sort=3&o=0
In my case, I didn't really feel comfortable hitting my new shock against the ground so I separated the metal cap from the shock housing with a small flathead screwdriver (or you can use a chisel or something similar) and that worked fine. Just took a little bit of effort and off it came. Once the bump stop is cut in half, just pound the cap back onto the strut body and you're good to go!


Comment