

E30 Roll Bar
Since the bar didn’t need to be built to any sanction specs, I decided to use 1.5” OD, .095” thick ERW tubes. The norm for ERW is usually 1.5-1.75” OD .120” thickness; however, due to the additional support bars in the design and weight considerations, I chose to go with the lighter tubes.
First the main hoop needs to be bent. A mandrel bender has a slight learning curve and a few tests need to be performed before making your final bends. When lined up on the bender, the actual bend will starts a certain distance away from the initial mark, based on the tube thickness. After a bending a test section, it was calculated that the bend starts about .5 inches after the mark. Along with the 5.5 inch bend radius, this would have an impact on the bend marks. Rough dimensions were taken, and with the help of a little geometry, the bend marks were obtained.

Test bend was done with a .065 tube just to confirm my calculated dimensions. One must be minding of which end you start the bend. This slipped my mind as seen in the following picture.

Another piece of .065 was used and the dimensions needed little modification. I was ready to bend a stick of .095. Test fit went well.

At this point, the bender was no longer necessary. The remaining tubes would have to be notched and welded. Notching was done with a hand grinder and welds with a MIG welder. The cross bar is welded in, and test fitted to make sure it clears the front seats.


The cross bar is welded in, and test fitted to make sure it clears the front seats.


The remaining two tubes in the main hoop are notched, welded, and an unnecessary test fit is performed. Looks hot, I know. If I ever do another roll bar or cage, it’ll be buffed out nicely and clear coated.


Next, the main hoop mounting brackets had to be made. A harbor-freight-special mill was used for this task.


The floor pan was then drilled to match the plates.

One design consideration was the fact that I wanted the bar to be as far away from my head as possible. Therefore, the hoop would be welded at one end of the plate. To ensure that all the force didn’t have to be absorbed by only one end of the plate, a scab plate design was used so that I could have a bolt attach inside the tube. A nut is welded.

The mounting brackets had to be welded to the main hoop next, but to ensure proper fitment, they would need to be tack welded inside the car. Certain measures have to be taken on street cars to avoid burning any parts of the interior. A moist towel and heat/fire resistant material was used.


Once tacked, the hoop was removed out of the car and welded completely.


At this point, the rear bars needed to be made. Again, the plates were made on the mill, the body was drilled to match, and the brackets were tacked onto the tubes inside the car, using the same method as for the main hoop. To make it possible to remove the roll bar out of the car, the rear bars would have to be bolt on. Therefore, I made a cut about 3” from the end and would use a coupler that would have an OD approximately the same as the main tubes ID. A piece of 1.375” .12” DOM was ground down to 1.305” for this purpose. Two sections, 4” in length, were used, with 2” of engagement in both directions. One end was welded onto the main bar.


The entire assembly was then drilled on the mill for the bolt attachment.

Everything was lined up inside the car and tacked.

The entire assembly was removed and welded completely.


The weldmeister. My friend helped me with some of the welding and let me use his tools/shop.

Now, the surface rust had to be sanded off, using 220 grit sand paper, in preparation for paint.

It was time to paint. I chose to use duplicolor graphite wheel paint and clear coat, since I had a lot left over from painting my old 944’s wheels. It also matches the metallic paint of the car quite well.


Ready for installation. All the mounting points are pictured.


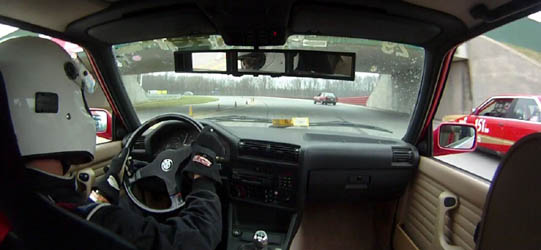
Installed.


Looks a lot better in person – lighting wasn’t the best for pictures.
Overall, the project ended up costing me about $110. I hope you guys found this interesting or learned something. Not a very difficult project but much more time consuming and requires more design considerations than expected.
Since the bar didn’t need to be built to any sanction specs, I decided to use 1.5” OD, .095” thick ERW tubes. The norm for ERW is usually 1.5-1.75” OD .120” thickness; however, due to the additional support bars in the design and weight considerations, I chose to go with the lighter tubes.
First the main hoop needs to be bent. A mandrel bender has a slight learning curve and a few tests need to be performed before making your final bends. When lined up on the bender, the actual bend will starts a certain distance away from the initial mark, based on the tube thickness. After a bending a test section, it was calculated that the bend starts about .5 inches after the mark. Along with the 5.5 inch bend radius, this would have an impact on the bend marks. Rough dimensions were taken, and with the help of a little geometry, the bend marks were obtained.
Test bend was done with a .065 tube just to confirm my calculated dimensions. One must be minding of which end you start the bend. This slipped my mind as seen in the following picture.
Another piece of .065 was used and the dimensions needed little modification. I was ready to bend a stick of .095. Test fit went well.
At this point, the bender was no longer necessary. The remaining tubes would have to be notched and welded. Notching was done with a hand grinder and welds with a MIG welder. The cross bar is welded in, and test fitted to make sure it clears the front seats.
The cross bar is welded in, and test fitted to make sure it clears the front seats.
The remaining two tubes in the main hoop are notched, welded, and an unnecessary test fit is performed. Looks hot, I know. If I ever do another roll bar or cage, it’ll be buffed out nicely and clear coated.
Next, the main hoop mounting brackets had to be made. A harbor-freight-special mill was used for this task.
The floor pan was then drilled to match the plates.
One design consideration was the fact that I wanted the bar to be as far away from my head as possible. Therefore, the hoop would be welded at one end of the plate. To ensure that all the force didn’t have to be absorbed by only one end of the plate, a scab plate design was used so that I could have a bolt attach inside the tube. A nut is welded.
The mounting brackets had to be welded to the main hoop next, but to ensure proper fitment, they would need to be tack welded inside the car. Certain measures have to be taken on street cars to avoid burning any parts of the interior. A moist towel and heat/fire resistant material was used.
Once tacked, the hoop was removed out of the car and welded completely.
At this point, the rear bars needed to be made. Again, the plates were made on the mill, the body was drilled to match, and the brackets were tacked onto the tubes inside the car, using the same method as for the main hoop. To make it possible to remove the roll bar out of the car, the rear bars would have to be bolt on. Therefore, I made a cut about 3” from the end and would use a coupler that would have an OD approximately the same as the main tubes ID. A piece of 1.375” .12” DOM was ground down to 1.305” for this purpose. Two sections, 4” in length, were used, with 2” of engagement in both directions. One end was welded onto the main bar.
The entire assembly was then drilled on the mill for the bolt attachment.
Everything was lined up inside the car and tacked.
The entire assembly was removed and welded completely.
The weldmeister. My friend helped me with some of the welding and let me use his tools/shop.
Now, the surface rust had to be sanded off, using 220 grit sand paper, in preparation for paint.
It was time to paint. I chose to use duplicolor graphite wheel paint and clear coat, since I had a lot left over from painting my old 944’s wheels. It also matches the metallic paint of the car quite well.
Ready for installation. All the mounting points are pictured.
Installed.
Looks a lot better in person – lighting wasn’t the best for pictures.
Overall, the project ended up costing me about $110. I hope you guys found this interesting or learned something. Not a very difficult project but much more time consuming and requires more design considerations than expected.


Comment