

The front suspension was completely overhauled shortly after I bought the car, including new rear shock mounts. I however, hadn't touched the rest of the suspension. Since it's been my goal to replace all the wear parts on this car, I've been collecting parts (very slowly) over the years and it's finally come down to getting it installed. After reading all the horror stories of stuck rear subframes, I did my best to prepare and get some extra hands to help.
The parts:

(some pictured, some not)
-Powerflex poly bushings for the subframe and trailing arms
-Goodridge stainless brake lines
-ATE super blue
-new rear rotors
-Mintex redbox pads
-Redline diff fluid
-Wheel bearings
First step was getting the car into the air and start removing the exhaust.

Then the fun began.... the driverside axle was stuck... bad. Broke 2 pullers and no matter of hammering was getting it out of there. Moved to the other side and the axle removed as it should with a puller. Good to know it wasn't just my technique ;)
I wanted to replace the bearings on the car since everything was nicely supported and using the bearing tool would be easy.. but it wasn't meant to be. So I pulled the subframe with axle:

And after all the horrible stories of seized subframes, this one came right out, what a relief!
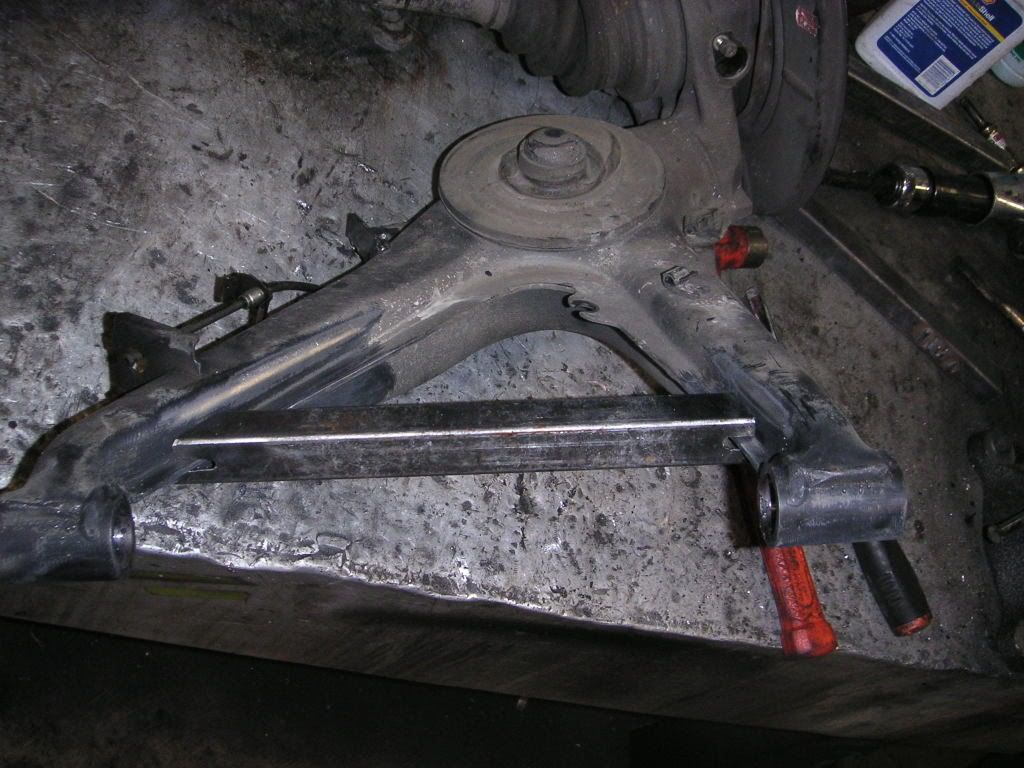
We got to the task of removing the trailing arms and getting it set up on the press to remove the axle:

But again, that axle was stuck... 12 tons of force, PB blaster and even heat did not work. It stayed stuck.
Now I wish I had a video of this... but I'll do my best to describe it: We remove upper portion of the press to allow some room to swing a sledge (see where this is going?) Since it was nicely supported, we held one small sledge on the axle and I went at it with the big sledge. 3 hits later and it's free!
Now one mistake I made was after the passenger side stub and bearing removed easily, I forgot about the C clip on the driver's side.. after some time wasted and frustration plus one mushroomed bearing puller plate, I found my error and the bearing came right out.
Then it came to pressing out the bushings, easy with a press. They came out in one piece:

Did a quick power wash of the subframe, put new diff fluid in and installed the Powerflex bushings.
These went in with no problem. Just a rubber mallet to drive in the metal sleeves and it's ready to install.
Here is a close up pic of how the bushings install since I couldn't find one when I was researching:

And ready to go in:

I've added a new diff seal to my to-do list for next time ;)
And a shot of it all back together with the brake components:

Now while the car is still in the air, I have to swap out the motor mounts and breather hose and she's back on the road :)
The parts:
(some pictured, some not)
-Powerflex poly bushings for the subframe and trailing arms
-Goodridge stainless brake lines
-ATE super blue
-new rear rotors
-Mintex redbox pads
-Redline diff fluid
-Wheel bearings
First step was getting the car into the air and start removing the exhaust.
Then the fun began.... the driverside axle was stuck... bad. Broke 2 pullers and no matter of hammering was getting it out of there. Moved to the other side and the axle removed as it should with a puller. Good to know it wasn't just my technique ;)
I wanted to replace the bearings on the car since everything was nicely supported and using the bearing tool would be easy.. but it wasn't meant to be. So I pulled the subframe with axle:
And after all the horrible stories of seized subframes, this one came right out, what a relief!
We got to the task of removing the trailing arms and getting it set up on the press to remove the axle:
But again, that axle was stuck... 12 tons of force, PB blaster and even heat did not work. It stayed stuck.
Now I wish I had a video of this... but I'll do my best to describe it: We remove upper portion of the press to allow some room to swing a sledge (see where this is going?) Since it was nicely supported, we held one small sledge on the axle and I went at it with the big sledge. 3 hits later and it's free!
Now one mistake I made was after the passenger side stub and bearing removed easily, I forgot about the C clip on the driver's side.. after some time wasted and frustration plus one mushroomed bearing puller plate, I found my error and the bearing came right out.
Then it came to pressing out the bushings, easy with a press. They came out in one piece:
Did a quick power wash of the subframe, put new diff fluid in and installed the Powerflex bushings.
These went in with no problem. Just a rubber mallet to drive in the metal sleeves and it's ready to install.
Here is a close up pic of how the bushings install since I couldn't find one when I was researching:
And ready to go in:
I've added a new diff seal to my to-do list for next time ;)
And a shot of it all back together with the brake components:
Now while the car is still in the air, I have to swap out the motor mounts and breather hose and she's back on the road :)


Comment