
Hi. Well before I get to the good stuff I guess I'll introduce myself. My name is Nelson, I'm from Miami, FL and I'm an automotive and motor sports photographer. I've had quite a few cars in the past, mostly japanse...mostly Nissans, but never anything european. I've lurked/researched/read this forum for most of the past year and feel like I'm fairly ready to get acquainted with the community. My friend Guillermo (e30gangsta) put me on to this forum, and every since I've visited daily :D
Ok enough babble, on to the car. It's a 91 318i Sedan, originally I got this car in a trade. I traded a Laguna Green 325i vert that I didn't own for long, mainly because the vert was automatic and had a lot of rust, plus I've always liked sedans and when I came across this offer, I happily took it.
Quick pic of the vert...looks clean....but booooyy was it rusty.

Ok, so then I traded that for the sedan I'm driving around now. That was about 8 months ago, for a while I wasn't too interested in modifying the car, at one point I almost sold it :(, good thing I didn't because I've become obsessed with E30s. So fast forward to this past weekend I decided to slowly start making progress with the car.
First problem that needed to be addressed:
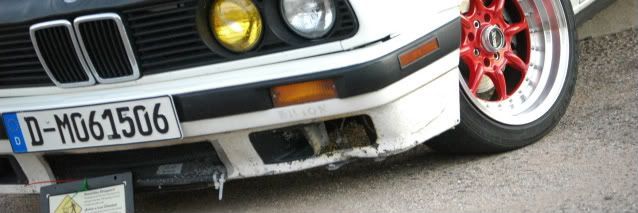
Previous owner cut the springs on OEM shocks, so the shocks were blown and the car was slammed, causing me to bust three oil pans in a span of two months.

So then I decided, fuck that I'm parking the car until I install proper suspension. Ideally I wanted a set of BCs, but the car has a couple more issues to address before I spend a grand on suspension, so I decided to take a more cost-efficient approach to address the problem and be able to actually drive the car. After reading the entire Suspesion Techniques springs thread, I decided to order a set along with GR2 front inserts and rear Camaros along with a set of E90 tophats, new bumpstops and bellows. Big thanks to Steve from Blunttech for the parts.

And the work commenced! Comparrison between rear cut springs and ST units.

Followed Grippy's advice from his blog and went to Home Depot to purchase the 3/8 threaded inserts for the rear camaros, they fit tight and secure, and since they're threaded, there's no fear of the inserts falling out.


And the rear is done! Took a whole 15 minutes:yawn:

Unfortunately Miami weather really sucks in the summer, it's either stupid hot or raining. I don't mind the heat....but the rain stopped me from doing anything else to the car for the day.

Another aspect of the car that needed to be addressed was the interior. Now, I'm a really big fan of all black interiors, but it's really hard to find a complete set down here in the junkyards and getting it on the private sector is getting pricey. So I did the next best thing and decided to paint my interior parts. Starting with the seats.
First I cleaned them very thoroughly with degreaser and dried them. Also let them air dry for a full day.

Clean and ready for paint.

Finished product. Paint sticks pretty damn good, I've been driving the car for a full week now and there's no sign of chipping or paint rubbing off. Have to let a least a full day for the paint to fully dry and stick. Pretty happy with the results.

Gave the same treatment to the carpet, it was already "painted" black by the previous owner, but they didn't do a very good job since the paint didn't stick and was rubbing off.

After, still gotta get a new glove box and dash. Little by little.

So then Sunday, decided to start working on the front struts. Took out the housings and cleaned them up really good. Had to anyways since all the oil inside the housings had to come out.

While the housings dried I decided to paint the wheels silver again since I didn't like the black before.

Then I put the front suspension together, ready to go back on the car.

Done for the day, springs are still settling. So I guess it'll go down a bit more, but I really don't car and wish it didn't since I'm really happy with the height as it sits. Car is dirty in this picture, I had literally just finished installing everything back on it. Still deciding what to do about paint, whether I should plasti-dip it red or wait longer for a legit paint job.

It's a work in progress, and still needs a lot of work to be decent but at least it's moving in the right direction. Just got these smoked depo smileys from DTMFiberwerkz yesterday, still have to order HIDs and new fog lights in order to wire these up.

Before that, I gotta change out the dreaded rear wheel bearings along with the brakes and motor/tranny mounts. I'll post updates soon. Thanks for looking :)
Ok enough babble, on to the car. It's a 91 318i Sedan, originally I got this car in a trade. I traded a Laguna Green 325i vert that I didn't own for long, mainly because the vert was automatic and had a lot of rust, plus I've always liked sedans and when I came across this offer, I happily took it.
Quick pic of the vert...looks clean....but booooyy was it rusty.
Ok, so then I traded that for the sedan I'm driving around now. That was about 8 months ago, for a while I wasn't too interested in modifying the car, at one point I almost sold it :(, good thing I didn't because I've become obsessed with E30s. So fast forward to this past weekend I decided to slowly start making progress with the car.
First problem that needed to be addressed:
Previous owner cut the springs on OEM shocks, so the shocks were blown and the car was slammed, causing me to bust three oil pans in a span of two months.
So then I decided, fuck that I'm parking the car until I install proper suspension. Ideally I wanted a set of BCs, but the car has a couple more issues to address before I spend a grand on suspension, so I decided to take a more cost-efficient approach to address the problem and be able to actually drive the car. After reading the entire Suspesion Techniques springs thread, I decided to order a set along with GR2 front inserts and rear Camaros along with a set of E90 tophats, new bumpstops and bellows. Big thanks to Steve from Blunttech for the parts.
And the work commenced! Comparrison between rear cut springs and ST units.
Followed Grippy's advice from his blog and went to Home Depot to purchase the 3/8 threaded inserts for the rear camaros, they fit tight and secure, and since they're threaded, there's no fear of the inserts falling out.
And the rear is done! Took a whole 15 minutes:yawn:
Unfortunately Miami weather really sucks in the summer, it's either stupid hot or raining. I don't mind the heat....but the rain stopped me from doing anything else to the car for the day.
Another aspect of the car that needed to be addressed was the interior. Now, I'm a really big fan of all black interiors, but it's really hard to find a complete set down here in the junkyards and getting it on the private sector is getting pricey. So I did the next best thing and decided to paint my interior parts. Starting with the seats.
First I cleaned them very thoroughly with degreaser and dried them. Also let them air dry for a full day.
Clean and ready for paint.
Finished product. Paint sticks pretty damn good, I've been driving the car for a full week now and there's no sign of chipping or paint rubbing off. Have to let a least a full day for the paint to fully dry and stick. Pretty happy with the results.
Gave the same treatment to the carpet, it was already "painted" black by the previous owner, but they didn't do a very good job since the paint didn't stick and was rubbing off.
After, still gotta get a new glove box and dash. Little by little.
So then Sunday, decided to start working on the front struts. Took out the housings and cleaned them up really good. Had to anyways since all the oil inside the housings had to come out.
While the housings dried I decided to paint the wheels silver again since I didn't like the black before.
Then I put the front suspension together, ready to go back on the car.
Done for the day, springs are still settling. So I guess it'll go down a bit more, but I really don't car and wish it didn't since I'm really happy with the height as it sits. Car is dirty in this picture, I had literally just finished installing everything back on it. Still deciding what to do about paint, whether I should plasti-dip it red or wait longer for a legit paint job.
It's a work in progress, and still needs a lot of work to be decent but at least it's moving in the right direction. Just got these smoked depo smileys from DTMFiberwerkz yesterday, still have to order HIDs and new fog lights in order to wire these up.
Before that, I gotta change out the dreaded rear wheel bearings along with the brakes and motor/tranny mounts. I'll post updates soon. Thanks for looking :)


Comment