-
Anytime your in town once its running just hit me up. Always more than welcome to drop by Scott.
__________________________________________________ _________________________________
__________________________________________________ _________________________________
One more pic of the almost finished product. I'll snap some of my own pics tomorrow when I have a chance. Just leave this here to marinate, can't wait to drive this car again.

Leave a comment:
-
Well not much in the way of updates. Won't have the car for another 2 weeks give or take. Gives me time to finish up the motor stuff.
With that being said I'll let the pictures speak for my heightened anxiety for about an hour till I could put things back on flat ground.

Finally swapped the pan on that Matt did for me, the clearance of before and after are crazy.


The pilot bearing I almost completely overlooked and forgot to order. Wondered why something didnt look right...

Slapped together a new thermo & water pump for good measure. Metal impellers all day baby.


This happened the other night outside my work. Definitely a good way to burn 15 mins with my co workers. Check your fuel lines people, seriously.

Also I'll just leave this here for now since it's not my picture. It's far from done but gives you an idea of whats to come...
 Last edited by DIIRTY-30; 02-29-2016, 04:15 PM.
Leave a comment:
-
I had him cut the circle for my spare wheel well since the person who was supposed to do it for me flaked hardcore. I'll most likely have him finish welding my shifter, carrier, and eventually exhaust. Definitely just became my go-to guy though, going to drop by later tonight and see the finished product.
On a side note, hopefully the hardlines will be started tomorrow and brakes checked and addressed for safety. After that, just a matter of towing it home and getting a driveshaft.
I was hoping to have the flywheel & oil pan swapped out by today but still kinda limited due to the thumb issue lol..Leave a comment:
-
NP. Stoked to see it completed!
Ask him about dead-pedals and other trinkets you might like fab'd.
He offered me to make one as well as my delete panels, but I haven't had time to go back and wanted to take a crack at it myself.Leave a comment:
-
Nailed it! Its funny, turns out I met Allan like 2 yrs ago; as soon as I saw the touring I was like wait a second.. Anyhow thanks again for the heads up Abbi, appreciate it man!
Nope not me; I like cutting shit up with sawzall's, they should hire me as a spokesperson lol.
Aside from that I've had an idea for the interior that I was tossing around for a while. Just more of an excuse to execute it now. Afterall, this car isn't seeing another owner for a long time if ever. It's not perfect but I spliced, diced, and glued it back together, & I take great pride in it.
Thanks man! Yeah def should have gotten stitches haha. Busted it open atleast twice a day since. But I don't even wanna try and figure out how I did it, sanding the engine bay, slipped and caught myself on the right piece of metal. Wasn't anything a good 6 oz of whiskey couldn't take care of.Leave a comment:
-
Ouch! That thumb! How did you manage to do that?
Looks great! I haven't been here in a while and its coming along fabulously!Leave a comment:
-
-
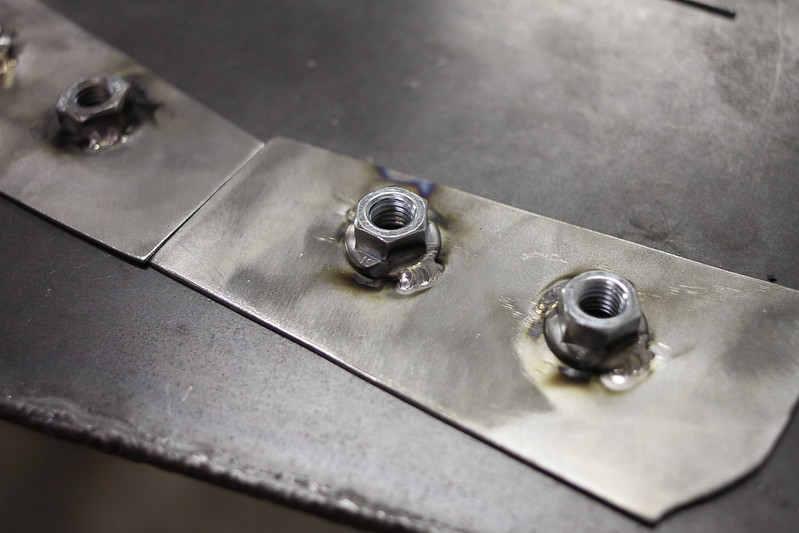
Thanks for the pictures and additional info! Actually I really like this idea, maybe better than riv nuts since like you said it distributes the load over more of the thin sheet metal. Also if I screw it up somehow I can just make another plate. Dammit... ordered the riv nut tool this morning overnighted
Leave a comment:
-
I spent a lot of time staring at JGood's, Gary's M3, & pantelones' supports; this was my best solution considering how limited the access is. Stripping the paint down just to get a good weld would be such a PIA lol. I did the same piece for the outside of the fender for the top section, and made the smaller piece for inside the frame rail. Figured this would be the best solution to distribute any stress from vibrations & also easier to work with than washers ha. I considered doing riv-nuts but figured this would be a bit easier since I've had to remove it atleast 5 times now.
The part looks similar to this : (Stolen from Pantelones thread)
Leave a comment:


Leave a comment: