Announcement

Collapse
No announcement yet.

E30 from Sydney, Australia.

Collapse
X
 
  • Filter
  • Time
  • Show
Clear All
new posts

    E30 from Sydney, Australia.

    Hi guys, have been scouting the forum for awhile now and finally decided to throw up a thread.

    Couple months ago, i picked up a zinnoberrot '89 BMW E30 318i manual. I kind of loss interest in my E90 and decided an E30 would be a fun change.


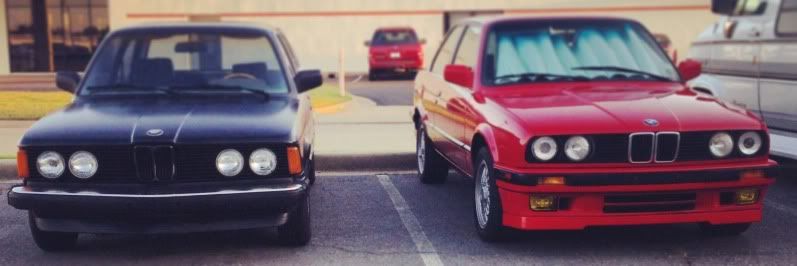
    Found it on carsales(online used car site) late one Saturday night and woke up early the next morning to arrange to look at it. Luckily it wasnt too far from my place. The car was in decent condition, took it for a drive. Since its a 1989 car, it had some faults like the gearknob was in piece, free play in the steering wheel (more on that later). But that said, came back from the drive and the deal was made and i drove home with an E30. The paint looks pretty good, abit faded in some areas but buffing will bring it back to life. It came with a faded genuine MtechII rear spoiler (which i hated, lol), was missing a rear bumper trim and the centre caps off the basketweaves.

    Here it is


    #2
    I had purchase the car at pretty much the worse time. Uni was getting tough with so many assessments due so i decided to do the right thing and not touch the car till it was over. That didnt stop me collecting the parts though haha.

    Firstly, i cleaned it up. Cleaned up the engine bay, steam cleaned the interior to the best i could. The rear seats were the worst and i pretty much gave up on them lol.


    I then took apart the mtechII rear spoiler and just fitted the bottom half. Apparently its a common mod in Indo but it just didnt look right to me. Kept it like that for awhile till i sold it.


    The first actual mod i bought was an iS front lip. The lip it originally had was the i lip which was snapped and missing a piece. Luckily the clips were still in good condition so the iS lip was just a direct fit. Check out the stock ride height. CRAZY!


    Next up were recaro seats. These came out of a Proton Gti and came complete with front and rear seats. My goal was to fit the front seats, and mod the rear to fit into the E30 (more on that later). Note the rear seats are the fold down type so are split.


    I couldnt help but fit the front seats. Theyre abit dirty and abit worn on the driver side bolster but i was happy. From there i just drove it pretty much as it was till my last exam was over.

    Comment


      #3
      Next up was addressing the stupid gear knob. Seriously it was in pieces and so dangerous, it would just lift off when i try to change gears fast. I had to pull back the leather gaitor thing and superglue the pieces together and also put some electrical take on the shifter itself to hold the gearknob down since it was loose lol. It looked ugly so i had to get something to replace it. I never knew how expensive a gearknob would cost farout lol. So i went and bought a cheapie, although it isnt the same style and probably the model that is fitted on the 1 series hatches, it did the job and was only $10:)

      old:


      new:


      By now, i hadnt touched the car for ages till exams were over. Once they were done, full speed ahead!

      I forgot to mention the free play in the steering wheel. I thought the steering column was shot and wasnt keen about having to get a new one but lucky i found out it was just the steering guibo thing and i fixed that asap! $40 and i could finally drive properly without crapping myself trying to drive next to a truck haha

      Next up was to replace the worn and torn steering wheel. I replaced it with a Nardi Classic, such a great wheel.


      You may have noticed it is missing the trim under the dash (again more on that later).

      One thing i needed to do badly was to lower the car. Lowering E30s isnt as easy as lowering an E46. Its not a matter of unbolt the shocks from the hub, E30 suspension needed to be welded. This meant, you would have to cut down your OEM strut housing and weld on the new coilovers. Although no all brands had to this like the higher end, KW, GC (if bought complete off them) etc. I thought about going the cheap route and pay only $450 for some JOM 'coilovers' which were pretty much shock replacements and a height adjustable spring replacement but then i decided i might aswell do it properly and that i did. I ended up getting some BC BR Coilovers which were professionally tig welded onto some hubs. Although owning a welder myself, this is one job i didnt not want to DIY:


      Reason why i chose BCs was because i had them in my E90 and i loved them. Best bang for buck coilovers. Also because they were proper true coilovers with independent height adjustment.

      So exams had ended and i attemped to fit the coilovers. No go! i didnt own a socket big enough to remove the stock hub nut then i had to put it all back together again:(


      Because purchasing the coilovers, i knew i would have troubles fitting the stock wheels when full slammed and so spacers would be needed upfront. This was the test with 8mm spacers and slightly raised coilovers.

      Comment


        #4
        So onto fitting the coilovers. The rears went in with ease and was done in under 30 mins.


        *that reverse rake;)

        Onto the front coilovers. HA! what a fking joke. A few of you guys probably saw me complaining on facebook one day about it. I couldnt take one of balljoints off, snapped one of the tools, bought new tools and still nothing. People were telling me to hammer the crap out of the hub but still nothing.


        I was pretty pissed at it. The car was on stands for a couple of days and i was about to give in and take it to my mechanic till a mate told me to hammer it harder. I realised i wasnt yanking down on it while hitting the hub haha..with a couple of hits, i finally got it off!


        Comment


          #5
          The paint was slightly faded and so i tried out Meguiars Ultimate Compound. It actually worked quite well. However i didnt do the whole car since i kind of done it on a really hot day and the polish was drying too fast but here is one pic that shows it quite well. Note the left side is the area where the compound was applied. Still needs another go but i was quite happy with the result


          Next up was the bumpers. As you can see the bumpers are all black and even the front is like grey lol. So i decided to spray them:)
          Took the bumpers apart


          I did some repairs where there were cracks or indentations in the bumpers


          Prepped the bumpers


          Mixed some paint


          First coat


          Couple more


          Lets clear that sh*t


          Sanded back and buffed

          Comment


            #6
            So remember when i said i was going to modify the proton rear seats onto the E30 rear. See how dirty they are:


            I headed over to lincraft and bought some material and bam!


            Onto the back bit, abit of cutting here and there


            All done! although its not 100%, im happy with it and it looks better than the dirty oem seats. Fitted:


            Also, remember when i said i was missing the under dash trim? i purchased one second hand from the wreckers and it was in bad condition. It is made of cardboard lol and it had cracks so i got it wrapped in black vinyl fabric. It had a like a trim/area apparently for headlight adjustment but it didnt come with the switch and i dont think mine had the adjustment so i had to fill the gap somehow...


            Abit of trimming


            Hooked up:


            Comment


              #7
              I got my missing parts off a friend of mine who has everything E30. I was going to weld up the holes from the previous spoiler but he was telling me that i wouldnt get it completely smooth and i guess i couldnt be bothered so i just got a red spoiler off him. However the red wasnt the same red so i've got to repaint it.


              I also fitted the painted bumpers


              I had to fix the mouldings as some were scratched and had like battle scars and used some bumper black paint


              Then fitted it


              WHAT A DIFFERENCE the red paint does:)

              Fitted my Agentz sticker


              Finally, i modded the trunk light from single trunk light on the boot lid to two lights fitted under the rear parcel shelf.

              Comment


                #8
                Lastly, onto the wheels.

                Here they are.

                Genuine BBS RS slant lips RS180 and RS247


                The specs end up being 16x7.5 -6 and 16x8.5 -6

                I fitted 195/45/16 on the fronts and 205/45/16 on the rears. Before even driving the car, i knew that the 205s would scrub.


                First, i tried rolling the guards as much as possible. Since E30s dont have any camber adjustment in the rear, the only way of getting camber is by natural camber meaning i would have to go lower and lower to get the right about.

                So i changed up the rear tyres to 195/45/16s to get more clearance.


                Took it out for a drive for the first time in about a month lol. Was awesome but i set the dampers on all fours to max stiff so i was bouncing everywhere lol.


                So went back and changed the damper and decided i wanted to go lower.

                This was with no thread piece and no collars. As you can see, it was abit too lower. Also that particular wheels needs to be refurbed as the clear is peeling.


                But yeah, ive still yet to get the perfect ride height but it sits like this atm

                Comment


                  #9
                  Great work restoring her so far!

                  Wheels certainly make the car.


                  Go here be happy!

                  Ratchet Garage e30 V8 build.

                  Comment


                    #10
                    holy f what a transformation! keep up the good work

                    Comment


                      #11
                      Daaaam looks real good, mate!
                      IG: @_j.wn

                      Comment


                        #12
                        Amazing! Great work and love all the options you went with!

                        Comment


                          #13
                          Hell yeah, awesome job so far man.

                          Comment


                            #14
                            looks great man, love it!
                            Instagram: @dillonmakar

                            Build thread HERE

                            Comment


                              #15
                              I like it a lot. More on that interior piece that is holding the volt meter. I dont believe I have that piece.
                              View my build thread. http://www.r3vlimited.com/board/showthread.php?t=287724

                              Comment

                              Working...
                              X