-
Check out my Alpine's DEAD build thread http://www.r3vlimited.com/board/showthread.php?t=348571
E36 M3 Build thread http://www.m3forum.net/m3forum/showthread.php?t=597637 -
Small update. Well. Actually it's pretty significant. This past weekend I pulled out my old cracked dash, installed a crack free dash I sourced for mega cheap along with a new center console section. (I flocked the old center console and cup holder setup and ended up not really liking it. If anyone wants my flocked center console and cup holders, they're for sale! PM me if interested. Anyway, here are some shots of the new dash, and console. I spent quite a bit of time cleaning and moisturizing everything :)
Old dash:


Old dash out!

New dash in after hours of trying to get it to fit right and massaging the little things like the glovebox and firmest against the window seal :)

Done! Ish...
Like many others, I managed to scrape up the driver side A pillar vinyl, so I decided to do something fun for a little while before I'm able to source another set. Opinions? I might just leave them! Thy look pretty cool matching my boots and white car.


At the Catuned open house two weeks ago with the crew!

Took some shots at the spot that started my automotive photography career in Davis! (By career I mean hobby...) Funny story, I feel one of my great creative/photography accomplishments have been to have my photos of my buddy's VW bug featured on petrolicious! Still stoked over that :)


One of the shots that got onto petrolicious!

In other news, My interior has some big-ish changes coming soon! Stay posted for updates in the next few weeks.
I'll see you Bay Area natives this weekend at cars and coffee SF! Be there or be square!
Check out my Alpine's DEAD build thread http://www.r3vlimited.com/board/showthread.php?t=348571
E36 M3 Build thread http://www.m3forum.net/m3forum/showthread.php?t=597637Comment
-
I scraped up my driver side a pillar when I did my dash. I like what you did for a temporary solution. But I would stick with oem.How to remove, install or convert to pop out windows
http://www.r3vlimited.com/board/showthread.php?t=297611
Could be better, could be worse.Comment
-
Check out my Alpine's DEAD build thread http://www.r3vlimited.com/board/showthread.php?t=348571
E36 M3 Build thread http://www.m3forum.net/m3forum/showthread.php?t=597637Comment
-
Less shitty mirrors thanks to my buddy Jacob and two hours of hand buffing/polishing! :D
Old:

"New":

And I decided to go back to the red velocity stack, gives it a little more pop.

Check out my Alpine's DEAD build thread http://www.r3vlimited.com/board/showthread.php?t=348571
E36 M3 Build thread http://www.m3forum.net/m3forum/showthread.php?t=597637Comment
-
Awesome build so far. I too have an IS and have been building it over the last few years. Just finished the turbo build on it. Was interested in the velocity stack option. First where did you get it. Second, what modifications to the headlight assembly is needed and how easy is it to go back to a headlight? Interested in the other side seeing as the turbo sits right there. But i'm not sure if ill dig it so I wanted to know if its easy to go back. Lookin good though ill def keep tabs.
Comment
-
Hey nick, you can find them almost anywhere. I measured the headlight to be roughly 6" OD. So I found mine on eBay with a 6" OD and 3" ID to match the airbox. I simply removed the high beam and left the frame in place, and fitted the V-Stack in place. Secure however you please: duct tape, bubble gum, supa glu, etc. I used 3M mounting tape (the thick grey 5lb stuff, I believe the part number is 4010). Totally reversible. That's why I didn't use a more permanent mounting thread like screws and brackets.
Check out my Alpine's DEAD build thread http://www.r3vlimited.com/board/showthread.php?t=348571
E36 M3 Build thread http://www.m3forum.net/m3forum/showthread.php?t=597637Comment
-
Cool thanks. I might have to try one out. The only thing is I wouldn't have a filter if I connected it straight to the turbo inlet. I could just leave the elbow and filter in place and the stack would just be allowing more air into the general area of the filter... Worth a shot. But its nice to be able to go back to normal with ease.Comment
-
Check out my Alpine's DEAD build thread http://www.r3vlimited.com/board/showthread.php?t=348571
E36 M3 Build thread http://www.m3forum.net/m3forum/showthread.php?t=597637Comment
-
I just stumbled upon this thread via a Google search and read the whole damn thing. I love what you've done with this car!Comment
-
Check out my Alpine's DEAD build thread http://www.r3vlimited.com/board/showthread.php?t=348571
E36 M3 Build thread http://www.m3forum.net/m3forum/showthread.php?t=597637Comment
-
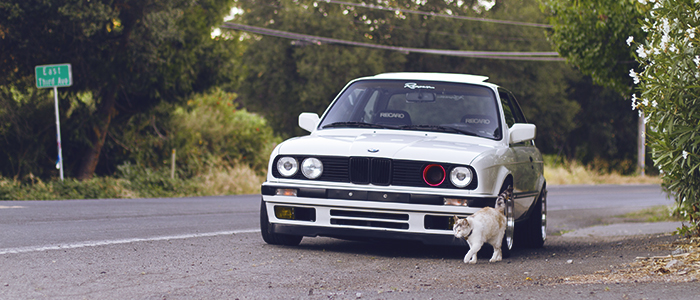
Installed some new smoked depo smileys with new H1 bulbs! Wired up the city lights with pigtails I made from old side marker bulb sockets since I have euro trim deleting the side markers. Plug and play city lights with no invasive action on the wiring harness!
Headlight porn! NSFW! ;)


Check out my Alpine's DEAD build thread http://www.r3vlimited.com/board/showthread.php?t=348571
E36 M3 Build thread http://www.m3forum.net/m3forum/showthread.php?t=597637Comment
-
Comment
-
I follow you on Instagram and to see all the work that goes on behind the scenes is inspiring, the subtle touches of class and attention to detail you put into this is amazing. Smoked headlights look amaziiiing BTW.Comment


Comment