

Glad you went with keeping the m20. I wanna get mine in as good of shape as yours, but I'm waiting until I graduate and get my own place with a garage.
-
-
Check out my Alpine's DEAD build thread http://www.r3vlimited.com/board/showthread.php?t=348571
E36 M3 Build thread http://www.m3forum.net/m3forum/showthread.php?t=597637Comment
-
I picked up a set of BBS RS005's earlier this year before the end of the summer semester. Over the past few months I have fully restored them and widened them from 16x7 to 16x9 squared. Here was the process!
Picked up the wheels and removed the balloon tires.


Heated up the wheels in the oven to soften the silicone.

Disassembled and stripping the lips

Started to wet sand and polish the lips (180-320-500-800-1000-1500-2000 grit process). Then followed by polishing compound with a sewn wheel. Then a higher shine polish with a flappy wheel. This process was very tedious. The first two lips took a total of 10 hours or so from stripping the clear to wiping them down with a microfiber.
I found that I could use my ceramics wheel to spin the lips and speed the process. The last two lips only required about 6-7 hours or labor!


Sent the 2" deeper barrels, faces, and waffles to be media blasted and powedercoated in a metallic silver finish! They look amazing in the light.

Machining off excess powdercoat to ensure proper fitment.

Assembling the wheels with new chrome plated hardware from threepiece.us and torquing them to spec.


I decided to just transfer my 215/40/16 tires to save some money. My friend Javier recommended a small shop a town over from Napa with a high attention to detail that would be willing to transfer the tires and do a stretch. Not a single mark!

Mounted on the car!


I plan to eventually pick up a set of half or quarter height hexes. But in the mean time, I decided to spray these full height hexes black. The SEM base coat came out great, but the duplicolor clear resulted in a rough texture from a final dusting layer. I plan to strip them this weekend and respray them with SEM trim black. Then, I will install the NOS gloss black/gold 3D BBS logos I recently purchased to finish off the look!
Check out my Alpine's DEAD build thread http://www.r3vlimited.com/board/showthread.php?t=348571
E36 M3 Build thread http://www.m3forum.net/m3forum/showthread.php?t=597637Comment
-
Looks good. In my opinion it needs meatier tires.How to remove, install or convert to pop out windows
http://www.r3vlimited.com/board/showthread.php?t=297611
Could be better, could be worse.Comment
-
sexy wheels, but the balloon tires were so much more 80s! did you clear coat the lips or any type of protective layer?
Comment
-
Thanks for the input! The balloon tires were way oversized and wouldn't fit in the wheel wells. (Think 225/55/16's on a small e30). While my 215/40's aren't ideal, and are a little undersized; it's better than nothing. I intend to eventually up the size to a 215/45 or a 225/45, but for now this will be adequate. Stretchy stretchy.
I don't plan to rip on the mountain roads or auto cross with these wheels anyway, so I really have no concern about the stretch.
I didn't coat the lips! And most refinishing companies don't. Since they're aluminum, they won't fade or dull. That also allows me to go back and polish out any scratches they might acquire over time. I have some ceramic coating on the way to seal them up!
Check out my Alpine's DEAD build thread http://www.r3vlimited.com/board/showthread.php?t=348571
E36 M3 Build thread http://www.m3forum.net/m3forum/showthread.php?t=597637Comment
-
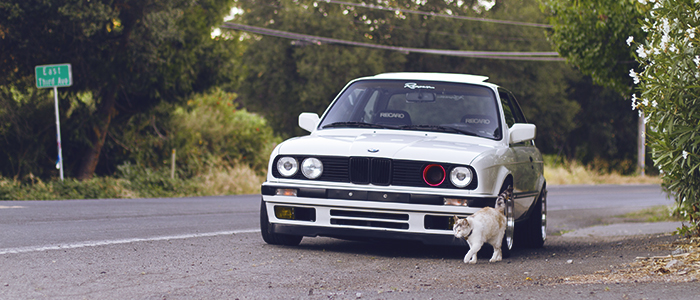
Hello! White late model coupe from the bay
It's the little things!
Last weekend I ordered a new VIN coded ignition tumbler. Since I bought the car, it's had two different keys; one for the doors/trunk, and one for the ignition. I figured it was replaced at some point due to a broken key or something, so I ordered a coded lock cylinder from the stealership for a whopping $133 after CCA discount.
Swapping it out was a breeze with a small picture hanging nail from a generic kit. Out in minutes!
Packaging

Old tumbler

It's so OCD satisfying to only have one key for the entire car!


I also picked up a red46 skid plate from a buddy of mine for a great deal! Brand spankin' new as well!
Underside still looking fresh after 400 miles


That about wraps it up for this update. Maybe I'll get to stripping and painting the BBS hex nuts tomorrow after work.
 Last edited by Toodaloo; 10-22-2016, 10:34 PM.
Check out my Alpine's DEAD build thread http://www.r3vlimited.com/board/showthread.php?t=348571
E36 M3 Build thread http://www.m3forum.net/m3forum/showthread.php?t=597637Comment
-
aww, i need a new ignition key too - sad to see that price...
also, that front wheel looks spectacular without the cap on it.Comment
-
Well, I believe the key itself is <$30, however the tumbler is the pricy part. Since the jets have no chip like new cars, they're not too terrible to the wallet like new cars.
A few of you requested a photo of the cup holder post paint, here you go!
I used SEM trim black for the durability and nice finish! It came out well! However, it's not a perfect match to the OEM vinyl. I might do something about that...

Check out my Alpine's DEAD build thread http://www.r3vlimited.com/board/showthread.php?t=348571
E36 M3 Build thread http://www.m3forum.net/m3forum/showthread.php?t=597637Comment
-
Some eye candy for you night owls.


Check out my Alpine's DEAD build thread http://www.r3vlimited.com/board/showthread.php?t=348571
E36 M3 Build thread http://www.m3forum.net/m3forum/showthread.php?t=597637Comment
-
The passenger side of you front bumper is crooked and needs aligned. Other than that is looks awesome.How to remove, install or convert to pop out windows
http://www.r3vlimited.com/board/showthread.php?t=297611
Could be better, could be worse.Comment
-
:thankyou:
Thanks for pointing that out! Can't believe I haven't noticed that in over two years of ownership.
Aligning my bumpers has been on my list for a long time. The passenger side shock was pulled out a bit from loading the car on a flatbed prior to my ownership, and the rear passenger was pushed in from backing into one of those yellow parking light barrier poles. Hense, why I fixed and resprayed the rear bumper and attached brand new OEM euro trim a while back.
I would rather have a body shop make the adjustments and get them sitting perfectly since I don't have the tools/knowledge/guts to adjust the bumper shocks.
Bodyshop = $$$
Student = not so much $$$
Check out my Alpine's DEAD build thread http://www.r3vlimited.com/board/showthread.php?t=348571
E36 M3 Build thread http://www.m3forum.net/m3forum/showthread.php?t=597637Comment
-
If your brackets just need adjusted a bit, you can do it yourself for free and just a little bit of time. It depends on how the shocks are like you said though, but the fine tuning is with the plastic brackets on the sides near the wheels. You just loosen the bolts and adjust the position of the brackets to raise or lower how the bumper sits. It might be worth a shot to see if you can fix it before dropping money on it. If your shock is bad I'm sure you could get one cheap from a parts yard and swap it in.
Cars is looking great!Comment
-
Thanks for the input! Unfortunately two of the shocks (one front one rear) are pulled out/pushed in. Very noticeably actually :/. I've removed and installed the bumpers countless times and adjusted the brackets with little luck. Also, those only allow adjustment up and down from the ends/sides of the bumpers, my issue lies more in the shock area. I'll find some time to play with them, and if I can't figure it out I'll have a shop wrap it up for me.
Thank you!
Check out my Alpine's DEAD build thread http://www.r3vlimited.com/board/showthread.php?t=348571
E36 M3 Build thread http://www.m3forum.net/m3forum/showthread.php?t=597637Comment
-
Like the look of the new front end quite a bit but I think the wheels need to be a bit darker to match.2003 Z4 3.0 6-speed- Silver, 19's, daily driver
1990 Silver 325i- Lowered on H&R OE Sports, e90 drop hats, KYB shocks, color matched rocker panels, 16" Emortal RS wheels on 205/50/16 tires... Currently getting a full refresh including an S52 swap!
1997 Black Ford Probe GT- Stripped to 2220lbs, MS3X, Forged motor in midst of assembly... Dyno results and 1/4 mile times pendingComment


Comment