-
Its felt like spring for the past few days (except today, got a little chilly) so ive been tinkering. Got close to 50 which felt amazing. Starting to get antsy to drive this car! Keep in mind I havent gotten to really drive it at all yet. Never seen above 4k rpm...which is where all the fun is obviously!
Some things I didnt take pictures of
-Replaced the broken interior light
-Replaced some interior clips for the center console
So I talked to a friend about replacing the fuel hose from the in-tank transfer pump to the external fuel pump. Much to my disappointment, we realized this hose could only be removed if the fuel tank was lowered. Not the smartest design. I thought this was the hose that was leaking but before going through all that trouble, I started the car to see forsure where the fuel leak was coming from. Thankfully, its not from that hose. Its from the pump to filter hose. Easily replaced. Im afraid what the gas is going to look like from this old filter.

My negative battery cable was starting to look a little gnarly...so I replaced it. Bmw updated this part


New fuel filler neck. Old one was ripped up

Added the window crank tool to the tool kit so now its really complete

Motorsport handles

I installed the black tape on the rear bumper, and threw the filler on just to see how it looks. Thoughts?


No filler for comparison


Thanks for lookingLeave a comment:
-
Fuel lines to fix leaky old hoses and filter

Due to the fog light connectors being cut and hacked up, It's all the more reason to install these. Just waiting for paint to arrive

I realized my driver side rear window trim piece was loose when I first washed the car. Here you can see I'm missing the grommet pieces

So I took it off...


And replaced the parts like a normal person would...


Broken throttle body screw caps

New

Cleaned the hood insulation. Just spray down with water, you don't want to agitate this material with anything

After

And finally, I threw my front bumper back on. I replaced the missing bumper guides. Bumper tape really improves the look of the car. :) forgot to put the bumper nut covers back on when I took this

Leave a comment:
-
Yes liquid stitch is a product they sell. It worked good but is hard to make it look nice. If you are using it before dying the seats you should be okay.
I got into most of the hard to reach areas, so it's not required. However taking the seat back off of the seat bottom is a good idea. You'd have to try really hard, pressing the leather to look into the deep creases to see the parts I missed.
I might post up some more pictures tomorrow that shows a more step by step with a description of what I did. But it's really pretty straight forward, I just followed the directions they give you :)Leave a comment:
-
Thanks for the write-up. I needed this to get psyched for my own leather dye project. Can you provide more info. on the Liquid Stitch product. Is it a Leatherworld product too?
Also, in retrospect, do you think the cost/benefit analysis would favor taking the seats apart prior to dying? Or do you think it wouldn't be worth the extra work?
BTW, a full-write-up on the seat dying process would be awesome. I know there are already a couple DIYs but it's nice to see different peoples' perspectives. And your seats came out well.Leave a comment:
-
Thanks for the kind words guys! Im very excited with how the seats turned out.
Thanks for posting this info, good for me and others to know. I did put as little filler as possible down, and avoided heavy sanding as like you said I didnt want to go into the hyde. And unfortunately, our winter isnt going anywhere so these seats will be able to cure for awhile :pLeave a comment:
-
well, this is nice to see. congrats on a M3 and keep up the great work!Leave a comment:
-
Seats
The trick, as I understand it, is to sand the cracks down and then apply as little filler as possible. What I did on my other seats was nearly strip the color...pretty much leaving NO CRACKS whatsoever on the seats. Be very careful. You dont want to go into the hyde itself either. I used a chemical to achieve this taking just a few seconds. Let that dry before sanding. Make sure also that you sand everything well before dying as it will make the paint stick, otherwise there is a tendency to peel. Then I barely applied anything (as far as filler was concerned) as it wasnt even necessary. The cracks will likely not come back as bad as if you filled it. Also, it helps if you let these cure a few months. This assumes you have extra seats. Nothing beats re-upholstering though but all things considered if done properly, you can extended the life a few years before sink money into buying new leather.Leave a comment:
-
-
Well, heres the results of the leatherworldtech kit. I tried using both preval and the crown spra tool. Both did not work well with the dye. That being said, if you blot the final layer of dye with the sponge, it leaves almost no brush strokes and evens the dye out. If you have a compressor with an airgun, id absolutely reccomend using that.
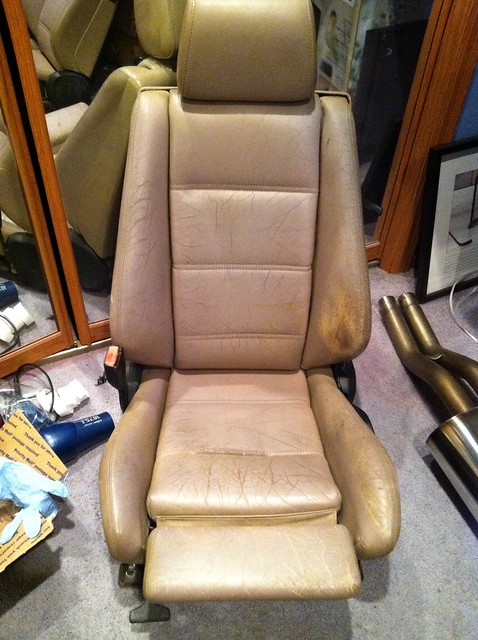
So heres what I started with. I didnt get good before pictures of the passenger seat, as it was in pretty good shape to begin with. The driver seat was the reason I went through with this.
First, I had to take care of this rip.

I bought 'liquid stitch' with my repair kit. While its not the best, it will keep the rip closed, so it doesnt keep catching on my pants and rip even more.

You can see in those pictures the extend of the cracking. In this one you can see most bolsters are cracking as well. The thiegh bolster and upper side bolster in particular have seen better days.
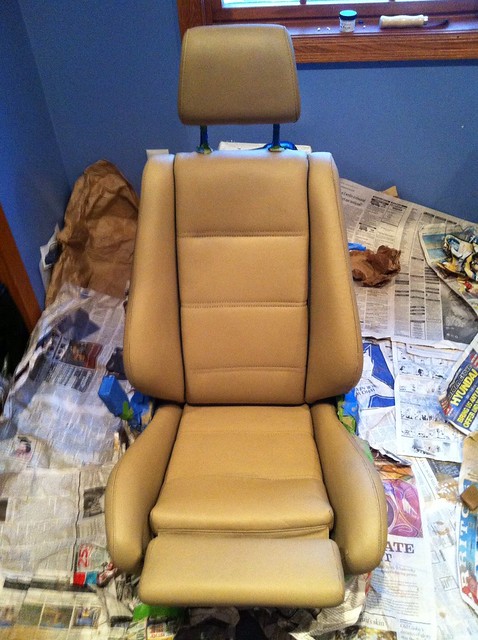
So, if you want more info or pictures on the process, I can post them or send them to you. But heres how the seats turned out after applying the leather filler, sanding it down, and putting on 5 coats of dye.

Heres the passenger seat. There was much less cracking on this seat, so it looks almost new now.


Very satisfied with the kit. I spent $100 on everything when it was all said and done. Waiting for the dye to cure completely before I throw them back in the car.Leave a comment:


Leave a comment: