
Last Saturday I got some more work done on the engine block. There was a pretty significant amount of rust that built up in the coolant passages because of the retarded previous owners just filling it with tap water when it would get low. With the air compressor out, I blew out as much of that rust I could. Eventually 98% clean air was coming out of each coolant passage. I cleaned up the mating surface of the block and emptied the block of fluids better than before too. Then I oiled up the cylinder walls with WD40 for the interim. I would rather leave the piston tops covered with carbon build up than compromise any mating surfaces. I don't foresee any problems with this from the reading on the internet I have done.
I also had to unbolt the engine stand from the motor and rest it on two saw horses and reorient the damn stand. I was an idiot and secured it with one of the four arms attached to the oil pan when I first removed the motor. When I had it off the stand, I took the opportunity to remove the automatic transmission flex plate and flywheel. It was quick work with an impact wrench. I feel better now that the motor is secured properly and I can move it around with a little bit more gusto. Plus, I can pull the oil pan and front timing cover now and take a look at what I have to work with.
Still contemplating on using Permatex "The Right Stuff" in-lieu of regular gaskets. I also need to wirewheel the block to get it ready for paint. Not looking forward to that. Go figure.
I plan on going out tonight and seeing how my tram gauge is going to work on frame measurements.
-
Got some crap done today. I cleaned up the new cylinder head and the combustion chambers are cleaned enough for me. I power washed the crap out of it and then let it dry in the sun. Then added WD40 on the valves on the chamber side, added fresh oil in all the cam journal spots and valve stems. Rotated the thing over 10 or so times and made sure everything was smooth. Shouldn't have any issues with the way it is stored.
Also got the "Jesus Nut" off so I can do some more cleaning on the block. 100 psi compressor on a 1/2" air gun got it off with no fuss. I am going to remove the lower front cover and the oil pan and take a look at things. I am not going to try and clean the piston tops since they look ok to me. Obviously I will clean up the mating surface but that's about it. I will have to replace the timing chain guide and tensioner guide.
I do want to think about painting the block. I will color key the valve cover to the block too. I don't want to do black because I want to see leaks. I don't want aluminum color because it is too much of the same color as the head and intake. Given that the car is Cirrus Blau, I don't want to do another blue color like Ford Dark Blue. I have thought about burnt orange and red. Maybe purple!
I am debating on not using paper gaskets upon reassembly of the upper and lower timing covers as well as oil pan gasket. Instead, I would use Permatex "The Right Stuff." Heard nothing but great stuff about it.
In other news, I had to power wash the drive way after doing the initial block cleaning. It was just a mess. I don't have a massive gas powered power washer, just a cheap $100 job from Home Depot. It did the job but took an hour. No reason to mention it. Just did. Ha!
I also marked out the tram gauge so that I can get out there and get those parts finally welded in. Need to see how well I did tomorrow.Leave a comment:
-


The junkyard proved to be fruitful! I have a good head for $45 bucks!!! 91% Isopropyl Alcohol in the combustion chambers never leaked a drop.
Now the chambers are filled with Dawn detergent. Should clean right up. Yayzorz!!!Leave a comment:
-
One of the things preventing me from starting to weld on the car is needing to be reasonably sure that I am welding the piece in correctly. Thanks to JGood and his work, I was able to find out the basic measurements I need prior to welding.
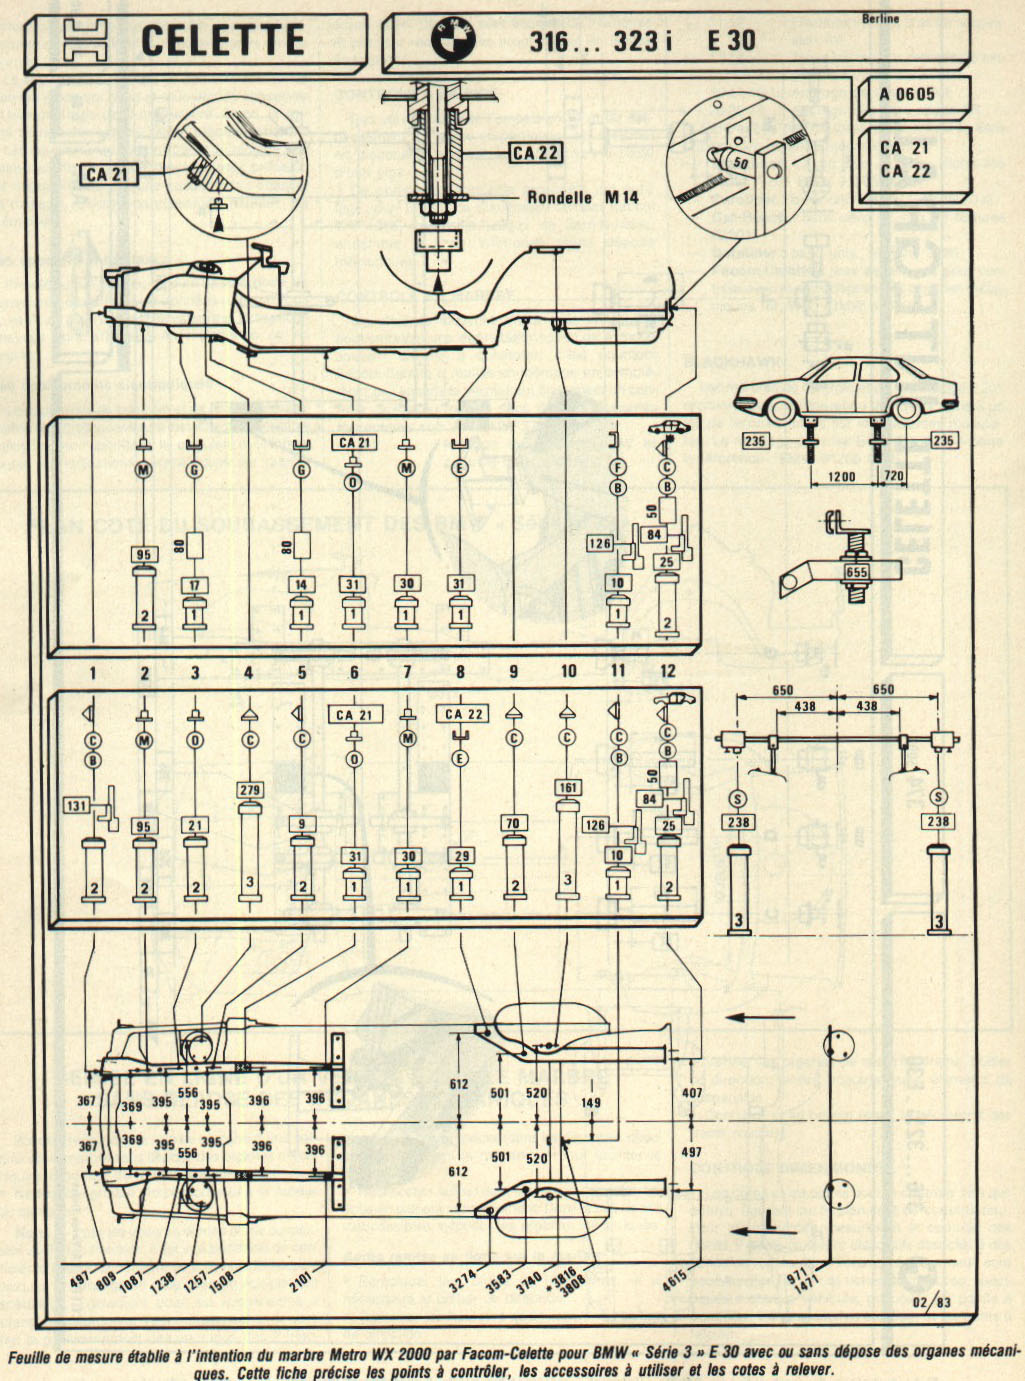
After PMing him, he said that he kind of winged it as opposed to actually doing detailed measurements when replacing his strut tower. Granted, he didn't have the same level of damage that I did. Since being off a little this deep into the car will translate being way off later in the welding process, I have to be reasonably sure that things are lined up alright.
Which comes to my DIY Tram Gauge. Cheap ones are still over $120 bucks. I am far to cheap to spend that kind of coin on something I will use once. So here goes nothing!
Parts list:- 3/4" steel pipe
- 1/2" electrical conduit
- 17/64" drill bit
- M10 1.0 DeWalt drill and tap set (freaking amazing thing here for a novice like me)
- M10 10mm set screw
- Two 1/4" by 6" lag bolts
- Eight 1/4" diameter nuts for lag bolts
Basically it is as simple as drilling 17/64" holes in the ends of each pipe for the 6" lag bolts secured by the nuts. Then drill and tap a hole in the larger pipe for the set screw. Now you have measurement points that are adjustable. I plan on using the chart above to get basic measurements and draw lines on the electrical conduit for presets if you will.


One advantage of using the metal pipe is that if you have a magnetic level like I do, you can pretty easily get at least one dimension level.
EDIT: Forgot to mention, total cost? $15 bucks if you already have a drill press. New bits, the bolts and the pipe. The guy at Home Depot tried selling me the stuff for $2 because it was all scrap. But when I went to the register, the lady didn't even bother charging me. Great freaking price!Last edited by marshallnoise; 03-10-2015, 05:58 AM.Leave a comment:
-
Went to the junkyard for a 50% off sale and was pretty happy with the booty. I wanted a newer steering rack for the car at some point so I always had my eye out for a new-to-me rack. I don't need the nicest or newest rack so a Z3 or Z4M rack wasn't ever in the cards. But the e46 racks were something I looked for. Found one! This is just a shot of the plate. It has two torn boots (probably from the asshats at the yard) that will need to be replaced. But I didn't feel any slop when I was testing it out. It came off a 2002 330ci. EDIT: After researching, it IS the famed ZHP Rack! FUCKING SCORE!!! But this will do. I will power wash the piss out of it and do some better pics. Oh, paid $45 bucks.

This is an 88 m30B35 head that I pulled from a 735i. I went to another Ecology yard hoping to find a more wrecked one to pull another head but this car proved the best choice of all the m30s available. No coolant splattered all over the engine bay. No ultra clean cylinder head inside. No Victor Reins exhaust manifold head shields. Very clean oil remnant on the dipstick. And best of all, the head bolts were super tight. Very tough to break free. Which I thought on my old head were way too easy to break free in my opinion. As you can see, there is no corrosion around the water jackets or anything. I will do a chamber liquid test and some better pictures later. And this one was $45 as well.

In other news, I rode up to Helmet (Hemet, :p) on Friday and looked at a 91 4 Door Alpinewise II. It was, at least in pictures (of course) a pretty smoking deal at $500. It was missing only rear brake rotors, wheels and front/rear bumpers. It had a runing m20 and automatic too. I was contemplating abandoning this project and going with that since I love white cars with tan interiors and the fact it was a 4 door. Upon further inspection, it had damage to the driver's front door (minor) damage to the right rear wheel well (pretty severe) and rust in the trunk. Plus the owner of the car who has a European car repair shop told me it was salvaged. I didn't see any obvious reasons for the salvage title, but no matter. When the OTHER guy took me over to see the car (yeah, that was weird), he let loose that his e36 had 210K on it but he swapped the cluster for one with 150K. He was pretty proud of that. I wasn't impressed. In fact, it pisses me off. Oh well.
Oh, and at Home Depot tonight, I was able to source the beginnings of my own home made tram gauge out of 1/2" conduit and a 3/4" steel pipe. The plan is to drill and tap the bigger pipe for a set screw and then drill the ends of the pipes for large nails/bolts (haven't decided). Then I can measure and mark the few measurements I need and then I am ready to get this sucker welded back together.Last edited by marshallnoise; 03-10-2015, 05:57 AM.Leave a comment:
-
Until money comes available to purchase the TIG setup mentioned before, I am persevering with the stick welding stuff. I have watched a couple of hours of videos and have really gotten an idea of what to look for when stick welding. I grabbed a fresh sheet of 20 gauge cold rolled sheet metal (16" by 48") to mess around on. I have been experimenting with heat, starting arcs, not blowing holes, and laying long beads. I am aware that long beads are not going to be an option really because too much heat means warping.
Every day or so I am going out there and striking arcs. I figure that's the best way to learn. Doing it. Laying down flat with E6013 5/64 rods, I can go down to 20 amps with good success. With this rod you need a tight arc, which is tough to do. I find that these thin of rods are hard to control until they get down to about half used. Then they stiffen up and you don't need to brace them. So until they get to that point, I kind of do a cue stick setup about 2-3 inches from the arc. A little dab and bam, arc is started. I find the cleaner the metal, the easier the arc is to strike and maintain. This is obvious. So, duh.
Anyway, my first attempts are at the top right and continue on down. Amps were up to 60 just seeing what would happen and yeah, blow through. Towards the left I wound down the amps to 20 when flat and 30 when vertical. It took 3 attempts but I finally was able to get the piece on the left to weld down solid in the vertical format. Part of the reason it is so ugly is because I did a bunch of tacks as opposed to a continual bead. I think this is what I am going to have to go with, at least initially.
Lots more practice and maybe finding 1/16 rods would be better and easier to control. Enjoy the horrible welds. Critique if you wish too. All the help I can get, the better.


 Last edited by marshallnoise; 02-20-2015, 07:26 PM.
Leave a comment:
-
My buddy Josh came over (the guy who I bought this car from in the first place) and used my shop press to switch out his e36 control arm ball joints. His first time using one...he was impressed AND now understands the crazy forces at work. Plus, his geometry skills were sharpened a bit. While he was doing that I decided to tear into the head a bit and begin dis-assembly. Right off the bat I broke two exhaust rocker shafts because I am an idiot. I will spare the details, but needless to say, dumb.
Here is the head prior to stripping down.

Here it is after. To me, the cam journals look really good. The cam itself looks great too.

One thing I didn't realize was that the rocker shafts are two piece. That surprised me.
Next step is valve removal. Then I will send the head out to be machined and cleaned up. I will ask them about the valve guides and the valves and see if they can be reused. If it all checks out, then it is simply a matter of reassembly at that point with time taken to lap the valves in. Might as well do all of them while I am in there.
And I am definitely going to go for a TIG set up on my welder. Just need money. Wife just lost her job so that means I need to tighten up the wallet a bit.Last edited by marshallnoise; 02-16-2015, 03:35 PM.Leave a comment:
-
So piggy backing on my last post, I got a little better at starting arcs with 6013 5/16 rods. I picked up that 6013 rod and a fresh sheet of 20 gauge metal to play around with. I am all the way down to 22 amps and I am able to start the arc. The problem I am having is that when the rod is brand new, it is harder to start the arc. When it gets about halfway used, then I can consistently start the arc.
The other issue I am having is that the slag really kind of confounds where the weld is. You can see the puddle and all, but it is happening so fast because the material is so thin, I am not sure if I am going to join two pieces of metal together.
Since my welder will do TIG, I am faffing around with the idea of getting the accessories to work with TIG. Not dealing with the slag will be nice and you can really get super tiny and precise with the arc. The beauty of a TIG weld won't matter much here since it will be painted over anyway and it is not body work. I am going to have to reserach getting tungsten, MIG wire (probably .030) and a bottle of argon with a regulator. That's all I need to get started. Money is tight right now so this part of the project may be on hold.
Might start tearing down the cylinder head next week. The way I see it, if the valves are good still then I might be able to just lap them back in. Remember, it's not like I had zero compression nor did the Windex just rush out of the chambers. We'll see.Leave a comment:
-
I just spent a little time with my welder...aaaaaaand I am going to have to rethink the stick welder. I have and planned to use an Everlast 140ST which could to TIG but does ARC welding too. The idea was to use it in stick mode with amps down to 20 amps and use 1/16th rod. Well...I can lay a bead just fine that way. But doing circles, not so much. Between striking an arc and then getting in and out without getting the metal too hot is going to be too much for me.
I am going to look into some MIG welders. I guess JGood used a Lincoln Weldpack. Anyone have any ideas?Leave a comment:
-
Here are some close ups of the head gasket. It really doesn't look in too terrible of shape. Not sure what brand it is either. The exhaust shields said VR...so I must presume so is this gasket.


And I finally did some chamber testing. As expected, chambers 1 and 6 are tight as a drum. But 2 through 5 are leaking very badly from the exhaust side.

I used Windex cause it is blue. Easy to see live, tough to see on camera.

Chamber for cylinder 1. Loads of fluid, nothing draining out the exhaust port.

Chamber for cylinder 2. Fluid is lower because it has been leaking out the exhaust port. You can barely see the fluid at the bottom of the lip there.
I didn't take any pics of the straightness of the head. I used a straight edge with a light behind it and yeah...head is warped. Lots of light coming through the center. Much less light in the ends. Don't even need a feeler gauge.
So I have some decisions to make on the head. I can either get it fully cleaned, decked and new exhaust valves lapped in, send it out to get fully rebuilt, or take a chance on a used head or two.
Cheapest option is to get even two salvaged heads complete for $70 a piece at Ecology. Next option is a set of exhaust valves for $26 x 6 plus a head clean and decking at $90. And I have no idea how much a place like bimmerheads charges for a rebuilt head.
Decisions, decisions.Leave a comment:
-
-
I like the thought process how rebuild your e30.
Thanks for info on vert in Ecology in OC!!!!Leave a comment:
-
I kind of wanted to mock up the red part a little more seriously than I previously had. In the process, I was able to see how I was going to measure at certain points and visualize how it is going to sit in there. When you sit back and look at things more critically, you really begin to see the car as a geometric shape with lots of parallels.


The other thing I noticed is that the frame rail that I cut out of the other car was much longer than the one in the blue car. I am pretty sure the junk yard red car was an 87 vert. If you look carefully, you can see the difference in length. I lined up the frame piece out of the red car right next to the place it should be if installed.

Here are some more shots.


Legos man. Legos.Leave a comment:
-
Got a fair bit done tonight. Wasn't really planning it going so well tonight but it did. I will post in two sections. Hopefully one post can take all the pics I shot.
Turning back to the frame repair, I decided to get after it tonight. I spent a lot of time thinking about how to bend that piece back into more shape. It is a lot easier to see it in person, but here are all the pictures. The method I used is self-explanatory and so are the results. I am pleased.


Leave a comment:
-
I pulled the alternator and bracket off the block today. Doused the piston tops with WD40 and tarped it. I will clean it later. Bigger fish to fry with the head.
Took the alternator and starter to Vatozone and had them tested. Great shape. They look like hell but I think some vinegar and steel wool will fix that pretty quick.
While I was there I ordered a new water pump. It has the metal impeller on it thankfully and should be good to go. The guy suggested I hose out the coolant passages and then run compressed air through it to dry it out. I think that's a good idea.Leave a comment:


Leave a comment: