Announcement

Collapse
No announcement yet.

Project Armo "330i" M-tech 1

Collapse
X
 
  • Filter
  • Time
  • Show
Clear All
new posts

    #91
    Yesterday I started learning metal turning. As so many times before in this project, my previous experience on the subject was zero. One of my goals with this project is to learn new skills. I made aluminum reinforcement cups for the transmission mounts. In E30 the engine will be so close to the radiator that I wanted to minimize the movement of the engine to avoid collisions. I know that these cups are available commercially but no one sells them in Finland and I wanted to learn to use lathe anyway.

    I started with 60mm round aluminum bar stock and E21 transmission mounts.


    The lathe is a small unit that my boss bought for a cheap price from auction a long time ago. He did some testing but came to conclusion that the lathe doesn't work properly and doesn't produce good quality so no one's used it since. I did some testing and adjusting myself and was able to produce satisfying quality. I think the tool holder might have been replaced at some point. Many of the tools seem to sit too high and may not cut properly. So I watched some educational videos and asked for a few tips from my workmates and felt confident enough to start. The lathe has such small chuck that I didn't want to put too long piece in it so I made the cups one by one. Slowly I progressed learning step by step.


    For some reason I couldn't get the parting tool to cut properly. No matter how much I adjusted the tool or how much I used cutting fluid, the result was always the same. The tool started to vibrate and then cut too much all of a sudden. I ended up cutting the piece with an angle grinder and then finishing it in lathe.


    I'm really happy with the result and the second one turned out twice as good in quarter of the time.


    Last edited by Skarpa; 08-13-2017, 10:05 PM.
    E30 Armo "330i"

    Comment


      #92
      Love the work & detail you're putting into this project, and the self-learning approach that goes along with it! Keep it up!!

      Great deal of inspiration here for my own M52B28 project...

      Originally posted by Skarpa View Post
      While I was fiddling with the subframe I checked that my reinforcement plates fit ok and they are actually near perfect. I'll post the dwg files here. Anyone know any good file sharing site where I can just leave something for people to download?
      I was just trawling the web for such drawings yesterday, but to no avail...
      Was planning to start pulling subframes & make templates for my own sets, but if you'd be able to share yours, that'd be a massive help!!!

      I've used 4shared and uploaded for general file sharing before, with no major complaints

      Comment


        #93
        Originally posted by NufnSus View Post
        Love the work & detail you're putting into this project, and the self-learning approach that goes along with it! Keep it up!!

        Great deal of inspiration here for my own M52B28 project...


        I was just trawling the web for such drawings yesterday, but to no avail...
        Was planning to start pulling subframes & make templates for my own sets, but if you'd be able to share yours, that'd be a massive help!!!

        I've used 4shared and uploaded for general file sharing before, with no major complaints
        Thanks, I'll try keep up with my standards. I know the value of good project threads because I myself draw so much inspiration and information from other people's projects. I try to document my work well and share any useful bits of information I come by.

        I posted a link for the templates on the previous page but it may be easily missed. I need to edit it into original post. I shared the templates via Microsoft cloud storage when I remembered having one:

        Last edited by Skarpa; 02-11-2016, 02:09 AM.
        E30 Armo "330i"

        Comment


          #94
          Nice work on the cups!

          Comment


            #95
            Originally posted by CorvallisBMW View Post
            Nice work on the cups!
            Thank you!

            Today I continued tinkering with the ITBs. I really put a lot of time in these considering that I don't even plan to use them in the first configuration. But what the hell, I enjoy working on them and I'm the boss of this project ;). The plenum and the runners were pretty dirty so I took them apart and washed them.


            Two runners were damaged. One of the throttle cable brackets had broken off and the flange in both runners was cracked almost in half, leaving long, crescent-shaped crack at the joint of the flange and the tube. The part must have been dropped on the floor or removed very forcibly. There's no way this damage is from normal usage. The throttle cable bracket didn't have perfect crack surface. There were some small gaps so I used epoxy on that. For the cracks in the flanges I used loctite super glue designed specifically for plastics and rubbers. We use it at work for making O-rings and for all kinds of plastic gluing and it seems to hold really well.

            If the glue doesn't hold I can always get new runners from marble counter but they are about hundred euros a piece. I'm pretty confident with the glue, though. When the glue had hardened I tried to twist and pull the flanges and I could use quite a lot of force without anything breaking.

            Next I assembled everything back together. I will test-fit the whole assembly with the brake booster once the engine is in the car. In future I will still take off the runners to paint the plenum. It's just so scuffed and faded.


            While I had everything back together I had a better look at the fuel rail than last time. It seems that I can actually fit the B28 fuel rail with not too much effort. The fuel pressure regulator clears the cylinder six vacuum pipe and the fuel lines just need to be straightened at the last bend to clear the throttle body. All the tabs on the vacuum rail side need to be cut off but as a little bonus, the tabs for the plastic cover line up nicely with the brackets in the throttle bodies and can be used to fix the fuel rail.


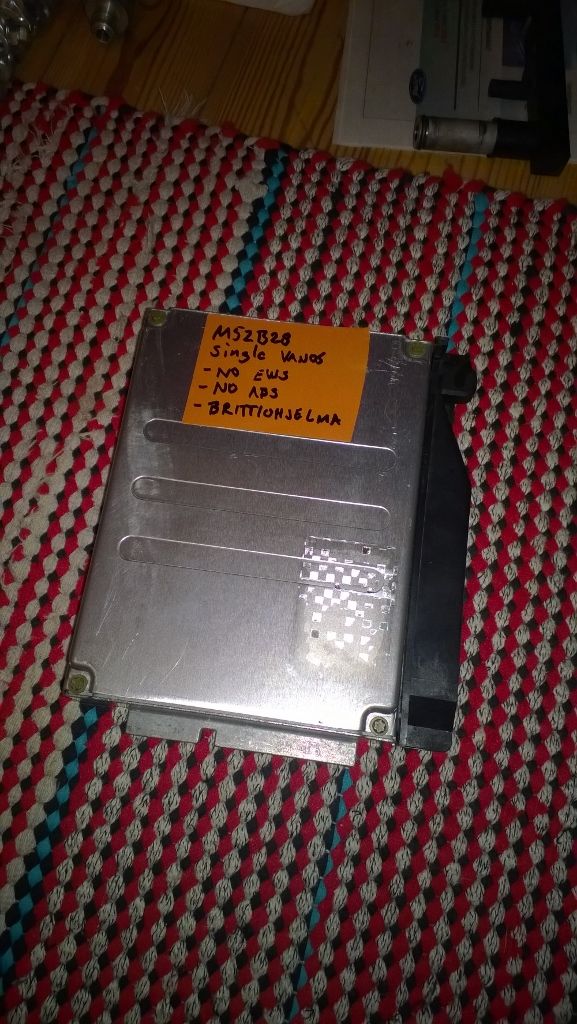
            For the ecu I plan to use the original Siemens MS41. Nowadays the software for flashing and tuning Siemens is easily available so it's not a big hazzle to tune it.


            I wanted to get rid of the EWS and ABS request in my box but it turned out that my box was an old one and not flashable so I bought another one which has already the EWS and ABS disabled. The ignition advance has also been tweaked a little. A stock B28 was dynoed at 205 hp with this ecu.

            Last edited by Skarpa; 08-13-2017, 09:53 PM.
            E30 Armo "330i"

            Comment


              #96
              I didn't want to take any risk while modifying the fuel rail. I dipped it in boiling water for ten minutes. I figured that after that everything flammable would have evaporated.


              I cut off all the unnecessary brackets, heated the fuel lines red hot and bent them so they fit.


              I will probably still bend the top pipe but first I need to see where it points in the car. Next it was time build the brackets for the fuel and vacuum rail. (according to my precise blueprints)


              When I was finished with the fuel rail I went to garage and pulled the oil pan. I knew the oil pickup was not proper E34 unit but a modified E36 pipe. I had E34 pickup laying around so I switched that in and had a look at the engine internals. And what do you know, they are brown. (I don't know what did I expect to be able to see.)


              Last edited by Skarpa; 08-13-2017, 09:54 PM.
              E30 Armo "330i"

              Comment


                #97
                I was going through my car stuff and selling things I don't need anymore and found out that I actually have a spare M52 valve cover. The cover has pretty bad paint. I decided to test modifying the breather connector on this cover and paint it if it turns out good.


                Yummy ;)


                I cut off the original hose barb, redrilled the hole into bigger diameter and tapped it with 1/2 inch parallel pipe thread.


                Now I just need to come up with hose connector with sharp elbow to clear the throttle position sensor. (the double nipple is just to check the thread)

                I also started welding the reinforcement plates for the front subframe. I cleaned the engine brackets in the frame, gave them a coat of weld-through primer and welded blank plates on them, plug welding the original holes.


                Then I drilled new holes for the engine mounts. Holes are re-positioned so that I can install the E28 mounts without flipping them.


                Then I welded in the bottom reinforcement plates. I needed to modify the hole a bit to get access to the repositioned nut.


                It's pretty clear that I'm no welder. I have decent touch when it comes to welding thin sheet metal bit by bit but when I should do continuous seam on thicker plate you can tell my inexperience. But I have no doubts on the reinforcements staying together and surely the subframe is stronger now. The beam is a bit rusty but seems still solid. If I will have enough torque or steering forces to crack or bend it I will gladly make a better one.
                Last edited by Skarpa; 08-13-2017, 09:43 PM.
                E30 Armo "330i"

                Comment


                  #98
                  I was pondering about cams, compression ratio and valve reliefs. With cams I'm leaning on re-ground M54B30 and M50 nv cams. The machinist tells me that cams can be ground to profile of 220 degrees @ 1-1mm / 10.05 mm lift (260 degrees duration) while keeping it bolt-on. Even 230 degrees/10.7 would be possible but it requires modifying the cam trays. These cams should not require modifying the piston in stock M52B28. I cross-checked this with Schrick cataloque and they promise that their 264/10.5 cam is a bolt-on.

                  Other modifications that I have planned are the M54B30 internals and raising the compression ratio. I would rather use the stock M54B30 pistons without requiring to modify valve reliefs. Stock M52B28 has compression ratio of 10.2 and quench height of 2,98 mm (2,88 mm in TU). With M54B30 internals the piston sits 0,7 mm lower at the TDC. That means that I can shave the block 1,0mm or use 1,0mm thinner head gasket without altering the piston-head clearance much. That would produce static compression ratio of 11.1-11.2.

                  Edit: If I calculated correctly, the dynamic compression ratio would be 8:1. S50B30 uses 7,7. I need to calculate dcr:s of a few other stock engines to get a sence of what ratios BMW considered suitable. I plan on using 98E pump gasoline (rough equivalent of 91 RON ie. premium)

                  I measured the M54 pistons just in case I need to modify them. The piston top thickness is 7,0 mm and the distance from top ring groove to piston top is 4,0 mm. Valve reliefs are ca. 1 mm deep.
                  Last edited by Skarpa; 02-29-2016, 01:57 AM.
                  E30 Armo "330i"

                  Comment


                    #99
                    Originally posted by Skarpa View Post
                    M3 front seats:

                    I like the horizontal stitching of the M3 seats much better than the narrow vertical stitching in regular models. The guy I bought the seats from had also the rear seat but for some reason he didn't want to part with it. So I'm still searching for a rear seat. If I don't find M3 seat my backup plan is E36 seat. It has similar stitching pattern with one minor exception: The horizontal stitches in M3 seat have two parallel stitches whereas the ones in E36 seat are single stitches.


                    E36 coupe bottom part fits very well but the backrest is unsatisfactory. The coupe has folding seats and because of the seat frame it sits far too forward making the seat uncomfortable. The backrest would require heavy modification. I'm thinking of combining the bottom part from coupe and the backrest from sedan.

                    E46 center armerst. I'll see if I can fit this in the car satisfyingly.
                    Small update on the interior: as you may remember, I was in search of a M3 back seat or suitable backrest for the E36 coupe backseat I have. Leather M3 seat has continued to elude me but today I scored an E36 sedan backrest for a decent price. Sedan backrest has no rigid frame and is much thinner than the folding backrests of the coupe so it should fit the E30 much better, although the shape of the wheel wells may still need a little touching. Also, the sedan backrest does not have the unnecessary seat belts in the middle. I have no pic of the seat in car yet but it seems to work just fine in the most important aspect. (apart from the horrible stench of air "refreshner")

                    Last edited by Skarpa; 08-10-2017, 11:54 PM.
                    E30 Armo "330i"

                    Comment


                      Pilsner Urquell 8-)

                      Comment


                        Originally posted by petrolhead View Post
                        Pilsner Urquell 8-)
                        Well spotted
                        E30 Armo "330i"

                        Comment


                          Originally posted by Skarpa View Post
                          Current:

                          BMW 320i 2d 2.0 m20 -88
                          BMW 325i Cabriolet 2.5 m50 -88
                          BMW 316i touring 1.6 m40 -90
                          BMW 320i 4d 2,2 m54 -01

                          Comment


                            Originally posted by Rocla View Post
                            Tiny picture
                            E30 Armo "330i"

                            Comment


                              My brother is working on a -86 635 csi and swapping a S38 in there. He was pondering on replacing the fuel consumption gauge with the oil temperature since the S38 has the oil temp sensor. We were discussing on the subject and I decided I want to do the same thing. The momentary consumption gauge is the most useless piece of equipment anyway. I had a flu this weekend and couldn't do much so I started studying on the subject and took my instrument cluster apart.


                              There's nothing wrong with my cluster. I took it apart a few years ago, replaced all the burn bulbs, replaced the batteries, painted the needles red and installed chrome rings around the gauges. The cluster is actually not originally from this car. European four-cylinder E30's came stock with clock in the instrument cluster instead of a tachometer. I swapped the cluster into tachometer one but it didn't come to my mind to switch the old speedo to the new cluster to keep the odometer reading. However I did write down the difference in readings. The odometer has about 50 000 kilometers too much.


                              The cluster of course had the coding plug of a four-cylinder engine (in the picture) so I swapped it into one from 6-cylinder model.


                              While I had the cluster apart I wanted to correct the odometer reading so I took apart also the speedo.


                              While doing that my hand slipped a little bit ;D

                              I'm doing so much work on this car and replacing so many parts that I decided a fresh start on odometer was justified. I did however mark down the correct odometer reading at the moment of resetting. Anyway, I have no plans of selling this car ever.


                              Then I polished the cluster screen. It wasn't bad but now it's certainly better. I used Autoglym extra fine polishing compound and paint renovator on it. Seemed to work fine.


                              So much for getting sidetracked and back to the original subject: the oil temperature gauge. I studied the mpg gauge to see how it works. I was under the impression that it's simply PWM voltage operated with a range of 1-1.6V but that wasn't actually true. There is a small DC motor running the needle. The motor has two coils perpendicular to each other. Increasing the voltage in coil number one raises the needle until a bit over ninety degrees of needle movement (about 24 l/100km). After that the needle stops and further increase in voltage does not produce any more movement since the static magnet in motor is already aligned with the coil. At this point, to run the needle further the signal needs to switch gradually from coil #1 to coil #2.

                              Car temperature sensors are typically thermistors. They have a resistance that's dependent on the surrounding temperature. It's quite easy to turn this into voltage output using a few electrical components but accurately operating two coils is another thing. For that it would be easiest to use programmable microprosessor (Arduino or such) to map the output values for each sensor reading. But I'm happy with 90 degrees needle movement with the voltage of 0.5 - 2.2V. I'll just need to see if I can offset the needle a bit to have the scale a bit more centered.


                              Next it was the matter of the sensor. It makes most sense to have the oil temperature sensor in the oil pan since that produces most functional measurement with the least disturbances. The oil level sensor 12617508003 used in many BMW engines (M43, M47, N47, M54, S62, etc.) has also a temperature measurement and that's the one I'd like to use. I have actually no idea what kind of signal it produces so I need to measure it at different temperatures. I went through my parts boxes to see if I have one available but came back empty handed. I only found one E34 unit.


                              I checked whether it has temperature measurement but no, it's just a float and two switches. One is switched on when the float is at high position and the other one when the float is in low position. So I still need to get a working sensor to measure it but I don't want to pay the price of a new before I'm sure I can use it. There's one in my E46 so I might pull it while doing an oil change. In the mean time I made a guestimation of the temp gauge face. I will sure need to modify it still.


                              PS. Anyone know the name of the font in E30 gauge faces? Impact, Helvetica and Oswald all come pretty close with Oswald bold being perhaps the best match but none of them is the exact same.
                              Last edited by Skarpa; 08-10-2017, 11:48 PM.
                              E30 Armo "330i"

                              Comment


                                Rear seat odyssey continues. I test fit the coupe seat part and sedan backrest in car and it was not quite success. The backrest was slightly too wide to fit. That was not a big problem, bending the seat frame a few centimeters took care of that.


                                Once I was able to fit the backrest in the car it sat there way too high.


                                The coupe seat part has a high and stiff section in the rear that raises the backrest way too high. With the sedan seat part the fitment was a better but not perfect. I guess the E36 rear seat just is a bit taller than E30. But I did not give up. Both parts individually fit nicely so it should be possible to modify them to fit together. I decided to shape the back of the seat part to give space for the backrest. I peeled away the leather and cut off the raised rear section of the seat, steel wire frame and foam.


                                Still the backrest wouldn't sit right. The back of the seat still needed to be thinner under the bacrest so I cut and welded the frame of the seat to move the rear edge two inches lower. I also needed to make the frame slightly narrower in the back to get better fit.


                                Of course the foam needed to be cut to match.


                                After these modifications I was happy with the fit. The lip on back of the backrest sits just above the rear shelf. I will need to fine trim the foam and apply some fluffy polyester fiber (or whatever you call that staff in English) under the leather to smooth things out. The leather will require some sewing to fit the modified shape. Let's see if my sewing machine is up to the task.


                                The wrinkles in the backerst will smooth out once I reattach the leather. I took it partly off when I was bending the backrest in shape. The seat part is brought slightly more forward than in E30's own seat but nothing too noticeable. I need to make slots in the seat frame to fit the brackets in the car body.
                                Last edited by Skarpa; 08-10-2017, 09:58 PM.
                                E30 Armo "330i"

                                Comment

                                Working...
                                X